Messaging
Table of contents
CloudBilling provides a flexible messaging solution that allows automated emails to customers, complete with attachments of transformation results. Transformation results can include the Invoice PDF or other exports generated within the CloudBilling platform. By using the Messaging functionality, users can send emails in bulk with customised subject lines and body contents, along with required attachments.
To complete a Message run successfully, the following needs to be configured prior:
- Subject templates
- Body templates
- Recipient Keys
- Customer Email Address
- Message Servers
- Message Senders
- Message Definitions
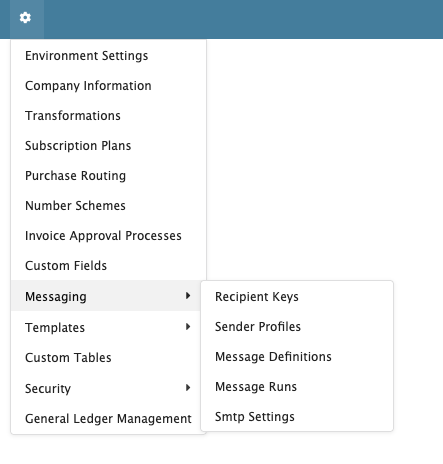
The messaging settings can be found under the Administration cogwheel in the menu bar, as can be seen in Figure Messaging 1.
Figure Messaging 1: Messaging options in the Administration menu
After all these prerequisites have been met, the messaging can start. At the end of the month, after invoices have been Approved, a selection can be made on the Invoices screen to email your customers. This is described in the section Messaging below.
Subject Templates
Subject templates can be set up by a CloudBilling consultant. These templates determine the subject line of the emails. This can be done by using plain text or using C# code to dynamically pull relevant information from the CLoudBilling platform about the customer or the invoice to display this in the email subject.
Body Templates
Similarly, body templates can be configured by CloudBilling consultants and are used to fill the body content of the email. The body template can use plain text or use C# code to retrieve certain information about the customer or the invoice. Additionally, HTML and CSS may be used to style the text in the body template and even include images within the body of the email.
Recipient Keys
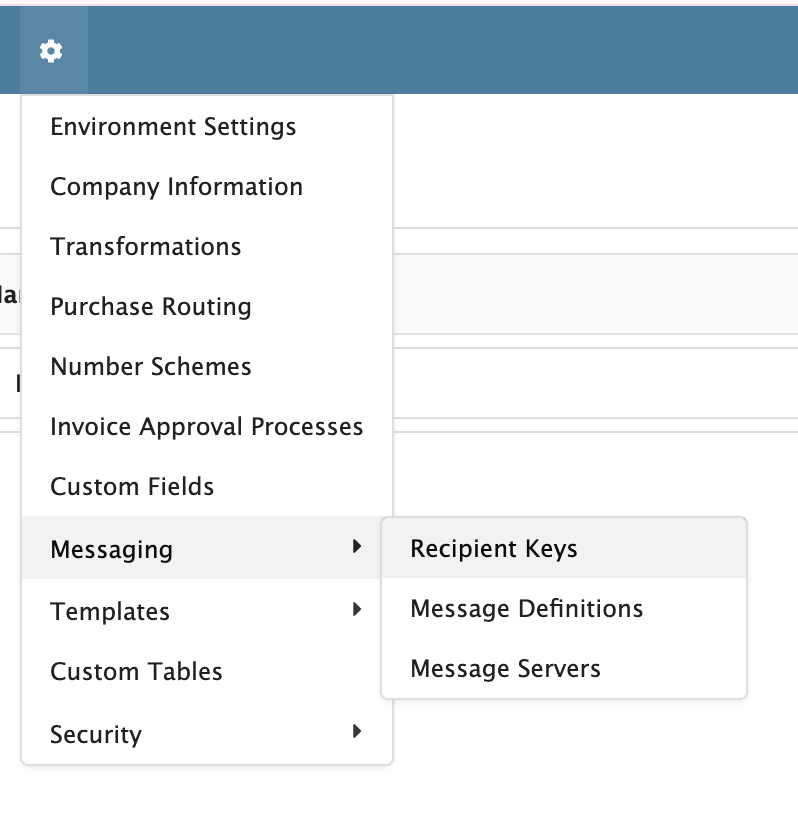
The Recipient keys can be set up under the Administration cogwheel in your menu bar when logged into the CloudBilling platform as can be seen in Figure 2. The Recipient keys determine which keys can be chosen when configuring Email addresses on your Customers in CloudBilling. Several recipient keys can be added if required. These keys can also be chosen as receiver when the Message Definition is configured and when configuring customers. In order for a customer to receive an email for a particular message definition, the email addresses for that customer must contain at least one entry that matches the Recipient Key configured in the Message Definition.
Figure Messaging 2: Recipient Keys in Administration Menu
Recipient Keys must be configured before moving forward with configuring Message Definitions and Customer Email Addresses.
A recipient key consists of the following, as also shown in Figure 3.
- Key: An identifier for the email address.
- Display Name: The name that will be displayed when selecting this key, both when editing Message Definitions and Customer Email Addresses.
Figure Messaging 3: Recipient Keys Example
Customer Email Address
When a Recipient Key is set up customers can receive that Recipient key when setting up an email address. A customer that has an email address with a Recipient Key that is also used in a Message Definition will be able to receive emails sent from that specific Message Definition. Multiple email addresses with different Recipient Keys may be added to a customer to send them emails using different Message Definitions. Alternatively, a customer may have multiple email addresses with the same Recipient Key to send multiple email addresses the same email.
Message Servers
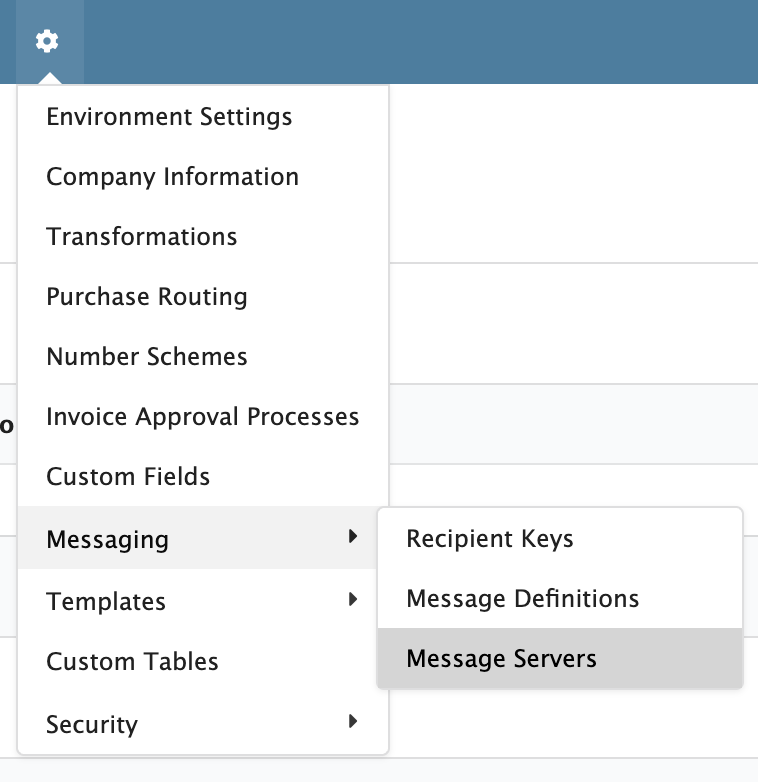
CloudBilling offers two ways to set up Message Servers. Generally speaking, Message servers only have to be set up once. The screen to set up a Message Server can be found under your Administration cogwheel under the Messaging option, also shown in Figure 4.
Figure Messaging 4: Message Server menu
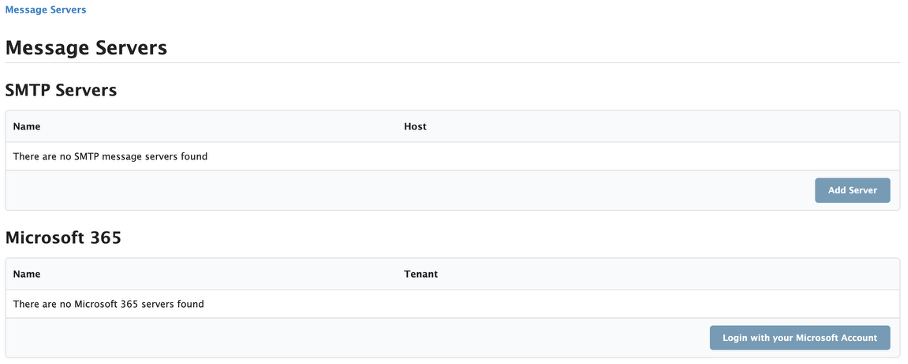
The options that CloudBilling offers is setting up an SMTP server, or using Microsoft 365 Graph to send your emails. When visiting the Message Server screen, both options can be seen. Figure 5 shows what the Message Servers screen looks like.
Figure Messaging 5: Message Server screen
Below, more explanation will be provided regarding how to set up the SMTP server and Microsoft 365 Graph server. Additionally, when a server is set up, the Message Senders can be configured per Message Server.
SMTP Server
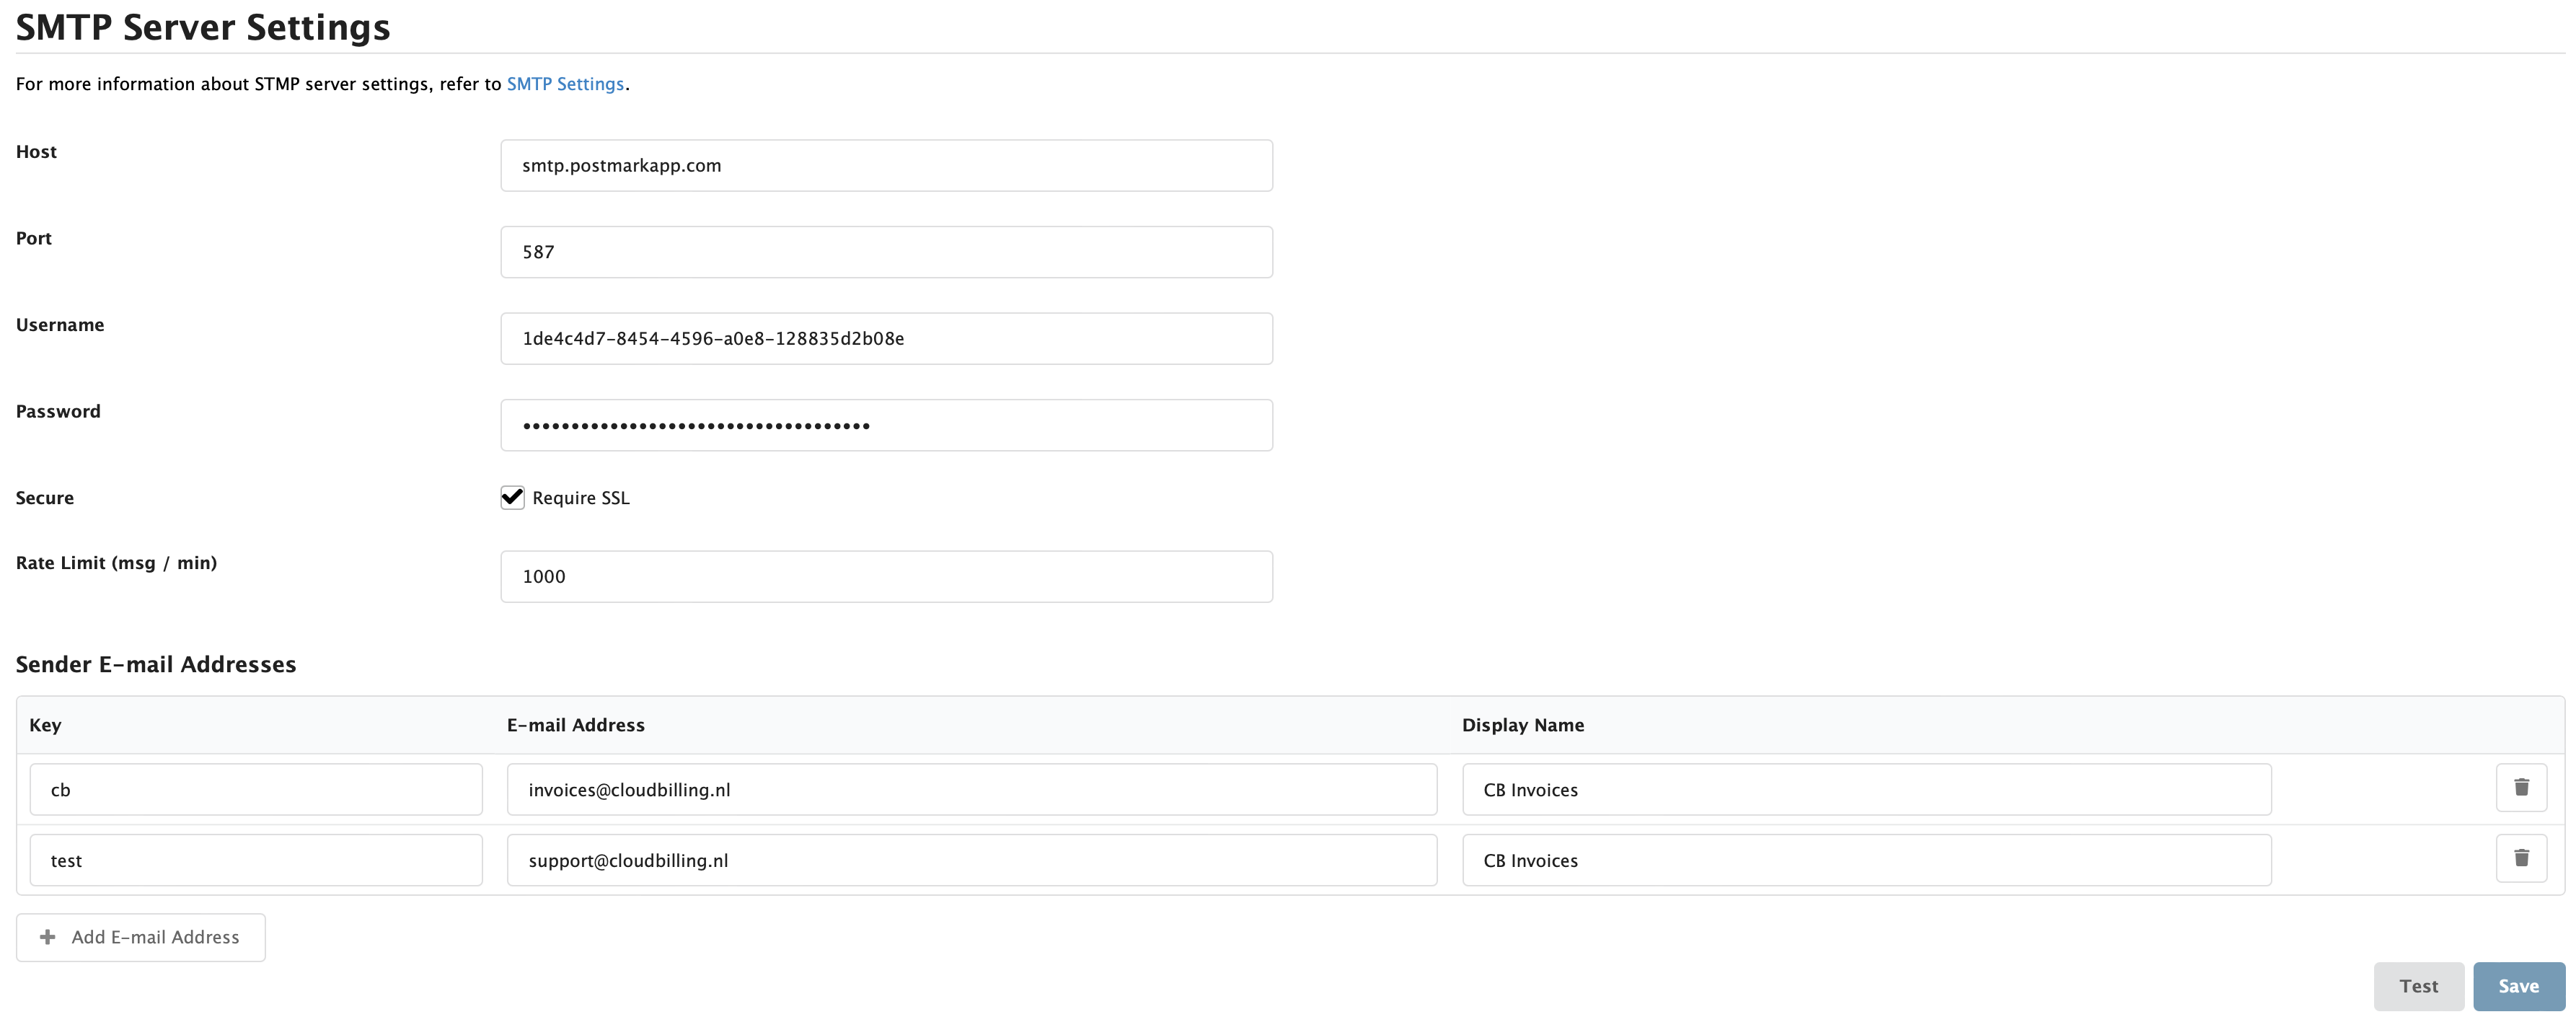
The SMTP settings allow for an SMTP server to be defined as well as a set of email addresses from which messages can be sent (Figure Messaging 6). To get started with the configuration of an SMTP server, click on Add Server under the SMTP Servers section. The following fields must be used to define an SMTP server connection:
- Host: the hostname of the SMTP server.
- Port: the port number of the SMTP server.
- Username: optional username to authenticate towards the SMTP server with.
- Password: optional password to authenticate towards the SMTP server with.
- Secure: Require SSL tick box determines whether the connection to the SMTP server must use SSL. This only applies to Explicit TLS.
- We support both Implicit TLS (SSL/TLS) and Explicit TLS (STARTTLS).
- To use Implicit TLS, use port 465
- To use Explicit TLS check “Require SSL”.
- We support both Implicit TLS (SSL/TLS) and Explicit TLS (STARTTLS).
- Rate limit (msg/min): outbound message rate limit in messages per minute, used to prevent flooding the SMTP server.
Figure Messaging 6: SMTP Server Settings screen
Use the test functionality before saving your settings to determine whether they are correct. A successful test sends a predefined test email message from one of the configured sender email addresses to itself.
Microsoft 365 Graph
To use Microsoft 365 Graph rather than an SMTP server, click on Login with your Microsoft Account under the Microsoft 365 section. This will redirect you to the login screen of Microsoft, where you will be able to pick an account.
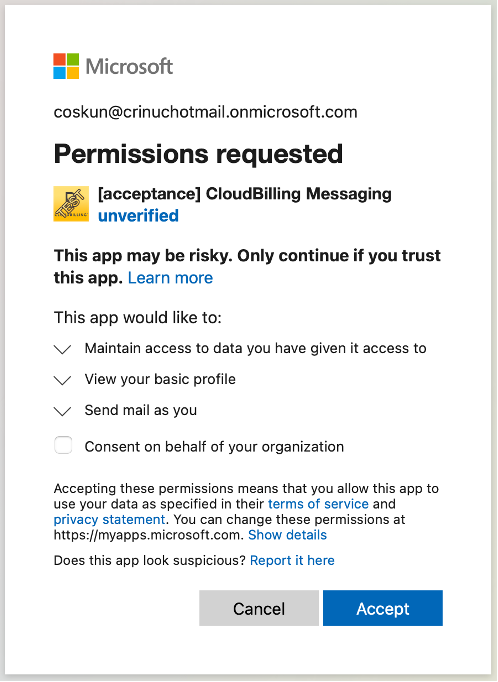
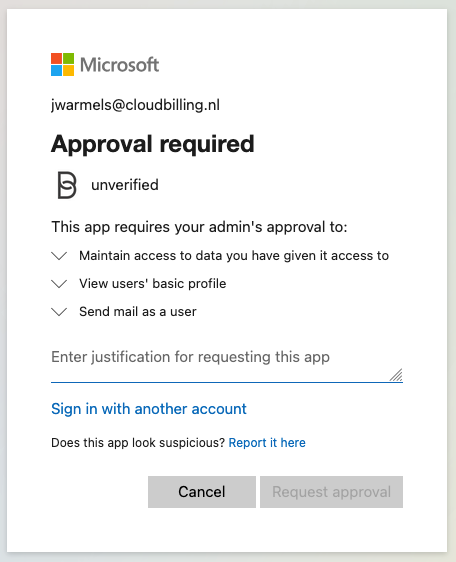
If you have administrative rights to grant CloudBilling permissions to use your Microsoft 365 Graph to send emails,
you will see the request “Permissions Requested” depicted in Figure 7. Otherwise, you will see the “Approval required” message shown in Figure 8, meaning that you are asking your administrators to grant access for CloudBilling to use Microsoft 365 Graph. You will only see these messages until the CloudBilling application has been granted access by an administrator user as an Enterprise Application. After permission has been granted for CloudBilling to use Microsoft 365 Graph, normal users will also see a version of the “Permission Requested” screen as depicted in Figure 7, but without the check-box to “consent on behalf of your organization”. Note that this is documentation about how Microsoft handles user access, this might change or look different if Microsoft makes changes to their process or if your policies are different.
Figure Messaging 7: Microsoft 365 Graph Permissions Requested Screen
Figure Messaging 8: Microsoft 365 Graph Approval Required Screen
Please be aware that the consent granted using “Login with your Microsoft Account” is a per-user (delegated) consent. CloudBilling acts on behalf of that particular user. If you use your personal email to authenticate the Message Server, your email address will be used as the Message Sender email. This makes it look like the email comes from your email address. If you want to send out the email from “invoices@company.com”, then this user needs the appropriate rights within Microsoft Graph to do so. This can be managed through normal Microsoft 365 Graph permissions.
Additional Message Senders may be added by using the Add Message Sender button after configuring the initial Microsoft 365 Graph Message Server. This will add another “from” email address for which that user has permissions.
Ensure to use a general email address to send out emails through Microsoft 365 Graph. If the personal email address used to authorise Microsoft 365 Graph gets deactivated, the Message Run may not function as expected any more.
Message Senders
For both the SMTP Servers and the Microsoft 365 Graph servers, a set of email addresses can be added in the Message Senders section when you click on the configured Message Server. These email addresses can be used in the Message Definition to determine what email address should be used to send the emails from.
A sender profile consists of:
- Key: A unique ID of the Sender Email Address.
- Email: The Sender Email Address.
- Display Name: The Display Name of the Sender.
Message Definitions
The Message Definitions screen, shown in Figure Messaging 9, allows the configuration of Message Definitions. A Message Definition determines the settings of a Message Run. This is often set up by the CloudBilling Consultant, but can be managed by any user. This section will provide documentation on setting up new Message Definitions.
Figure Messaging 9: Message Definitions screen
On the message definitions list screen, a new message definition can be added by using the [Add] button in the right top. The table shows the settings of existing Message Definitions and is empty if no Message Definition has been created yet. When a Message Definition exists, there are three buttons present that allow to Edit, Run or Delete the Message Definition. A tick box present in the rightmost column allows for multi-selection of Message Definitions. Multiple Message Definitions can then be deleted at once with the trash bin icon in the right top of the table.
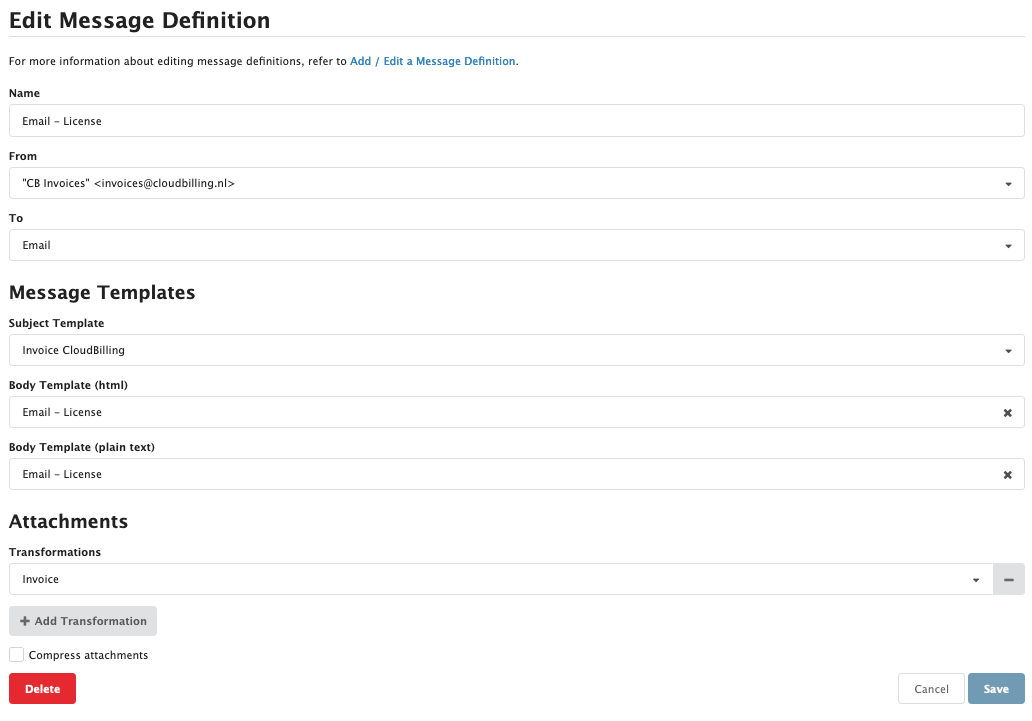
Editing or adding a message definition brings the user to the Edit Message Definition or Add Message Definition screen respectively. For the example shown in Figure Messaging 10, the Edit Message Definition screen with a filled-out message definition. A message definition needs the following fields:
- Name: An identifying name for the message definition.
- From: A choice of one of the Message Senders already defined in the Message Senders sections in one of the Message Definitions. Emails will be sent from this email address.
- To: A choice of one of the Recipient Keys already defined in the recipient keys screen.
- Subject Template: The template used to fill the email subject.
- Body Template (html): The template used to generate the body content of the email in HTML.
- Body Template (plain text): The template used to generate the body content of the email in plain text.
- Transformations: A set of invoice transformations, the result of which will be added to each email as attachments. This can be the Invoice PDF, or other exports generated by CloudBilling.
Figure Messaging 10: Edit Message Definition screen, example
Additionally, compressing the Attachments creates a zip archive, which can be password protected.
Messaging
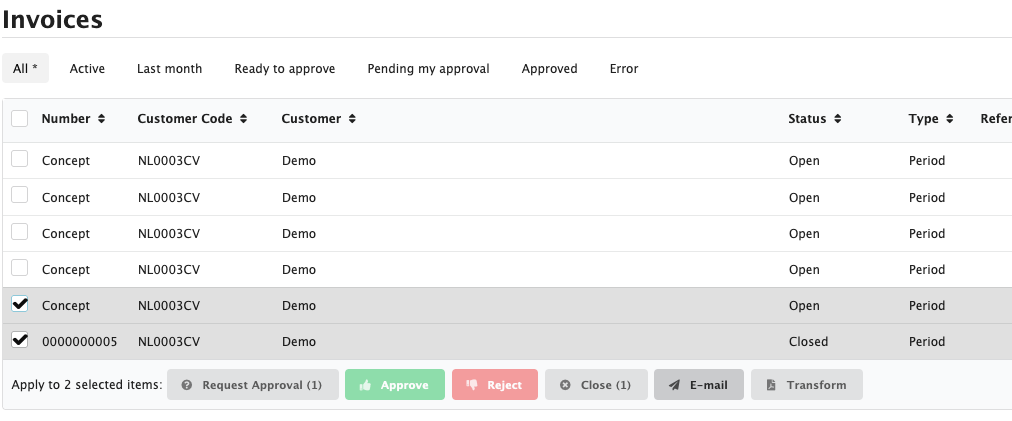
Once the Message Definition is fully configured, a Message Run can be started. A Message Run can be started by selecting invoices in the Invoices screen and clicking the “E-mail” button, shown in Figure Messaging 11.
Figure Messaging 11: Select invoices for e-mail
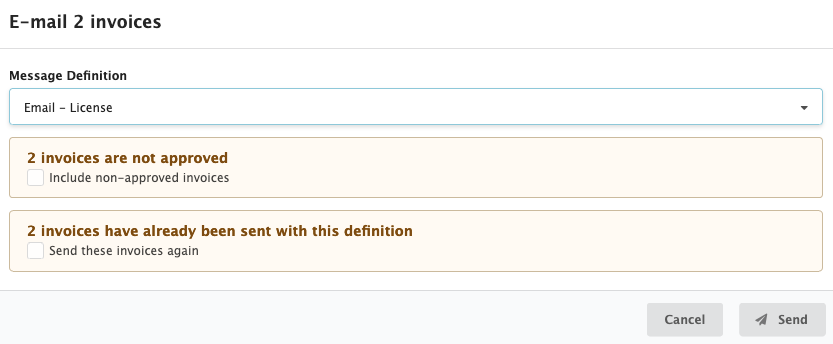
A popup, like the one shown in Figure 12, appears for you to select the Message Definition to use for this Message Run. After the Message Definition is chosen, CloudBilling can perform some checks against the selected invoices to make sure the operation will complete successfully.
These checks include:
- The Recipient Key being present with a valid email address on the Customers associated with the selected invoices. Otherwise, the email cannot be sent.
- Whether the invoices that are selected are Approved. Otherwise, an invoice that is still Open to change might be sent.
- Whether the invoices were previously included in any Message Runs. Otherwise, invoices might be sent multiple times.
Figure Messaging 12: Messaging checks
After reviewing your selection and checking for warnings, click Send to start sending emails. With this, CloudBilling triggers the Message Run. CloudBilling then triggers the transformation of the required Invoice Transformations in the Attachments of the Message Definition used for this Message Run. Once the invoices are correctly transformed, the message will be sent to the customer. This process runs within the next 24 hours. If the 24-hour limit is surpassed, the background process stops sending emails in this message run. However, a failed Message can always be retried manually.
Message Runs
Once a Message Run is successfully created, CloudBilling redirects to the overview screen for this specific Message Run shown in Figure Messaging 13. This screen displays information about the Message Run. This includes message definition, current status, transformation from and to date, customer cluster, created date and Bcc email addresses. The screen also shows an Overall Message Result Counts bar that changes colour based on the status of the Message Run. Green means that the message is correctly sent, orange means the messages are pending, and red means something went wrong while sending the message. Below this bar, the status of the current run and the total number of Messages in the Message run are displayed. The blue number can be clicked to find an overview of all Messages in the current Message Run as can be seen in Figure 14. The [Start] and [Stop] button can be used to respectively start or stop the message run. This stops the run for any messages not sent yet and re-apply the run for any messages not sent yet.
Figure Messaging 13: Message Run overview screen
When looking at the overview of a Message Run, it is important to check for duplicate customers in the list. They will receive multiple emails if not removed. Individual message results can be removed with the trash bin button. For each Message Result, a [Send Again] button is present next to the trash bin button. The Send Again button can be used to retry the message when it failed to send. Ensure to troubleshoot the actual issue before using this button. The rightmost column contains a tick box that can be used to multi-select results and delete or resend the selected results bulk.
Figure Messaging 14: Message Results screen
In the header of the Message Results, there are search options available. The search options allow searching on customers, used message definitions and the status of the message. The status of the message can be one of the following:
- Waiting: the message is in an active message run that is paused, and has not been sent yet.
- Pending: the message is waiting to move to the processing status.
- Processing: the message is processing before being sent.
- RecipientKeyNotFound: the customer is missing the required email address.
- UnknownSenderProfile: the message definition configuration points to an unknown sender profile.
- TransformationResultNotReady: transformation results are in processing state.
- GenerateFailed: the message has not been sent because something went wrong in the generation of the message.
- SendFailed: the message was generated, but the sending of the message failed.
- SendRetryExceeded: the message run or user tried to send the message multiple times, which exceeded the limit.
- Error: the message generation concluded in an error; this often has to do with the message template.
- SendSuccessful: the message was successfully sent to the customer.
- Closed: the message was closed manually, and the status cannot be viewed any more.
Messages that have another status than “SendSuccessful” after the message run is finished, should be investigated further by using the Message Results screen. The common causes of messages not being able to send are; the email on a customer missing, the invoice transformation not being present, or faulty credentials for the Message Server. The Step-by-step for the message run can be found in Performing a Message run
Once all messages have been sent successfully, the invoice message run should be finalised with the [Stop] button. When a Message Run is not Stopped, unexpected behaviour might occur. A Message Run might try to re-send results that did not receive the status Send Successful in a later run, for example.
When a message run is finished, ensure to Close the message run by using the [Stop] button, to prevent unexpected issues.
Step by step: How to set up ‘Messaging’
Ensure you first delivered the information regarding the Subject and Body of your email to your CloudBilling consultant. They will notify you when the Subject Template and Body Template are set up so you can configure the rest of your Messaging.
- Hover over the [Administration] option of the menu to open the submenu.
- Hover over [Messaging] in the submenu.
- Set up Recipient Keys on the Recipient Keys screen by clicking [Add Recipient Key].
- Set up a Message Server on the Message Servers screen by clicking [Add Server] underneath either the SMTP Servers or Microsoft 365 Graph option.
- Set up a Message Definition on the Message Definitions screen by clicking [Add] and filling out the following and clicking [Save].
- Message Definition Name in Name,
- Message Sender in From,
- Recipient Key in To,
- Optionally the Bcc emailaddresses,
- The Subject Template configured by your CloudBilling consultant,
- The Body Template configured by your CloudBilling consultant,
- Any Transformations you want to attach to your email, optionally compressed as a zip archive.
- Ensure the customers you want to mail have a valid email address filled out with the Recipient Key from your Message Definition.
- After invoice approval, start Messaging by making a selection of invoices you want to send a message for on the Invoices screen and clicking [E-mail] in the bottom bar of the table.
- Check for any warnings and either troubleshoot or click [Send] in the shown pop-up.
- Check your Message Runs to monitor whether your messages are send.
If you require further assistance please feel free to reach out to our support team.
