Excel Editor
Introduction
The Excel Editor can be used to import and update Purchase and Customer records in CloudBilling. While it is possible to create a new file from scratch with the Excel Editor, we recommend always creating and preparing the files in Microsoft Excel (or similar software) and use the Excel Editor to import it in CloudBilling.
The culture for the Excel Editor is US, which means that the decimal separator is a dot (.).
Procedure
To import a file with the Excel Editor, open it directly from the top menu, or under Connectors if your system has multiple Connectors active, and follow the steps below.
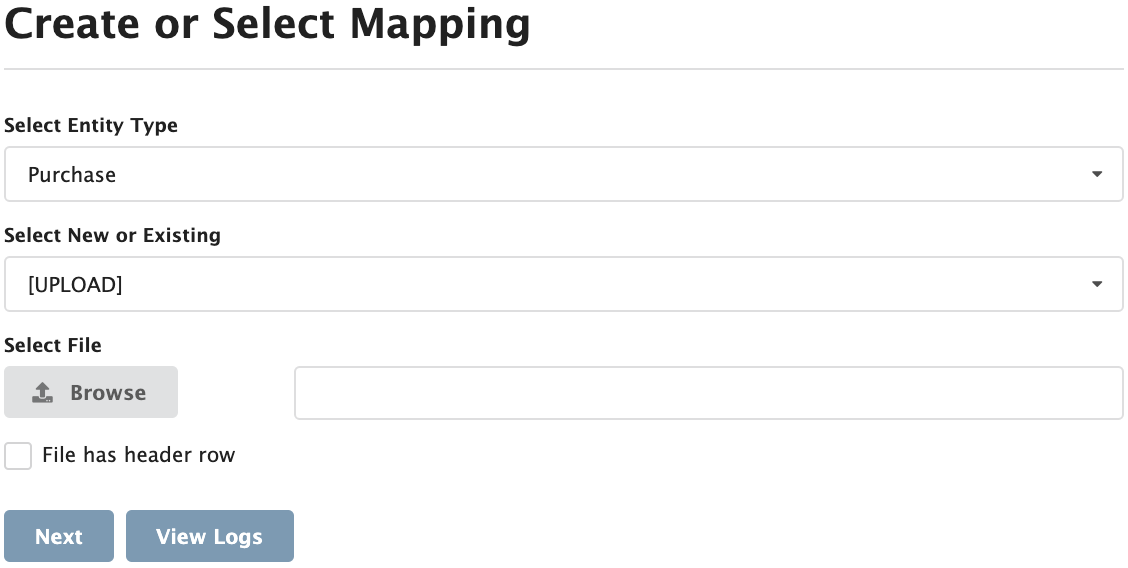
- In the *Select Entity Type *drop-down, select Purchase or Customer, depending on what you what to import. The procedure for importing Purchases and Customers is the same.
- We recommend using a template to import Customers or Purchases. These templates are prepared with the correct header labels (see step 4.) for easier processing. Download them here. Note: both template files contain an example record for illustration purposes. Please delete this before adding your own data to the file(s).
- Purchases: Data_template_Purchases.xlsx
- Customers: Data_template_Customers.xlsx
- We recommend using a template to import Customers or Purchases. These templates are prepared with the correct header labels (see step 4.) for easier processing. Download them here. Note: both template files contain an example record for illustration purposes. Please delete this before adding your own data to the file(s).
- In the *Select New or Existing *drop-down:
- Select New to create a new file from scratch in the Editor (not recommended).
- Select Upload to upload a file from your computer.
- Select an existing file that was created or processed at an earlier moment.
- After selecting Upload in the previous step, use the Browse button to locate and upload the file from your computer.
- Check the File has header row *box if the selected file has a header row. *Note: we recommend always using a header row with pre-defined column titles. If done correctly, this will allow CloudBilling to automatically map the correct columns to the corresponding CloudBilling objects.
- Click the Next button. After a few seconds, the file you selected will be displayed in CloudBilling.
- If one of the provided templates is used, it should look like this:

- The green row represents the header row in the original file.
- in row 2, the destination object (Map To) for each column must be provided. Row 2 will be pre-filled by CloudBilling wherever possible. In other words, if the correct header labels are used, CloudBilling will automatically map these columns to the correct destination objects.
-
Please check the following:
- All columns are mapped to the correct corresponding CloudBilling object.
- All date fields are in the following format: yyyy-MM-ddThh:mm:ss (2019-01-01-T12:00:00).
CloudBilling allows extra data to be stored on both Purchases and Customers in the form of Metadata (string, numeric and date). To import these, a label/key/name must be provided in the header row and these must be mapped to the appropriate Metadata type. As an example, consider a Customer that has the following extra data:
- AccountID (StringValue)
- DueDays (NumericValue)
- Birthday (DateValue)
If named and mapped correctly, the example above will look like this: 
Columns can be mapped to the following objects
| Map to | Type | Definition |
|---|---|---|
| BillInAdvance | Boolean | Defines if the purchase should be billed in advance (TRUE or FALSE). |
| CustomerCode | String | Defines the customer code. Customer codes should always be unique. |
| DateValues | Date* | Defines any date value that can be added to the meta data field. A label must be provided in the header row. DateValues can be used multiple times. |
| EndDate | Date* | Defines the end date of the purchase in case of pro rata purchases, such as subscription services or usage services. |
| InvoiceReference | String | Defines the (unique) invoice reference. |
| IsAdhoc | Boolean | Defines whether this is an ad hoc invoice or a recurring invoice (TRUE or FALSE). |
| NumericValues | Numeric | Defines any numeric value that can be added to the meta data field. A label must be provided in the header row. NumericValues can be used multiple times. |
| OverrideCost | Numeric | Defines the costs that should override the costs that normally apply for the products. |
| OverrideTotalPurchasePrice | Numeric | Defines the price that overrides the normal calculation done by all Pricing Rules for the products. |
| OverrideUnitPrice | Numeric | Defines the price that should override the price that normally apply for the products. |
| ProductLabel | String | Defines the product label of the purchase. |
| PurchaseDate | Date* | Defines the purchase date. |
| PurchaseReference | String | Defines the purchase reference. This value must be unique. |
| Quantity | Numeric | Defines the quantity of the purchased items. |
| RecurrenceLimit | Numeric | Defines the limit of times this purchase should recur. |
| RecurrencePeriodSize | Numeric | Defines the period size of recurrence defined in RecurrencePeriodUOM. |
| RecurrencePeriodUOM | Defines the periods in which a purchase should recur. It could be defined in Second, Minute, Hour, Day, Month, Year. The period size must be defined in RecurrencePeriodSize. | |
| SourceUpdateDate | Date* | Defines the date when the source is updated. |
| StringValues | String | Defines any string value that can be added to the meta data field. A label must be provided in the header row. StringValues can be used multiple times. |
* All date fields are in the following format: yyyy-MM-ddThh:mm:ss (2025-01-01-T12:00:00). Note that the Excel Editor considers time in UTC. If you need the time of a Purchase to be in a different timezone, ensure to include an offset in the hours of the date field.
Quarterly invoice periods or usage recurrence can be indicated by setting the RecurrencePeriodSize to 3 and the RecurrencePeriodUOM to Month. If this needs to align with the quarter, ensure to set the BillFromDate for Customers or the PurchaseDate for Purchases to align with the start of the respective quarter.
As stated above, it is recommended to use these exact names, as the Excel Editor will recognise these fields and prefill them. This will make importing purchases easier and less sensitive to errors.
After all columns are mapped and labelled correctly, click Save & Process. CloudBilling will import the data from the Excel file. A field with the text “Successfully saved file changes” will appear. Navigate back to the start screen of the Excel Editor by clicking cancel and click the View Logs button to check whether all records are imported correctly. The logs should have a row that states the latest import. For of a purchases import, it will state “Imported 0 customers and … purchases from file “…””. For a customer import, it will be vice versa. It could take a while when all purchases will appear under the “Purchases” section. The purchases will be put in a queue and be processed.