Pricing Rules
Table of contents
Pricing Rules are used by CloudBilling to determine what calculations to perform on a certain purchase. Pricing Rules depend heavily on the correct configuration of the Customer Cluster and Product Category. Therefore, it is important to first understand fully how the Customer and Product Categories are structured in the environment that is being worked in. The below table of contents can be used to navigate this page.
Pricing Rule navigation
The Pricing Rules can be found under the header “Pricing Rules” in the menu bar of CloudBilling, as can be seen in Figure Pricing Rules 1. When clicking on the header, the user is navigated to an overview of all active Pricing Rules in the environment. The [Valid Only] box under the text “Status” is ticked by default, which means that only rules that are in use are shown. Searching for specific Pricing Rules can be done on the Rule Name, Product Category and Customer Cluster, or the specific rule type. The rule types will be explained in more detail in the next paragraph.

Figure Pricing Rules 1: Pricing Rules page
Pricing Rules can be clicked to investigate the settings of a specific rule. Similarly, to adding other aspects in CloudBilling, the [Add] button can be used to make a new Pricing Rule. When this button is pressed, it will redirect the user to the “Add Pricing Rule” page, shown in Figure Pricing Rules 2. Pricing Rules can always be adjusted, but adjusting pricing rules will also make the invoices that use these Pricing Rules, recalculate. Therefore, it might take some time before changes to Pricing Rules can be seen on the invoices, as a Pricing Rule can also apply to “All Customers”. Thus, this will reapply the calculations to all customers that use this Pricing Rule as well.
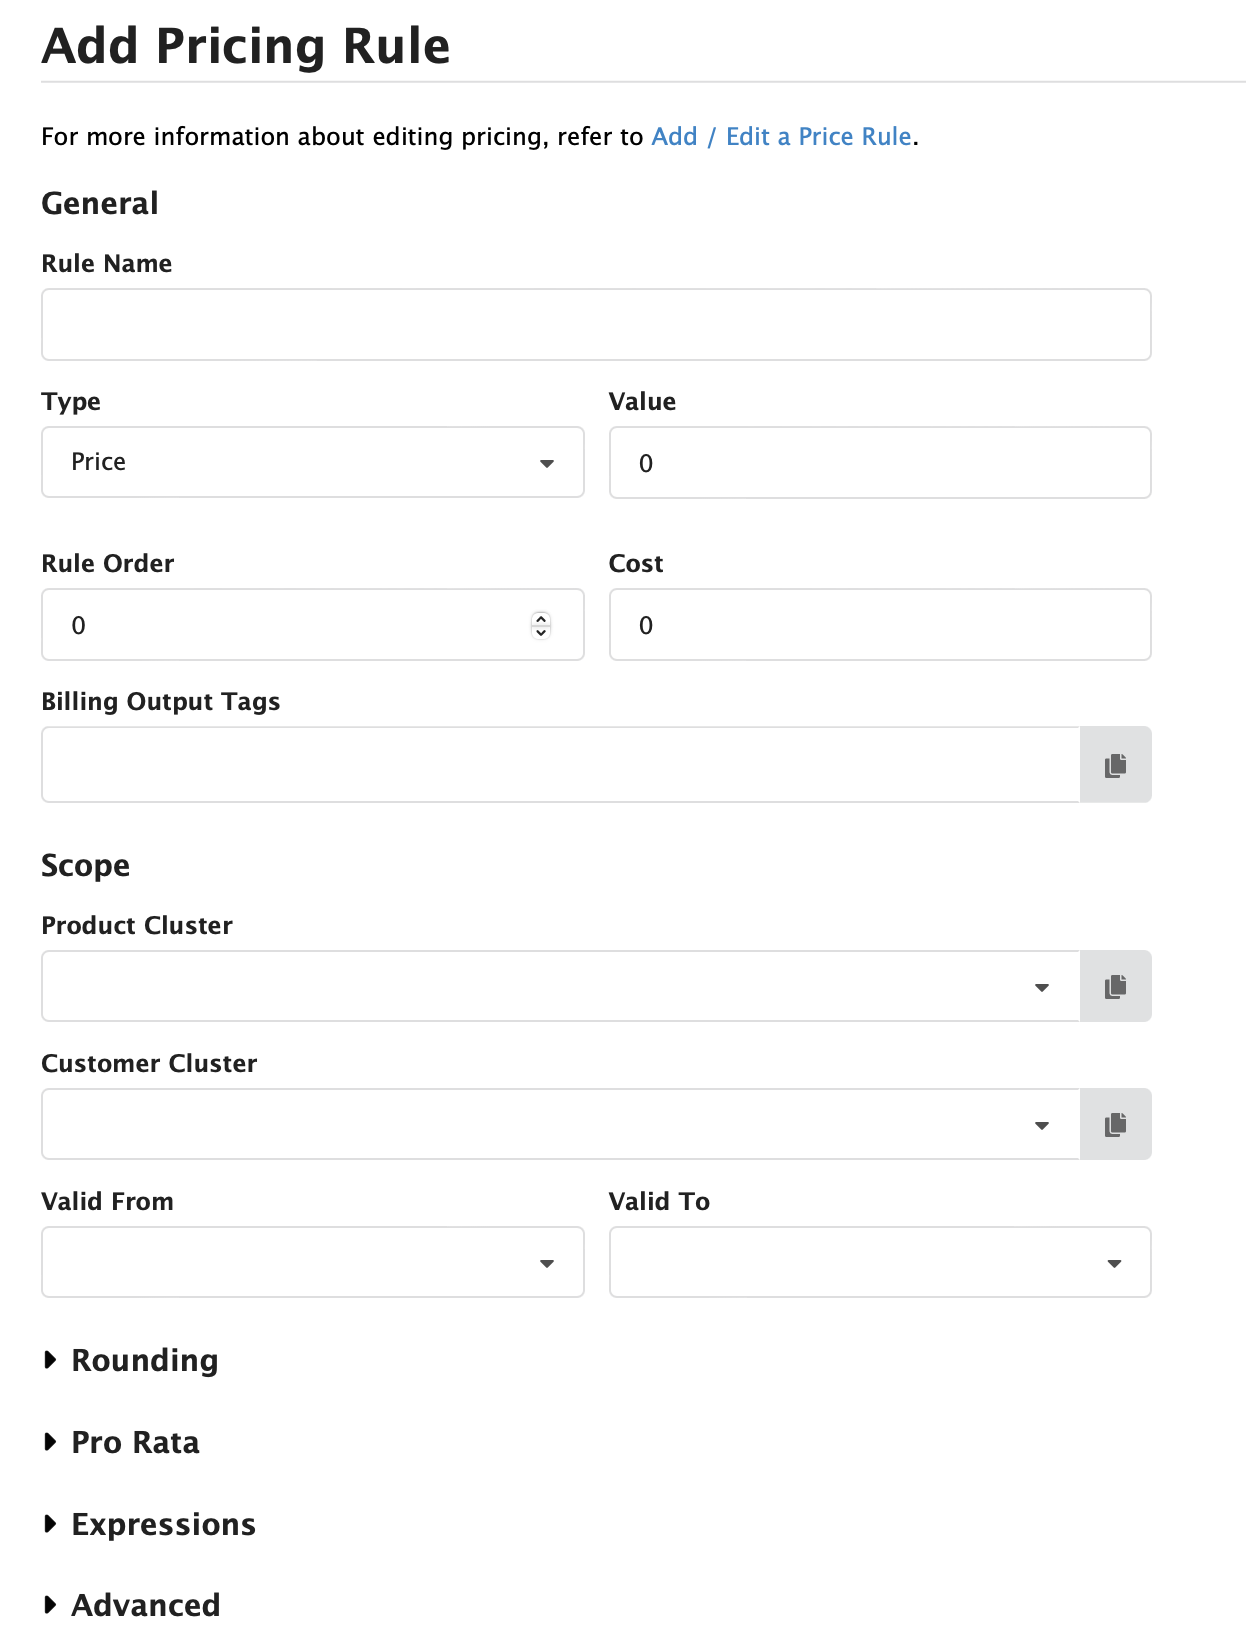
Figure Pricing Rules 2: Add Pricing Rule screen
Types of Pricing Rules
Nine different types of Pricing Rules are present that can be used by CloudBilling to perform different types of calculations. The different types of Pricing Rules can be found in Figure Pricing Rules 3 but are also listed below.
Pricing Rule types:
The Pricing Rules, and how to implement them, will be explained in this order. The structure of Pricing Rules is often Price, then an Adjust Percentage, followed by a Sum.

Figure Pricing Rules 3: Pricing Rule types
When setting up a new Pricing Rule, it is wise to indicate the Pricing Rule Type in the name of the Pricing Rule in combination with the product that the Pricing Rule applies to. This will reflect in the Invoice Details and will make troubleshooting easier. A Pricing Rule Name should look like: Pricing Rule Type Product Category Customer Cluster. For example, when making a Price for Support Hours for All Customers, the Name will look like PRICE Support Hours All Customers.
A rule should always have a rule name, type, Product Category and customer cluster. Additionally, a value and cost can be applied, as well as a valid from and to dates for a Pricing Rule. All value and cost fields have a decimal value and a currency type. The system will not support aggregation of values and costs with different currencies. Decimals in values always use a dot rather than a comma. Ordering is applied in the steps for making Pricing Rules and will be explained in more detail in section Rule Order. For these steps, it is important to understand that the rule order tells CloudBilling in what order to apply the Pricing Rules to a purchase. The lowest rule order will be applied first, while higher rule orders will be applied later. Rule orders can be used as minus numbers, which is common practice.
Price
A Pricing Rule with type Price is used to set a simple price for a product. This type is also the standard type applied when a new Pricing Rule is made. It is often necessary to apply a price rule first, as a purchase does not have to contain a price. A Pricing Rule with a value will ensure that a product always has a standard price. Furthermore, the price rule can be necessary for other Pricing Rules to perform further calculations. Without a price, a multiplication rule will not have an effect whatsoever. Below follow the steps to adding a Price rule.
Step by step: How to add a “Price” rule:
- Select [Pricing Rules] in the menu.
- Click on the [Add] button to open the “Add Pricing Rule” page.
- In the field [Rule Name], write “PRICE” combined with the name of the Product Category the rule will apply to. a. For a customer-specific price, add the customer name before or after the Product Category name.
- In the [Product Category] field, type the product name and select the product (cluster) the rule should apply to.
- In the [Customer Cluster] field, type “all customers” and select the relevant search result. a. For a customer-specific price, select the corresponding customer cluster.
- In the [Value], add the price. The price should exclude taxes. Cents must be written after a dot, rather than a comma, e.g. 2.40 will imply that a price is 2 euros and 40 cents.
- A cost, when present, can be added in the same way in the [Cost] field.
- Write -2 in the [Order] field.
- The [Valid From] and [Valid To] dates can be filled out if the rule needs to be applied from or to a certain date.
- Click on [Save]. In Figure Pricing Rules 4 an example of a Price type Pricing Rule that these steps will produce is shown.

Figure Pricing Rules 4: Price Type Pricing Rule
Adjust Percentage
An Adjust Percentage rule is a Pricing Rule that will apply a percentage multiplication to a previously set price. Because of this, an Adjust Percentage rule will often be set after a Pricing Rule or after a SUM rule. These rules can be used to give a customer a discount by setting a negative value in the Pricing Rule, or uplift by setting a positive value in the Pricing Rule. Thereby, Adjust Percentage rules can be used to apply VAT rules to customers or customer groups. When applying VAT rules, it is often also necessary to add a separate line to show only the VAT amount on an invoice. Because of this, the Adjust Percentage rule offers the option to do this. This section will explain to add a general Adjust Percentage rule, as well as add a VAT rule with a separate line item. The specifics of a separate line item will be explained in the section Separate line items.
Adjust Percentage rules often use Billing Output Tags. Billing Output Tags are often environment-specific, though in this manual the commonly used tags will be used when applicable, as an example. Due to the standard structure of pricing rules, Adjust Percentage rules are often used to show prices on specification pages, while sum rules are often used to show lines on the summary page. Billing Output Tags, or BOTs, will be explained in more detail in section Billing Output Tags.
Step by step: How to add an “Adjust Percentage” rule:
- Select [Pricing Rules] in the menu.
- Click on the [Add] button to open the “Add Pricing Rule” page.
- Set the [Type] to Adjust Percentage.
- In the field [Rule Name], write “ADJUST PERCENTAGE” combined with the name of the Product Category the rule will apply to. a. For a customer-specific price, add the customer name before or after the Product Category name.
- In the [Product Category] field, type the product name and select the product (cluster) the rule should apply to.
- In the [Customer Cluster] field, type “all customers” and select the relevant search result. a. For a customer-specific price, select the customer cluster.
- In the [Value], add the percentage that you want to use as a discount or uplift.
- A cost discount or uplift can be added in the same way in the [Cost] field.
- Write 0 in the [Order] field.
- The [Valid From] and [Valid To] dates can be filled out if the rule needs to be applied from or to a certain date.
- Click on [Save].
In Figure Pricing Rules 5 an example of an Adjust Percentage type Pricing Rule that these steps will produce is shown. In this case, this rule will produce a discount of five per cent.

Figure Pricing Rules 5: Adjust Percentage Type Pricing Rule
Step by step: How to add an “Adjust Percentage VAT” rule:
- Select [Pricing Rules] in the menu.
- Click on the [Add] button to open the “Add Pricing Rule” page.
- Set the [Type] to Adjust Percentage.
- In the field [Rule Name], write “VAT” combined with the name of the customer cluster it applies to. Usually this will be a country.
- In the field [Rule Name], write “VAT” combined with the country name to which the VAT rate applies.
- In the [Product Category] field, select “All Products”.
- In the [Customer Cluster] field, type the name of the customer cluster that the VAT should apply to. This will again often be a cluster named after a country.
- In the [Value] field, add the VAT that applies to this country as a positive number.
- As the [Rule Order] use a high order, often 30 is used to ensure that the VAT is applied after the last rule.
- Enable [Separate Line Item].
- In the [Output Tags] of the Separate Line Item, add “Summary” and “TotalVAT” as BOTs.
- In the [Billing Output Tags] of the rule, add “Summary” and “TotalInclVAT”.
- Click on [Save].
In Figure Pricing Rules 6, an example of a VAT rule is added. These rules are often made during an implementation by CloudBilling employees. More info on BOTs can be found in section Billing Output Tags.

Figure Pricing Rules 6: Adjust Percentage VAT Pricing Rule
Adjust Fixed
Like a general Adjust Percentage rule, an Adjust Fixed rule can be added. The difference between these two rule types is that an Adjust Fixed rule uses a fixed amount as a discount or uplift, rather than a percentage. Below follow the steps to add an Adjust Fixed rule.
Step by step: How to add an “Adjust Fixed” rule:
- Select [Pricing Rules] in the menu.
- Click on the [Add] button to open the “Add Pricing Rule” page.
- Set the [Type] to Adjust Fixed.
- In the field [Rule Name], write “ADJUST FIXED” combined with the Product Category. If the rule is customer-specific, add the customer’s name in front of the Product Category name.
- Add an appropriate [Rule Order], this could be at the same height as an Adjust Percentage would be. Otherwise, this could be after a SUM rule if the fixed amount is discounted or uplifted on a whole product category.
- In the [Product Category] field, add the product (cluster) the rule should apply to.
- In the [Customer Cluster] field, add the customer (cluster) the rule should apply to.
- In the [Value] field, add the amount. A positive number will function as uplift, while a negative number will function as a discount.
- Click on [Save].
In Figure Pricing Rules 7, an example of an Adjust Fixed rule is presented. When necessary, BOTs and separate line items could be applied to this rule. Refer to sections Billing Output Tags and Secondary settings (Rounding, Pro Rata, Advanced) for more information.

Figure Pricing Rules 7: Adjust Fixed Type Pricing Rule
Sum
A Sum type Pricing Rule is used to add up every earlier Pricing Rule result applied. A Sum is used on several order levels in the Pricing Rule structure. Pricing Rule Results for Products are summed together first. Then the Pricing Rule Results for Product Categories are summed together. This happens until all Pricing Rule Results end up in the “All Products” Sum to get the total amount of the invoice. Since Sum rules are likely to be used to show a line on the invoice, either on the summary page or on the Specification page, these rules often contain Billing Output Tags. More information on Billing Output Tags and how to use them can be found in the section Billing Output Tags.
Sum rules do not have a Value or Cost but do have “Grouping” settings. The Group By setting on the Pricing Rule can be used to group purchases on different criteria. The available options are Text Metadata, Numeric Metadata, Date Metadata, Purchase Date, and Source Product. A metadata is a key-value pair associated with a purchase. When a purchase goes through various Pricing Rules, some Pricing Rule results retain the metadata. To group by metadata fields, the keys are specified in the Pricing Rule. If multiple metadata keys are filled out, the rule will group purchases that match across all the specified keys-value pairs. Selecting the Purchase Date checkbox will display a drop-down list of time granularity options. From this list, you can choose to group by the exact time, hour, day, month or year of the Purchase Date. Source Product can be checked on or off. The Sum can produce more results than one if Group By settings are used. Additionally, Aggregation settings are present on Sum Pricing Rules. The standard setting is a simple sum. Besides that, there can be an aggregation set to the minimum, the maximum and the average.
Step by step: How to add a “Sum” rule:
- Select [Pricing Rules] in the menu.
- Click on the [Add] button to open the “Add Pricing Rule” page.
- Set the [Type] to Sum.
- In the field [Rule Name], write “SUM” combined with the name of the Product Category the rule will apply to. a. For a customer-specific price, add the customer’s name before or after the Product Category name.
- In the [Product Category] field, type the product name and select the product (cluster) the rule should apply to.
- In the [Customer Cluster] field, type “all customers” and select the relevant search result. a. For a customer-specific price, select the corresponding customer cluster.
- Add the correct Billing Output Tags. Usually these contain “Specifications” or “Summary”.
- Write 5 in the [Order] field.
- The [Valid From] and [Valid To] dates can be filled out if the rule needs to be applied from or to a certain date.
- Grouping and aggregation options could be used when applicable as described above.
- Click on [Save]. An example of a sum rule made using these steps can be found in Figure Pricing Rules 8 below.

Figure Pricing Rules 8: Sum Type Pricing Rule
Ladder
Ladder rules work similarly to a pricing table. These types of rules are useful when making pricing agreements that include prices for the quantity of a product that is consumed by the customer. Two examples of ladder usages include the first five products being free for the customer, after which they start paying the normal price for a product, or a product becoming cheaper when a customer consumes more of it.
Usually, a ladder rule is used instead of a simple Pricing Rule. To achieve a correct setup for a ladder rule, it is often important that the number of products goes through the Pricing Rule at once. Because of this, a pre-ladder sum Pricing Rule is set up. This is a simple summing rule, which will ensure that the total number of products goes through the ladder at the same time, rather than one-by-one. A pre-ladder sum follows the same steps as a normal Pricing Rule but will have to take place before the order of the ladder rule. Additionally, the name will be changed from SUM to PRE-LADDER, to reflect the purpose of the rule.
Add a PRE-LADDER SUM rule to ensure the ladder functions as expected.
The ladder settings contain a step type, a price type, and steps, as can also be seen in Figure Pricing Rules 9. A ladder step type can either be segmented or staggered. The segmented step type entails that the total quantity that is purchased will determine the price. The step reached with the total amount will thus determine the price for every single unit at once when this setting is used. The staggered step type entails that product prices are based on the quantity group they belong to. In this case, the first set of products will be priced by step one of the Ladder, while the rest of the products are priced by the second step of the ladder. Usually, the staggered ladder step type is used.
The Price Type Setting in the Ladder determines how the prices are applied. Unit price means that the given price is applied per product in the range, while group price means that the price is applied to the group of products once the step is reached. The Group Price will apply even when the quantity does not reach the upper-bound of a Ladder step. Unit price is the standard setting.
The steps of a ladder determine the ranges of the quantities per step, combined with the value (price) and cost of those steps. When the From-value in the first Ladder-step is left empty, no lower-bound is present. The same happens when the To-value is left empty, then no upper-bound is present. It is recommended to leave the To-value of the highest step empty, to ensure no usage can be missed by a capped value.
Step by step: How to add a “Ladder” rule:
- Select [Pricing Rules] in the menu. Note: ensure the pre-ladder sum is made beforehand.
- Click on the [Add] button to open the “Add Pricing Rule” page.
- Set the [Type] to Ladder.
- In the field [Rule Name], write “LADDER” combined with the name of the Product Category the rule will apply to. a. For a customer-specific price, add the customer’s name before or after the Product Category name.
- In the [Product Category] field, type the product name and select the product (cluster) the rule should apply to.
- In the [Customer Cluster] field, type “all customers” and select the relevant search result. a. For a customer-specific price, select the corresponding customer cluster.
- Put -2 in the [Order] field.
- Select the appropriate [Step Type].
- [Segmented]: the total quantity purchased defines the prices.
- [Staggered]: products are priced based on the quantity group they belong to.
- Select the appropriate [Price Type].
- [Unit Price]: the given price is applied per product in the range.
- [Group Price]: a price is applied per quantity group, even when the range of a group is not fully filled with purchases.
- Click on the [+ Add] button.
- Define the quantity range in the [From] and [To] fields. An empty field means indefinite.
- Note that the [From] value is not included and the [To] value is. For example, 0-10 includes 1 until and including 10.
- Set the [Value] for that range. This is the price. [Cost] can also be added if appropriate.
- Repeat steps 10 to 23 to create a ladder.
- The [Valid From] and [Valid To] dates can be filled out if the rule needs to be applied from or to a certain date.
- Click on [Save].

Figure Pricing Rules 9: Ladder Type Pricing Rule
Figure Pricing Rules 9 illustrates what a standard ladder rule would look like, using a staggered step type and a price type set to unit price. This rule shows a product that becomes cheaper when more usage is coming through the system.
Group Price
Group prices can be used to set the price for a selection of purchases based on a set of criteria. A Group price that does not use any specific criteria will, therefore, be used for the set of purchases. Other grouping types will allow the Group price to be applied to split up groups of purchases. The Group By option is thus often used while setting up this product. The types were briefly described before, but will be explained in more detail in the following list:
- [Metadata: Text]: group on one or more text metadata field(s) from the metadata of a purchase.
- [Metadata: Number]: group on one or more number metadata field(s) from the metadata of a purchase.
- [Metadata: Date]: group on one or more date metadata field(s) from the metadata of a purchase.
- [PurchaseDate]: group purchases per period. This can be Exact, Hour, Day, Month or Year, specifying the interval for the groupings.
- [SourceProduct]: group on the Tag name of the Product Category.
Each metadata contains a type, a key, and a value, as can be seen in Figure Pricing Rules 10. To group by a metadata field, the correct type and key must be known.

Figure Pricing Rules 10: Example metadata fields
Additionally, the Group By rule has more elaborate aggregation options. Aside from the quantity aggregation, there can also be an aggregation on the value type and the cost value type. The latter two can be either set to the Total Group Price or by the Unit price. The total unit price is the default setting of the rule, which means the price that is defined in the [Value] field is used for the grouped purchases. When the unit price is used for the aggregation type, the price defined in the [Value] field is applied per purchase.
The Quantity aggregation in a Group price works as following:
- [Sum]: purchases are summed up for the grouped setting that is chosen.
- [Min]: the lowest value is selected for the grouped setting that is chosen.
- [Max]: the highest value is selected for the grouped setting that is chosen.
- [Average]: the average value is calculated for the grouped setting chat is chosen.
Step by step: How to add a “Group Price” rule:
- Select [Pricing Rules] in the menu.
- Click on the [Add] button to open the “Add Pricing Rule” page.
- Set the [Type] to Group Price.
- In the field [Rule Name], write “GROUP PRICE” combined with the name of the Product Category the rule will apply to. a. For a customer-specific price, add the customer name before or after the Product Category name.
- In the [Product Category] field, type the product name and select the product (cluster) the rule should apply to.
- In the [Customer Cluster] field, type “all customers” and select the relevant search result. a. For a customer-specific price, select the corresponding customer cluster.
- Use an appropriate rule order, this rule is often used instead of a Pricing Rule or after a sum rule. Examples of the order would thus be -2 or 6, respectively.
- Add the price in the [Value] field. Optionally, also add the [Cost].
- Select the appropriate [Group By] option.
- Select the appropriate [Quantity Aggregation], [Value Type] and [Cost Value Type].
- Add Billing Output Tags if appropriate.
- Click on [Save].
Figure Pricing Rules 11 shows an example of a customer-specific rule that ensures that the customer will always pay a set price per day of using the product.

Figure Pricing Rules 11: Group Price Type Pricing Rule
Max price and Min price
Since Max prices and Min prices function in the exact opposite ways, it is appropriate to elaborate upon these rules in just one section. Since the Max price and the Min price rules are set up in the exact same way, this section will only include one set of steps and one example Pricing Rule.
A max price ensures that a customer is only charged until a maximum agreed upon price. Similarly, a min price ensures that the customer always gets charged for the minimum agreed upon price. Because of these rules using a total amount to determine whether the maximum or the minimum price has been reached, they will always need a preceding sum rule. This works like a pre-ladder sum rule and functions like a normal sum rule. It is wise to change the name of this sum rule to PRE MAX PRICE or PRE MIN PRICE for max price and min price rules respectively. Therefore, min prices and max prices are often used at Rule Order 6 or higher.
Add a PRE-MAX PRICE and SUM or PRE-MIN PRICE and SUM rule to ensure the Max and Min price rules function as expected.
Step by step: How to add a “Max Price” or “Min Price” rule:
- Select [Pricing Rules] in the menu.
- Click on the [Add] button to open the “Add Pricing Rule” page.
- Set the [Type] to Max Price or Min Price.
- In the field [Rule Name], write “MAX PRICE” or “MIN PRICE” combined with the name of the Product Category the rule will apply to. a. For a customer-specific price, add the customer name before or after the Product Category name.
- In the [Product Category] field, type the product name and select the product (cluster) the rule should apply to.
- In the [Customer Cluster] field, type “all customers” and select the relevant search result. a. For a customer-specific price, select the corresponding customer cluster.
- Use an appropriate rule order, the order should be higher than the order of the Pre-sum rule that was made.
- Add the price in the [Value] field. Optionally, also add the [Cost].
- Add Billing Output Tags if appropriate.
- Click on [Save]. On the following page an example Max price rule can be found in Figure Pricing Rules 12.

Figure Pricing Rules 12: Max Price Type Pricing Rule
Foreign Exchange
The Foreign Exchange Pricing Rule is used for converting the cost and price from one currency to another. By default, the exchange rate used for the currency conversion is retrieved from the Exchange Rates under the system
administrations. These rates need to be manually added for each calendar month.
Step by step: How to add a “Foreign Exchange” rule:
- Select [Pricing Rules] in the menu.
- Click on the [Add] button to open the “Add Pricing Rule” page.
- Set the [Type] to Foreign Exchange.
- In the field [Rule Name], write “Foreign Exchange” combined with the name of the Product or Product Category the rule will apply to. a. For a customer-specific price, add the customer name before or after the Product Category name.
- In the [Target Amount Currency] and [Target Cost Currency], type the target currency name and select from the search result(s).
- In the [Product Category] field, type the product name and select the product (cluster) the rule should apply to.
- In the [Customer Cluster] field, type “all customers” and select the relevant search result. a. For a customer-specific price, select the corresponding customer cluster.
- Use an appropriate rule order.
- Add Billing Output Tags if appropriate.
- Click on [Save].

Figure Pricing Rules 13: Foreign Exchange Type Pricing Rule
The Exchange Rates in system administration support configuration of monthly conversion rates only. For applying weekly or daily conversion rates, include the rate and target currency with the purchases as purchase metadata. The Pricing Rule can then be configured to retrieve the conversion data from the purchases.
- Select the [Use Purchase Metadata] checkbox in the Advanced section at the bottom of the page.
- Upon selection, the [Convert Amount] and [Convert Cost] checkboxes appear below, and are selected by default. Deselect them based on the requirements.
- The fields next to the rule type change to [Exchange Rate Metadata Key] and [Currency Metadata Key]. Type the metadata keys for retrieving conversion rate and the target currency.
- Click on [Save].

Figure Pricing Rules 14: Foreign Exchange Type Pricing Rule using purchase metadata
Rule order
Shown in the previous section and subsections, Pricing Rules always need to be specified for a combination of a Product Category and a customer cluster. As illustrated, it is normal for there to be several Pricing Rules, like a price, an Adjust Percentage and a sum rule, for the same combination of Product Category and customer cluster. This is also why the rule order is essential. The rule order determines the order in which Pricing Rules are executed by CloudBilling.
The rule execution order depends on three factors: the rule order that was set in the Pricing Rules, the rule order in which Product Categories are carried out, and the rule order in which customer clusters are carried out. The product clusters are always executed bottom-up, from the products, back up through the Product Categories to All Products. Contrarily, the execution order of customer clusters is top-down. First, the rules for All Customers will be carried out, followed by lower clusters and specific customers. This entails that a Pricing Rule for the product Usage for All Customers will be carried out first, which could then be followed with a Pricing Rule for the product Usage for a specific customer. When these two rules are put on the same rule order, the engine will choose the most appropriate rule and use the customer-specific rule only.
Sequentially, the rule order will be carried out as following:
- The Product Category is taken into consideration bottom-up, from the lowest product (cluster) upwards to All Products.
- The set Pricing Rule order, where the lowest number will be executed first. This order can be set in the minus.
- The customer cluster will be used top-down when the set order is the same, from the highest customer cluster “All Customers” down to specific customers. These steps in the sequence are all, separately, visualised in Figure Pricing Rules 15 below. Rule order is portrayed in the middle, as it relates to different levels of products, Product Categories, customers, and customer clusters.

Figure Pricing Rules 15: Rule execution order visualisation
As mentioned in the previous section, a standard rule order is recommended. This follows the structure of a Price rule, followed by an Adjust Percentage rule and a Sum rule. The standard order is often 0, 10 and 20, respectively. This allows adding extra rules for customers if necessary.
Other structures include the product using a Ladder rule to determine the standard pricing, then there will be a Pre-ladder sum before the Ladder rule. An order for these Pricing Rules will often be -5 for the pre-ladder sum and 0 for the Ladder rule. After that, it is wise to use a Sum rule again on order 20 so that any uplifts or discounts are given over the total price for that product.
Any other Pricing Rule constructions will often be made by CloudBilling employees. However, they can be explained during training or inquired about through our different contact options.
Billing Output Tags
Billing Output Tags were mentioned to have an important role in how items show up on the invoice. Billing Output Tags (BOTs) allow both the user as the CloudBilling employee to easily retrieve information from a certain Pricing Rule. Most BOTs are used to retrieve the information on that Pricing Rule to be used in the invoice template. This allows the invoice template to get the correct information based on the tags and print it as a line on the invoice. Additionally, the tags can be used to save specific information on Pricing Rules that is needed by the customer their systems, like a GL code. These customer-specific fields could then be retrieved and printed in an export, for example.
Billing Output Tags were already shown in the Pricing Rules section of this chapter. This section will introduce some of the most used Billing Output Tags that are used by the template. These tags are provided as an overview in Table 1.
Most CloudBilling invoices use a Summary page and a Specification page. Therefore, the tags “Summary” and “Specification” are often used respectively on a SUM rule for the ProductCategory and a SUM rule for the Product rule. The template will then retrieve the Summary tag to print a line on the summary page of the invoice. The Specification tag is, similarly, used to determine what items should be on the specification page. Additionally, a “cat:” tag is often used in combination with a “product category” to determine what section or category a product line item belongs to. A section can then also have a SubTotal line printed based on the combination of a Summary and a SubTotal tag. The last sum rule before the VAT rule will get the tag Total or TotalExclVAT, so that a line item can be printed with the total excluding VAT.
VAT related rules are Adjust Percentage Pricing Rules that use the Separate line item function. These rules use the tags TotalVAT, TotalExclVAT and TotalInclVAT. TotalVAT is placed on the BOTs of the separate line item, while the TotalInclVAT is placed on the BOTs of the rule. This will ensure that the separate line item will print only the VAT, while the normal BOTs ensure that the total including the VAT is also printed.
In Figure Pricing Rules 16, an example of an invoice is shown that shows how these Billing Output Tags relate to the line items that show on the invoice. The blocks will show the line item in question, and the tags will be shown as text.
| Billing Output Tag | Usage |
|---|---|
| Summary | Placing results on the summary page of an invoice |
| Specification | Placing results on the specification/detail page(s) of an invoice |
| cat: | product category Defining a subcategory of products to be grouped on an invoice |
| SubTotal | Placing a result of a group of different products on an invoice |
| Total | Placing the total amount excluding VAT on an invoice |
| TotalVAT | Placing the VAT amount on an invoice |
| TotalInclVAT | Placing the total amount including VAT on an invoice |
Table 1: Commonly used Billing Output Tags

Figure Pricing Rules 16: Example invoice with Billing Output Tags per line item
Scope
The Scope of a Pricing Rule consists of the Product Category and Customer Cluster the rule applies to, in combination with the Valid From and Valid To date. All these fields are used to determine whether the rule should be used in the pricing scheme on a certain invoice. The Product and Customer clusters set in a Pricing Rule, determine respectively the product (cluster) and customers a rule should be applied for, and have an influence on the Rule Order, as explained in earlier sections. Often, a standard set of Pricing Rules that applies to “All Customers” is present. This includes at least one SUM type Pricing Rule for each Product Category.
The Valid From and Valid To fields are date fields that can be used to determine when a Pricing Rule should be applied based on the date and time. The Valid From date indicates the exact second on which a Pricing Rule should start, including the selected second. The Valid To date indicates the exact second after which a Pricing Rule should end. The Valid To includes the indicated date. If a rule should apply until the end of the month, it is recommended to use 01/31/2025 23:59:59 to exclude the first second of the new month.
Often, these fields are used to give a temporary discount or uplift for a certain period. When left empty, the rule will always be valid. To make a rule invalid, a Valid To date can be set to a date in the past.
Grouping and aggregation
The Grouping and Aggregation options exist on the “Group Price” and “Sum” type Pricing Rules and will appear as an additional section to the right of the Pricing Rules, as can be seen in Figure Pricing Rules 11. A more detailed view of the Grouping and the pricing options can be seen in Figure Pricing Rules 17. This section will explain, in more detail, what the different Grouping and aggregation options are.
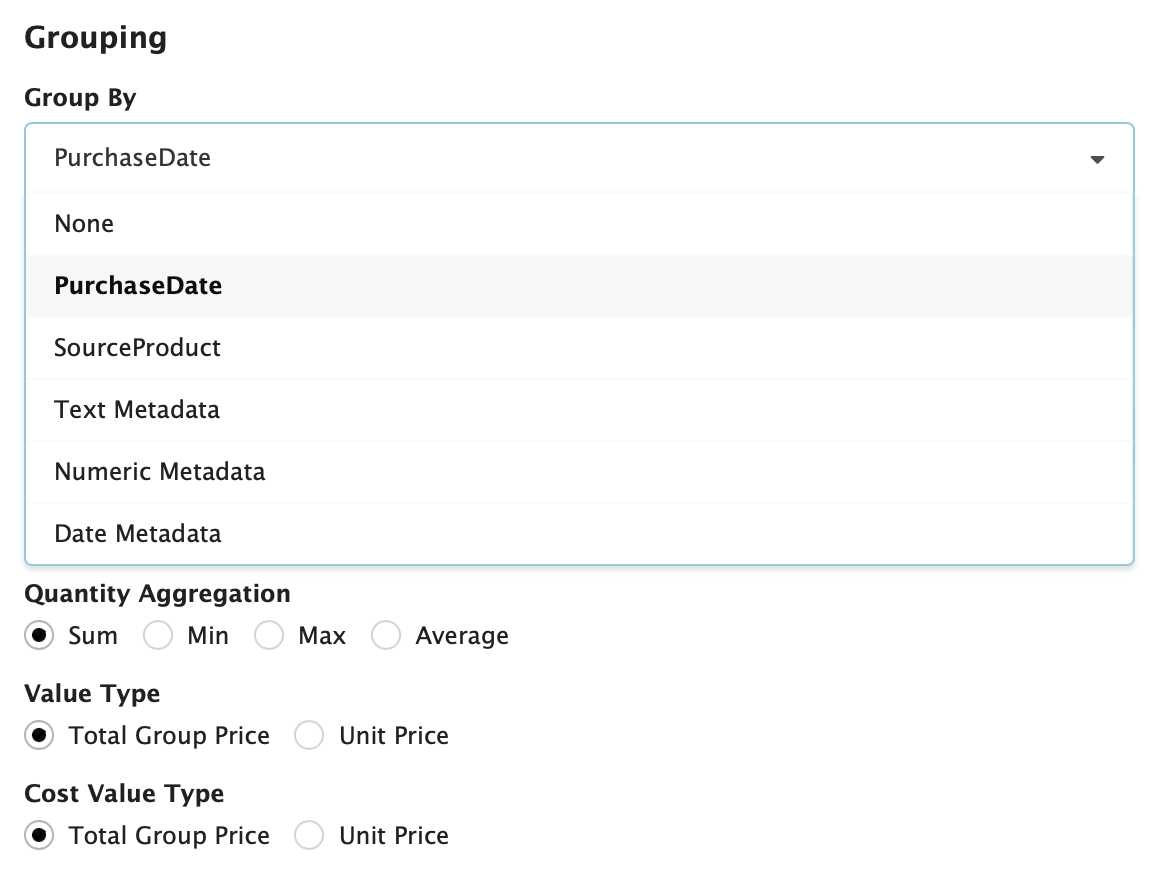
Figure Pricing Rules 17: Grouping and Aggregation options
The Grouping and Aggregation options were also briefly touched upon in the Group Price Pricing Rule section. Grouping can be used to Group purchases on different data values. There are no options selected by default. However, a Pricing Rule of type Group Price or Sum can be used to price a group of products or sum the values of a group of products based on multiple metadata fields, purchase date, or source product.
Grouping can be done on three different types of metadata in the purchase - text, number, and date. The metadata is a key-value pair, where the key needs to be filled out in the Pricing Rule to determine what field to filter on. If multiple keys are specified, the rule will group purchases that match across all the specified keys. The Purchase Date option will group purchases on a specified time granularity, which can be the exact time, hour, day, month, or year of the Purchase Date. The source product will group on the tag name of the Product Category.
Additionally, aggregation options on both SUM and GROUP PRICE type rules are present. The quantity aggregation exists on both these rule types. The quantity aggregation is set to “Sum” by default, but can also be put to Max, Min, or Average. This will have the effect that, respectively, only the maximum, minimum, or average quantity will be taken into consideration for the following Pricing Rules.
The Group price rules provide the option group on value type or cost value type. These aggregations are by default on the Total Group Price, which means that the price of all units together is used. However, they can also be set to Unit Price, which will ensure that the price defined in the value or cost field is used for each unit, for the value unit price and cost unit price, respectively.
Separate line items
Separate line items can be used for Adjust Percentage and Adjust Fixed rules and appear to the right side of the General Pricing Rule settings (Figure Pricing Rules 18). When the box “Separate Line Item” is ticked, the box with Output Tags appears. The separate line-item option can be used to show an uplift or a discount as a line on its own on the invoice. Furthermore, separate line items are also used to show the VAT amount as a line on the invoice. The output tags that are put in this option are, therefore, essential for how these lines are shown on the invoice. This is entirely dependent on how the invoice template is configured. Because of this, it is wise to discuss with your assigned CloudBilling consultant on what tags should be used, or to copy the tags from a Pricing Rule with a similar or the same function.

Figure Pricing Rules 18: Separate line-item option
Tags that are often used on the separate line item are for discounts and VAT rules. These are often configured as “Discount” for rules that give a discount and a combination of “TotalVAT” with “Summary” for VAT rules.
Expressions
Expressions can be found in the additional settings under the “Scope” section (Figure Pricing Rules 19). Four different types of expressions are present: value, cost, rule condition, and item condition expressions. The expression boxes function as small pieces of code, in which C# code can be used to adjust the Pricing Rule information. Often, these pieces of code are provided by the CloudBilling consultant as these can be complex for users that have no experience with coding. If preferred, advanced training is available for users that want to be able to create these types of Pricing Rules themselves.

Figure Pricing Rules 19: Expression option
Value and Cost expressions can use these pieces of code to adjust, respectively, the value or the cost of a pricing rule. To do this, information from the purchase metadata or the customer metadata can be retrieved. A good example of when the value and cost expressions are used are exchange rates. The rule will then retrieve the metadata field “ExchangeRateUsed” to use as a calculation on both the value and the cost. Figure Pricing Rules 20 shows an example of value and cost expressions. The ExchangeRateUsed is a metadata field on the purchase that is retrieved. This number is then used, times 100 and minus 100 to get an appropriate percentage. This percentage is in its turn used in the Pricing Rule on the value and the cost.

Figure Pricing Rules 20: Value and cost expression examples
Rule condition expressions and item condition expressions can respectively be used to determine whether a rule should be applied at all, or whether an item should go through the Pricing Rule. The latter rule is executed on each instance of the rule running on a source item and indicates whether the rule should run for the current source item or not. This condition, therefore, has access to using the source item metadata as well. An example of an Item Condition Expression can be found in Figure Pricing Rules 21. This rule checks whether the quantity of a source item is smaller than or equal to one. If the condition is true, the rule will be used for this item, otherwise the rule will not be applied. Similarly, it can be decided for Rule condition expressions, whether a rule should be applied or not. A rule can, for example, only be applied for a quantity that is higher than a certain number. A second rule should then exist that applies for the items under that number.

Figure Pricing Rules 21: Item Condition expression example
Secondary settings (Rounding, Pro Rata, Advanced)
Additionally, more complex settings are present on Pricing Rules. The secondary settings on Pricing Rules can be found as collapsed options at the bottom of a Pricing Rule. When expanding the sections, the options for the Rounding, Pro Rata, and Advanced sections can be viewed (Figure Pricing Rules 22).
Rounding options allow for a Pricing Rule to either round for the value or the cost. The default setting is “None”. The rounding can also be put to the nearest, meaning that it will either round up, or down, to which value is nearest (0.04 down, 0.06 up). Additionally, the rounding can also be set to always round Up or Down. The banker’s rounding is an option that uses an algorithm for rounding quantities to integers, in which numbers which are equidistant from the two nearest integers are rounded to the nearest even integer. Thus, 0.5 rounds down to 0, while 1.5 rounds up to 2.
Pro rata is a Latin term used to describe a proportionate allocation. This means that the prorated purchase is distributed in equal portions. For the pro rata settings in the Pricing Rules, it will be distributed over a time unit. Pro rata options allow for Pricing Rules to make prorated calculations, the default setting here is also “None”. The “Charge Per” option allows the user to make a prorated calculation on the following time units: second, minute, hour, day, month, year, or billing period. Additionally, the Start or End time can be rounded in the same manners as described for the rounding options.

Figure Pricing Rules 22: Secondary Pricing Rule options: Rounding, Pro Rata, Advanced
The advanced options include the Product Application Level, Override Rule, and Copy Metadata options.
The Product Application Level functionality allows the Pricing Rule to apply to Self, Product Categories or Products. The default of this setting is “Self”. If the Pricing Rule applies to Product Categories, it will apply to only the direct children of the Product Category that is filled out in the Scope of the Pricing Rule. When the Pricing Rule applies to Products, the Pricing Rule will apply to all underlying products of the Product Category that is filled out in the Scope of the Pricing Rule. If the Pricing Rule applies to a Product rather than a Product Category, this setting should not take effect.
The override rule option can be used when this Pricing Rule should be used instead of an already existing Pricing Rule. This can be useful to Override a Pricing Rule only for a specific customer. CloudBilling will, when an override is in place, always decide to skip the rule that is being overridden.
The copy metadata options can be set to None, Optimistic, or Custom. The default is “Optimistic”. This setting determines how metadata is treated in the Pricing Rule Results. When set to None, no metadata will be taken with to the next Pricing Rule Result. The Optimistic option tries to take as much metadata as possible. If the same Key has the same Value for all results, the metadata will move to the next Pricing Rule Result, otherwise it will be lost. The custom option allows manually putting in different metadata keys that should be taken with to the next Pricing Rule Result.