Invoices
Table of contents
The main output of CloudBilling is an invoice for each customer per period. This invoice is, at the core, a set of results of all the pricing rules that were applied to purchases for that specific customer in that specific period. Its most basic form of representation is an XML that lists all these results and their properties. The invoices can be found on the Invoices page.
An invoice in the CloudBilling context is a collection of Invoice Items, or Pricing rule results. Each invoice has a period which is configured in the customer. Additional information from the customer can be retrieved to show as text on the invoice; think about the customer name, address and metadata fields. Each invoice has a revenue total and a cost total, which reflects the current value of the invoice. Due to the real-time processing nature of CloudBilling, invoices are continuously updated. This can be seen by the invoice statuses. The following statuses exist:
- Pending: The invoice is pending calculation. There were changes that caused the invoice to no longer reflect the current situation.
- Open: The invoice is calculated and up to date.
- Approving: The invoice is in the approval process and is locked, preventing it from changing. This allows the user to check whether the information on the invoice is correct and ensure that the finalised invoice will look the exact same.
- Approved: The invoice is approved and ready to be sent out; the invoice will not recalculate any more. An invoice number is generated. This is considered a finished status and cannot be undone.
- Closed: The invoice is closed and will not be sent out; the invoice will not recalculate any more. No invoice number is generated. This is considered a finished status and cannot be undone.
- Error: An error occurred during calculation, the invoice may be recalculated, or support should be contacted if a recalculation does not resolve the error.
The invoices are generated once the customer is first saved. New invoices that should be generated are checked once every few minutes, so the invoices might not immediately generate. The new invoices will generate starting in the month configured in the “Bill From” date on the customer. If Products, Customers and Pricing are in place, purchases should automatically map themselves to the corresponding invoices based on the Purchase Date. The fact that multiple invoices are generated ensures that the full current month can be billed and that earlier months can also be billed, if necessary. The Invoices page can be found by clicking on “Invoices” in the menu bar (Figure Invoices 1). By hovering over this option, the Invoice management page and the Transformation Results page can also be found.
Figure Invoices 1: Invoices menu bar
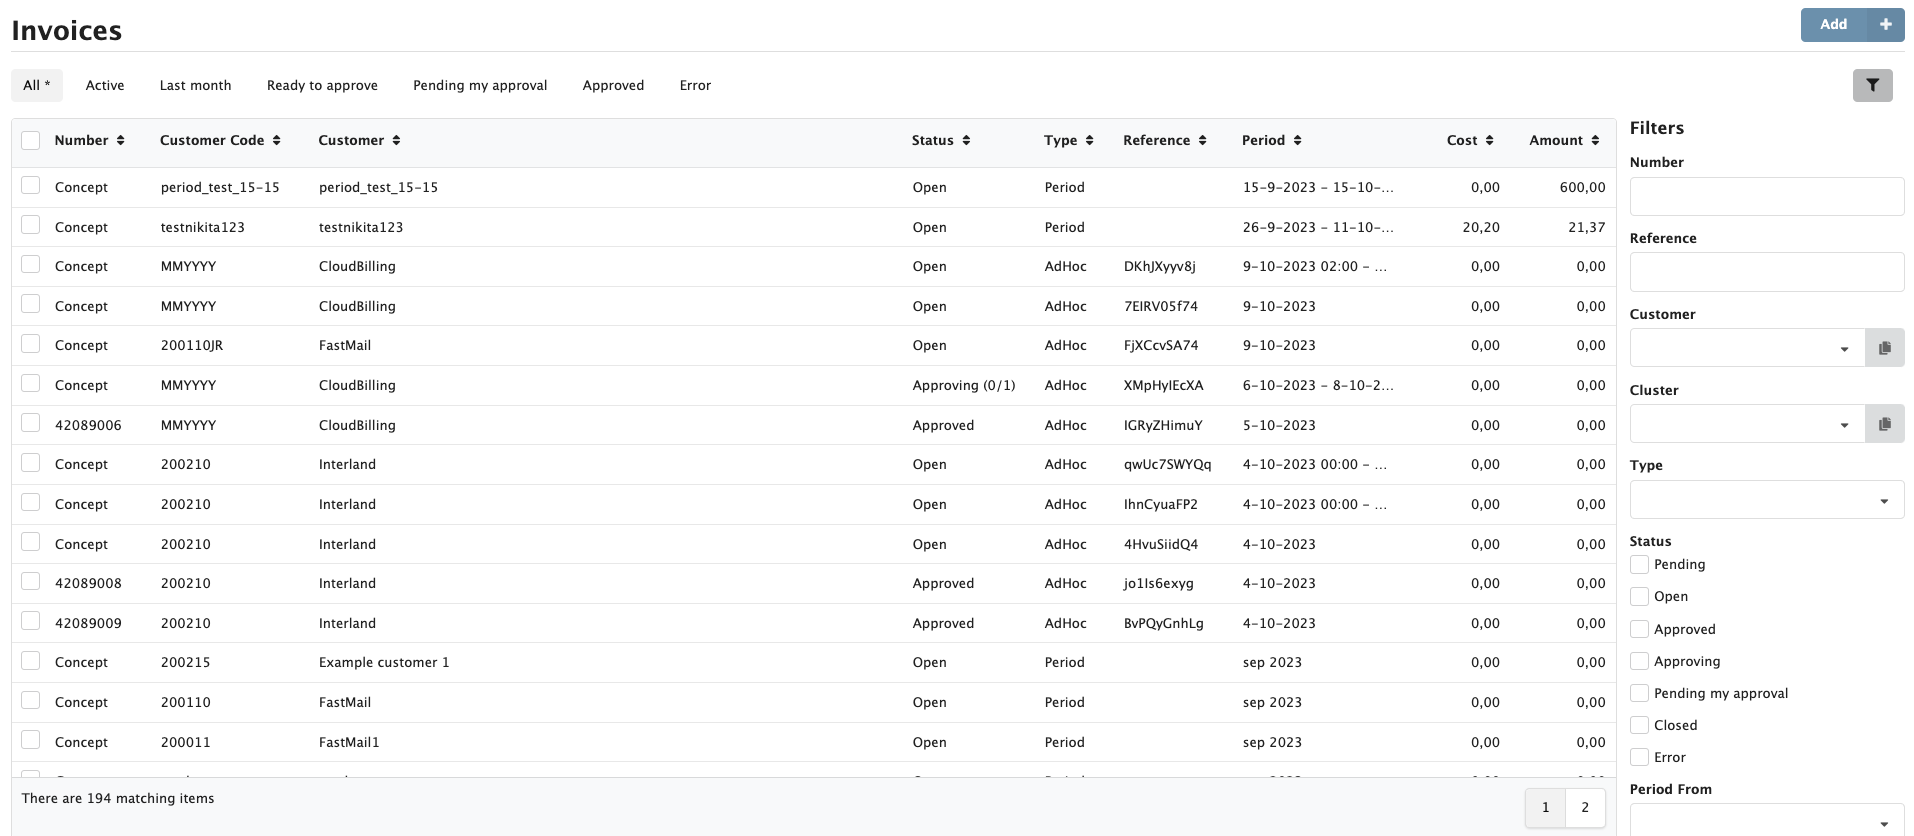
On the Invoices page, an overview can be found of all the invoices (Figure Invoices 2). The first page will show the most recent invoices organised in a table, that can be ordered ascending or descending when a column header is clicked. At the right top of the page, the [Add] button can be used to make an Ad Hoc invoice. Below that are some quick search options, and the option to search with filters.
Figure Invoices 2: Invoices screen
Clicking on the [Add] button will bring the user to the Add Invoice page. Over there, the invoice settings can be configured. All settings shown in Figure Invoices 3 except “Period To” have to be configured. Period To will be automatically filled out as the same date as Period From settings if left empty. An invoice should have a unique reference, which can be used in purchases to route them to this specific Ad Hoc invoice. The Invoice Date will show on the invoice as the date the invoice should be sent out, while the Period From and To dates are used as a period for the invoice. The Customer that is filled out should be corresponding with the customer the invoice is for.
Figure Invoices 3: Add Invoice screen
Back on the Invoices page, the pre-defined search buttons empower the user to have some quick search options (Figure Invoices 2). The default option is set to “All” which means that all invoices are shown without a filter. The remaining options for quick searches are listed below:
- Active: returns all invoices that have status “Open.”
- Last month returns all invoices from the previous month
- Ready to Approve: returns all Open invoices that are ready to be approved.
- Pending my approval: returns all invoices that are pending the user approval.
- Approved returns all invoices that were approved.
- Error returns all invoices that failed at some point in the billing or invoicing process and are now in an error state.
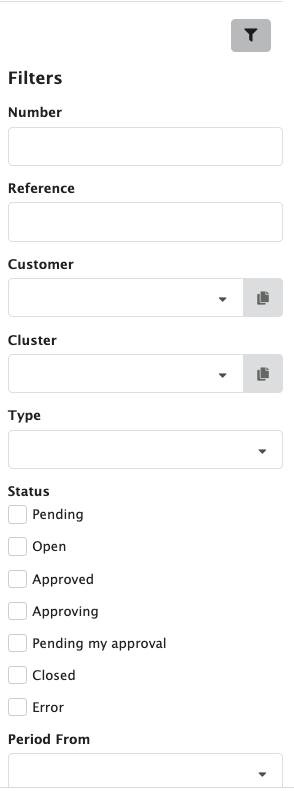
A custom search can be done by using the filters on the right side of the page ( Figure Invoices 4). Most options will help the user by giving suggestions. The user can search for the following options:
- Number: find an invoice with a specific number.
- Reference: find an invoice with a specific reference.
- Customer: find all invoices for a specific customer.
- Cluster: find all invoices for a particular customer cluster and the descendants of that cluster.
- Type: find all invoices for a specific type (Period, AdHoc, Credit).
- Status: find all invoices that match a specific status (Pending, Open, Approved, Approving, Pending my approval, Closed, Error).
- Period From: find all invoices whose period started on or after the date specified.
- Period To: find all invoices whose period ended on or before the date specified.
- Amount From: find all invoices whose amount is equal or higher than the value specified.
- Amount To: find all invoices whose amount is less or equal to the value specified.
- Approved From: find all invoices whose approval date was on or after the date specified.
- Approved To: find all invoices whose approval date was on or before the date specified.
- Sent by e-mail: find all invoices that were or not sent by email.
- Only empty invoices: find all invoices that have no purchases assigned.
These filters can be combined in searches for invoices.
Figure Invoices 4: Filter options invoices
This paragraph will go into detail on the information shown in the table. An invoice will get an Invoice Number only when it gets moved from the “Open” status to the “Approved” status. The Customer Code and Customer Name that the invoice is related to can be seen, respectively, on the second and third colum. The status of the invoice can be seen on the fourth column. The Invoice Type can be seen in the fifth column. If an invoice is not of the type Period, but AdHoc, a reference will exist in the sixth column of the table. The Period column shows the timeframe that the invoice refers to, and the Cost and Amount are the totals of the invoice.
When selecting the checkbox on the left side of an invoice row, some actions can be applied to the invoice (Figure Invoices 5).
Figure Invoices 5: Buttons invoices table
The buttons will do the following:
- Request Approval: request approval for the invoice.
- Approve: approve the invoice.
- Reject: reject the approval of the invoice.
- Close: close the invoice.
- E-mail: trigger the messaging process.
- Transform: execute a transformation on the invoice.
Approving and Closing invoices is irreversible. Once an invoice is Approved or Closed, there is no way to undo it. This is enforced to ensure invoice number continuity.
Ad Hoc Invoices in CloudBilling
CloudBilling generates standard period invoices at the first day of each new period. An invoice period might be several Days, Months, or Years. Besides standard periodic invoices, CloudBilling also supports Ad Hoc invoices, which enable users to create invoices manually when needed. This functionality may be used for one-time charges, credits or corrections, or special billing scenarios that fall outside the regular invoicing cycle.
Steps to Create an Ad Hoc Invoice
- Navigate to the Invoices page from the main menu.
- Click on the
[Add]button at the top right of the page. - On the Add Invoice page, fill in the following details:
- Select the Customer for whom the invoice is intended.
- Enter a Unique Reference for tracking purposes. This will become the Invoice Reference. Purchases may be added to this invoice using the Ad Hoc invoice reference.
- Set the Invoice Date, which may show up as the Invoice Date on the invoice, depending on the installed template.
- Define the Period From and Period To dates for the invoice. This may show up as “Period” on the invoice, depending on the installed template.
- Review all entered details to ensure accuracy.
- Click Save to generate the invoice.
Managing and Tracking Ad Hoc Invoices
Once created, Ad Hoc invoices appear on the Invoices page. This is also the place where your newly made Ad Hoc Invoices may be managed. The Ad Hoc invoices functions in the same manner as Period Invoices once generated. If changes are made that impact the invoice, the invoice will recalculate and the Invoice Approval Process must be followed to approve this invoice. Purchases will not automatically attach to this invoice, but may be explicitly added by providing the Invoice Reference on the purchase.
Invoice Viewer
The invoice viewer can be accessed by clicking on the row of the invoice to be checked. The invoice viewer will contain a standard header, several tabs that show the options, and a view of the template that is in the environment ( Figure Invoices 6).
The Invoice Viewer will open an example of what the invoice looks like with the current set-up, with the Default view opened first. It can be that there multiple templates are present that can be accessed through the invoice viewer. In that case, there will simply be more clickable tabs in the invoice viewer. The Transformations shows tab shows a list of transformations that exist for the invoice. On the same tab is also possible to execute new transformations. The Details will show a collapsible and expandable tree view of the invoice line items. This section can also be used for troubleshooting faulty invoices, triggering Recalculations of the invoice, or triggering Downloads of the invoice XML. Lastly, the History tab shows all the history of actions performed on the invoice.
Figure Invoices 6: Example view invoice viewer
If an up-to-date PDF transformation result exists for this invoice, this will be shown by default. In that case, the user can switch between the PDF and live preview of the invoice on the bottom of the invoice Figure Invoices 7.
What the invoice looks like is entirely dependent on the template that is uploaded in the environment and can, therefore, be adjusted to the wishes of the user. The templates are often not made or kept up to date by the user, but rather by the CloudBilling consultant, since the code the template exists of is CloudBilling-specific.
Figure Invoices 7: Switch to live preview button
On the right side of the screen, a Summary section can be seen with information about the invoice status, its period, amount and cost, and also a link to all the purchases assigned to the invoice. The Activity section shows the latest activity on the invoice.
Transformation results
The information on an invoice often needs to be represented in different formats for different purposes. The standard transformation of an invoice can be viewed in the Invoice Viewer on the Invoices page. This transformation is dynamically created, which means it is not a PDF yet. The PDF version of an invoice comes into existence once a PDF Transformation is applied to the invoice. Additionally, it could be that an export is needed in a CSV format for an overview of the totals and costs per category, or a general ledger export for an external general ledger system. These transformations will be saved in CloudBilling on the Transformation Results page (Figure Invoices 9). The transformation results page shows all the transformations that have been made for any invoices.
Figure Invoices 9: Transformation results screen
The aim of the transformation system is to enable generation of different representations of the same underlying invoice data. To this end, we use transformation templates, which use the Razor view engine, to transform the invoice information to any text-based format. Additionally, provided the text format is HTML, the platform allows for a PDF transformation to be performed by generating a PDF as a result.
The table on the transformation page shows the similar information as the Invoices page. Some additional information is present about the customer, invoice period, the used transformation and template, the channel, status of the transformation, created date and a last processed date when the invoice is Completed. The invoice can then be saved, deleted, recalculated and multi-select transformation results with the buttons, respectively, from left to right.
Invoice Approval
The default invoice approval process consists of the following steps:
- Requesting approval for an invoice or a selection of invoices. Executing this step will lock the invoice(s) by putting them in the Approving status.
- The invoice is ready for approval. The invoice can now be checked for correctness. Every CloudBilling user that belongs to a user group with invoice approval permission can approve the invoice.
- The invoice is Approved and an invoice number is assigned.
Between step two and step three, more reviewers may be added to the invoice approval process. This allows for multiple users with different rights to get notified and check the invoice before it becomes finalised.
If the invoice is rejected, the invoice will be reopened by moving from the status Approving to Open. This will automatically recalculate the invoice to reflect any changes that might apply.
If a process with multiple reviewers is set up in the Invoice Approval Processes, approving the invoice will notify the next reviewer. Rejecting the invoice will send it back to the prior reviewer. If the last required reviewer approves the invoice, the invoice will become Approved and get an Invoice Number. If the first reviewer rejects, the invoice will be reopened.
At the end of the period, Invoices must be Closed or Approved. Invoices should be Closed when they should not receive an Invoice Number and Approved when they should receive an Invoice Number. This is to prevent large batches of Invoices recalculating when changes are made in the environment.
Credit and Correction Invoices
If an invoice is approved, no further changes can be made to it. However, if the approved invoice is incorrect, the credit and correction functions are used to fix it. First, a full credit invoice is created for the incorrect invoice. Note that this will only be a full credit for the entirety of the invoice. Then, a correction invoice can be created. The correction invoice will be an adhoc invoice with copies of purchases from the incorrect invoice. These purchases can then be edited because the correction invoice will be in the ‘Open’ status. Initially, only the [Create Credit Invoice] button will be active for the approved invoices. Only when the full credit invoice is created and approved, the [Create Correction Invoice] button will be active.
Figure Invoices 10: Credit & Correction Invoice Buttons
Follow the steps below to create Credit and Correction Invoices.
- Click on the incorrect invoice to open it in invoice viewer. Here you will find the [Create Credit Invoice] and [Create Correction Invoice] buttons in the top right corner of your screen.
- Creating a credit invoice:
- Click on the [Create Credit Invoice] button. A dialogue box will open asking for confirmation.
- Click [Credit] to generate a credit invoice with negative values. The Summary section contains the invoice number of the incorrect invoice. This feature only supports creating a full credit.
- Double check if the credit invoice is correct and approve it. Only then, the correction invoice can be created.
- Creating a correction invoice:
- In the invoice viewer of the incorrect invoice, click [Create Correction Invoice]. A dialogue box will open asking for confirmation.
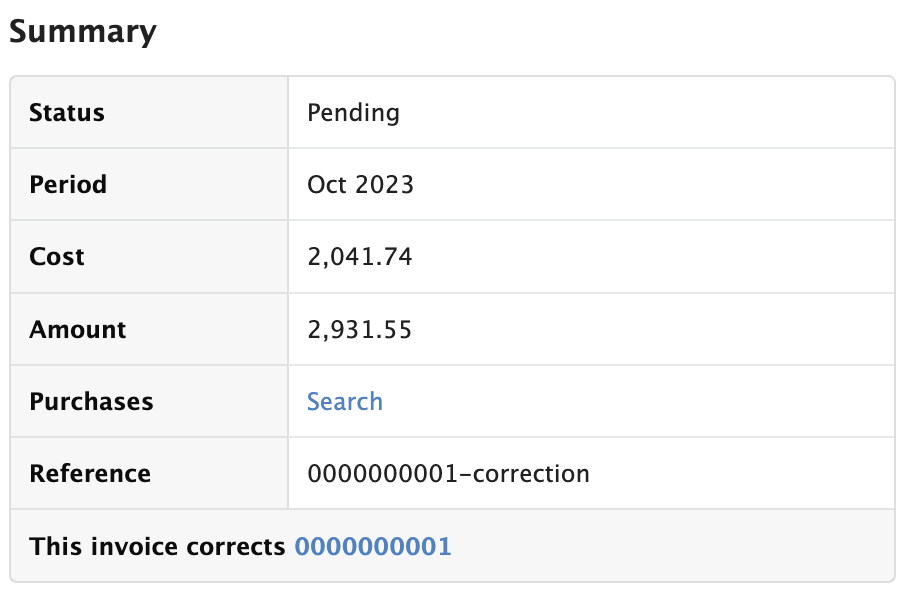
- Click [Correct] to generate an ad-hoc correction invoice. The Summary section contains the incorrect invoice number, total amount, and a link to related purchases.
- Click on Search to view and modify purchases in the invoice. New purchases must be manually linked to the correction invoice using the invoice number.
Figure Invoices 11: Correction Invoice Summary
CloudBilling also offers an option to perform partial crediting instead of full crediting. Note that partial crediting is not available as a separate function but can be configured depending on the requirements. Please contact our support team if configuration for partial crediting is required.


