Setting up a new GCP Connector
This documentation aims to provide the necessary steps to set up the CloudBilling GCP connector. For the setup in CloudBilling the Google Cloud Platform setup for export billing data needs to be completed.
Prerequisites
The CloudBilling GCP connector uses the export functionality of GCP Billing to BigQuery. Before a connection can be established, the GCP account which will be connected to needs to be set up with the correct permissions. To perform the following steps the user account that will be used needs at least the following permissions:
- BigQuery Admin
- BigQuery Job user
- BigQuery user
- Billing account admin
- Organisation admin
- Organisation role viewer
- Project billing manager
- Service account admin
- Service account key admin
- Service usage admin
- View service accounts (iam.serviceAccounts.list)
This account also needs to be logged into the GCP Console. When logged into the Google account a user with the correct rights should be able to see the “Console” button at the right top of the screen as depicted below.
Figure GCP 1: GCP Console button
For a more detailed guide on setting up the GCP Billing Exports to BigQuery, also refer to the documentation of Google.
Step 1: Create a new Billing Project on Google Cloud Platform
The Billing project contains the datasets for the billing exports and controls what services and users should have access to the billing exports.
-
Firstly, create a new project within Google Cloud Platform (GCP) or select an existing one. This can be done by clicking the blue button with the text “Create or select a project”.
Figure GCP 2: GCP Create or select a project button
-
In the left hand top of the screen there is a Hamburger menu that can be used to navigate to the Billing page. On the Billing page check whether Billing is turned on. Turn it on if it is still turned off. If Billing is turned off you will see a button with “Enable billing”. If you don’t have a billing account, create one. Select your location, fill out the form, and click Submit and enable billing.
-
Through the same Hamburger menu travel to the section APIs and Services > Enabled APIs and services to turn on the BigQuery Data Transfer API and the Cloud Billing API. This second one will be used to fetch the billing account ids and customer names of the reseller account.
-
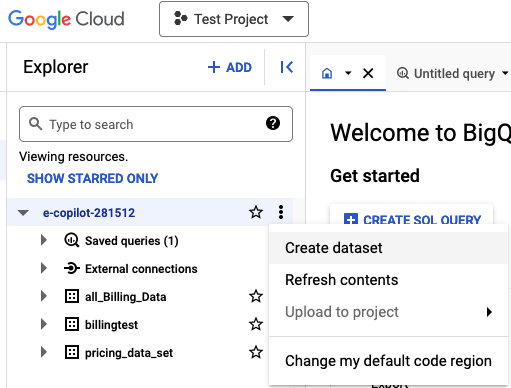
Following this a BigQuery dataset for the billing data needs to be created. To do so, travel to the BigQuery page and select the project you want to use in the Explorer panel. Click on the three dots to Create a new dataset. Give it a recognisable name (e.g. all_billing_data). If no project exists yet, a new one should be created first.
Figure GCP 3: GCP Create dataset button
-
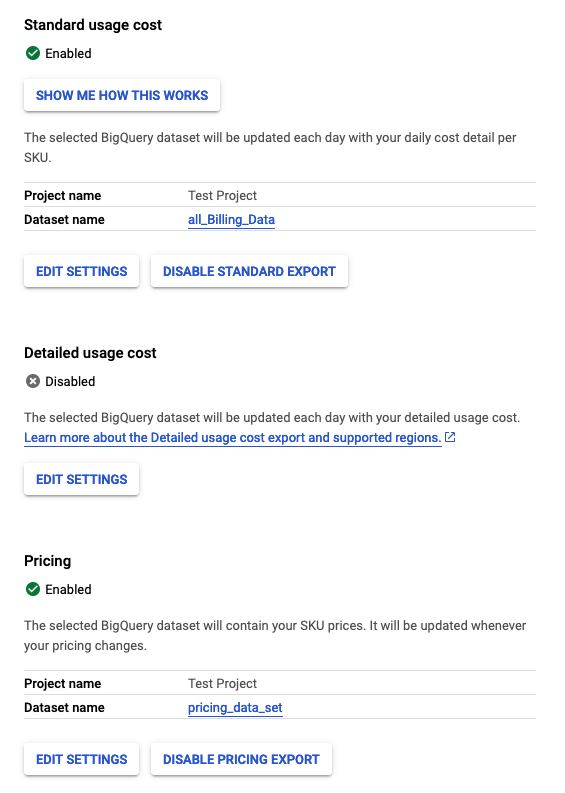
Travel back to the GCP Billing page using the hamburger menu. Enable the Cloud Billing Export to the BigQuery dataset. It is required to enable both the Standard usage cost (previously Daily cost detail) and the Pricing export.
Please note that it can take up to 48 hours for the first billing export items to appear in the BigQuery dataset.
Figure GCP 4: GCP Example settings datasets
Step 2: Create a GCP service account
To communicate with the Google Cloud Platform the CloudBilling GCP connector uses a separate service account. A service account comes with the possibility to generate a private key to authenticate connections with the Google Cloud Platform. The following steps need to be followed to set up this service account and generate a private key.
- Using the hamburger menu at the left top of the page, travel to IAM & Admin > Service Accounts. On this page, click the button Create Service Account at the top of the page.

Figure GCP 5: GCP Create service account button
-
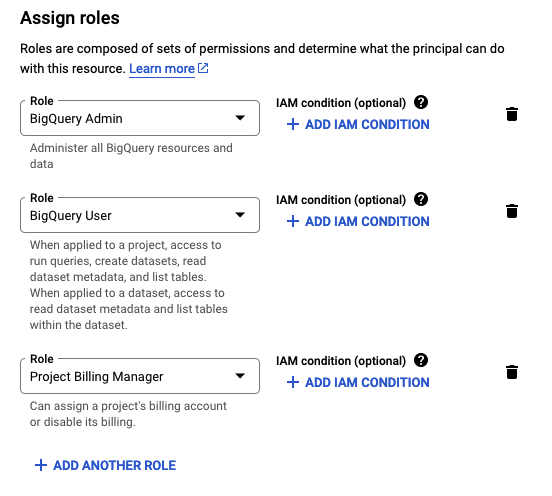
Travel to IAM & Admin > IAM to provide the service account with the appropriate roles. This service account needs the following roles: BigQuery Admin, BigQuery User, and Project Billing Manager.
Figure GCP 6: GCP Roles Service Account
-
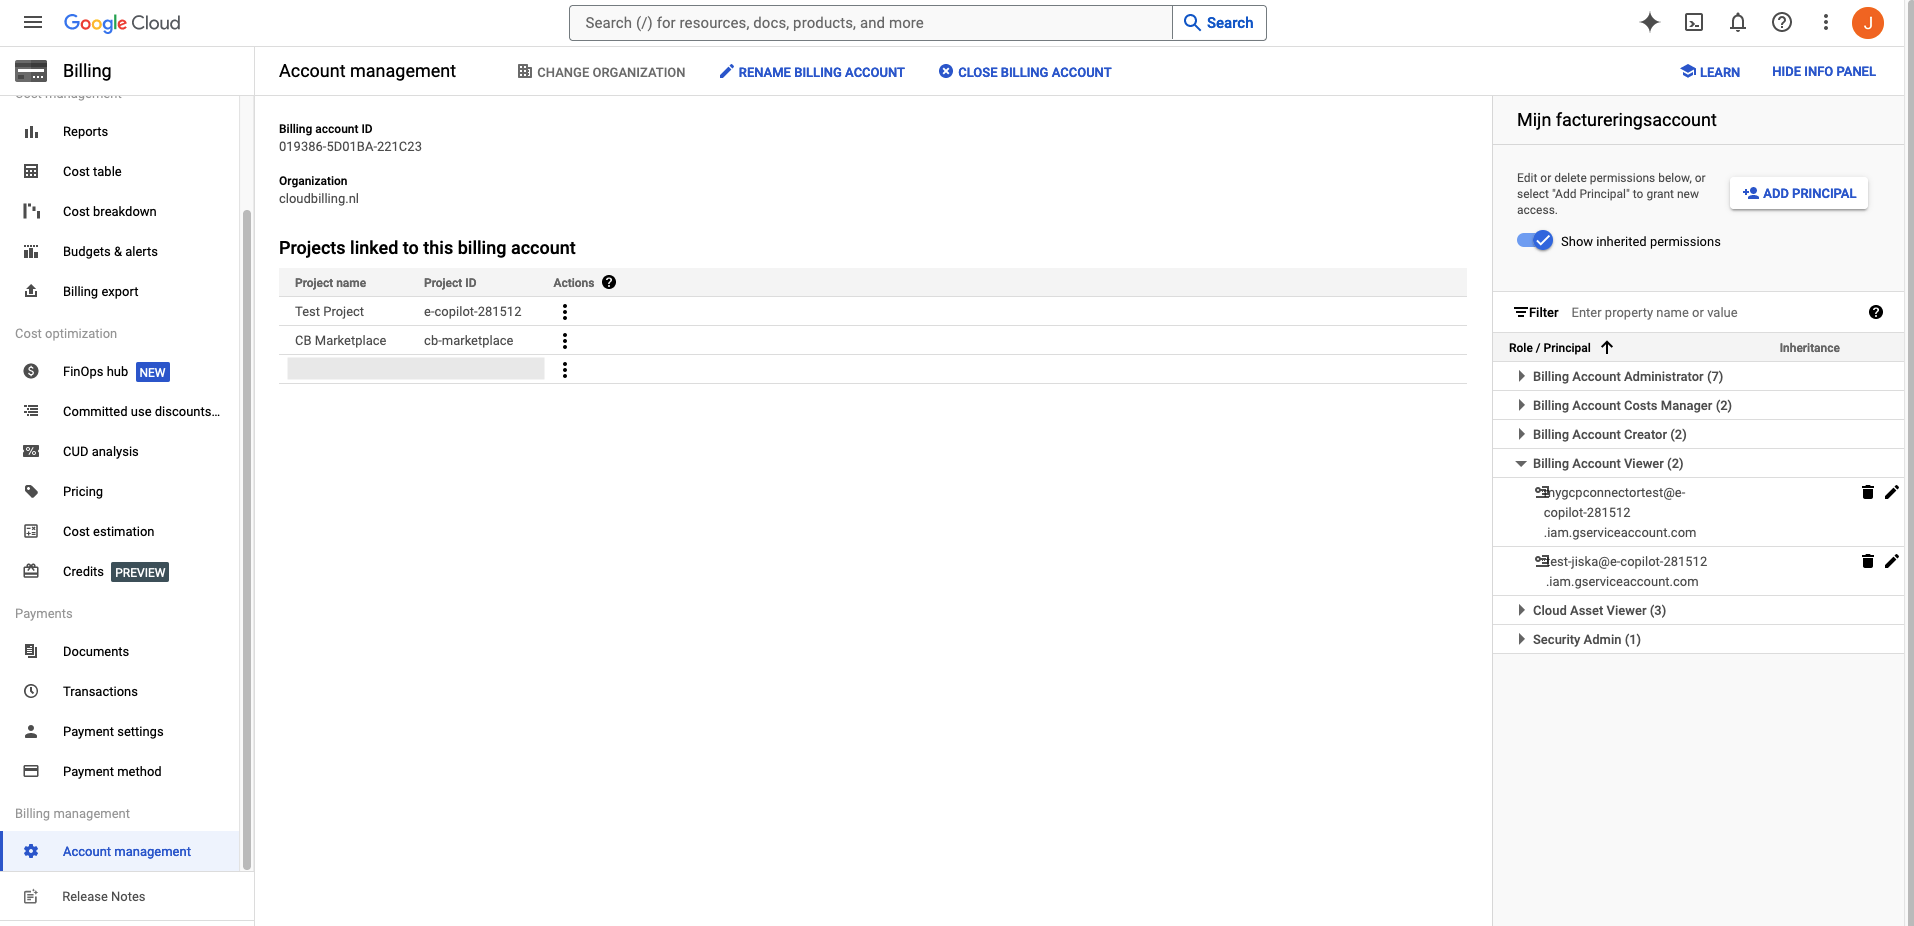
Travel to the Billing account by clicking on Billing in the hamburger menu. Scroll all the way down in the left bar to find Billing management > Account management and go to Account management. At the right top the button “Add principal” can be used to setup additional roles/principals. Give your service account the Billing Account Viewer role.
Figure GCP 7: GCP Roles Service Account
-
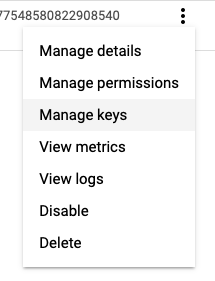
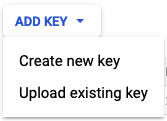
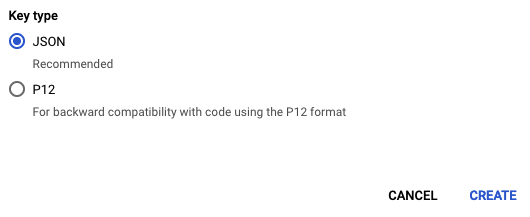
After the service Account is created it will appear in the list of Service Accounts on the page IAM & Admin > Service Accounts. On the right side of the table it will have three dots in the column Actions click these three dots and select Manage Keys > Add key > Create new key to add a new key to the service account with the type JSON.
Figure GCP 8: GCP Manage Keys button
Figure GCP 9: GCP Create New Key button
Figure GCP 10: GCP JSON Type Key
The key is automatically created and downloaded to your computer. This key is needed later to set up the CloudBilling GCP connector. It is most easily used if opened in a text editor. Always store keys in a safe location or delete them once they are entered into the CloudBilling GCP connector.
Step 3 Set up the CloudBilling GCP Connector account
The Google Cloud Platform settings should now be fully set up. This section will describe the steps that need to be performed in the CloudBilling environment to set up the connector. A prerequisite is that the GCP connector is turned on in the environment by a CloudBilling Admin.
-
To start with the set-up of the CloudBilling GCP connector travel to the Connectors page and select the GCP connector > Connector Settings.
-
On this page click the Add button at the top of the page to start setting up a new connector account.
-
The CloudBilling GCP Connector Account details that need to be filled out are the following fields:
- Account Name: A customisable name for the CloudBilling GCP Connector account. This can be any string.
- GCP Application Credentials: The fields Client Email, Private Key ID, and Application Credentials belong to this section. We will only fill out the Application Credentials by copying the information from the JSON file into this field. The other two fields will be populated automatically after the connector setup is saved.
- GCP Connector Settings: The fields Project ID, Billing Export Table Name, and Pricing Export Table Name belong to this section.
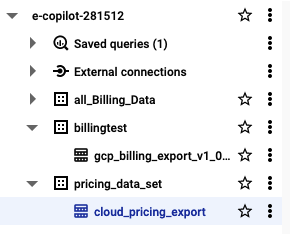
- The Project ID is the name of the project in which the billing data set was created. It can be found on the BigQuery page Explorer (in the image this name is e-copilot-281512).
- The Billing Export Table Name is the name of the dataset table where the billing items reside. This name is a combination of the schema name and the data table name like schemaname.datatablename (in the image this would be billingtest.gcp_billing_export_v1_0).
- The Pricing Export Table Name is the name of the dataset table where the pricing items reside. This name is a combination of the schema name and the data table name like schemaname.datatablename (in the image this would be pricing_data_set.cloud_pricing_export).
Figure GCP 11: GCP Name examples
Ensure to tick the enable checkbox to enable the GCP account. When this checkbox is unticked the account will be disabled and not retrieve any data.
Step 4 Set up the CloudBilling GCP Connector settings
Once the CloudBilling GCP connector account is set up the settings of the connector can be enabled. These can be found to the right side of the page under Connectors > GCP Connector > Connector Settings. The connector has the following settings that should be set up:
- Start reading from (n) days: Standard setting of zero (0), the connector then fetches the new data that was added by Google since the last run. When this field is set to a positive number, the connector will try to fetch data from that number of days in the past. After the connector ran once with this setting, it will automatically turn back to the default value of zero (0).
- Perform GCP Products and Pricing Maintenance: The checkbox enables maintenance for the connector. Maintenance is performed before reading new purchase data and requires multiple fields to be set up. A prerequisite is that a Product Cluster should exist to stream the GCP products to.
- Product Cluster: The parent product cluster to use when products are added by maintenance, should be “Google Cloud Platform”.
- Customer Cluster: The parent customer cluster for the pricing rules added by maintenance, should be “All Customers” in most cases.
- Default Margin: The default markup value to use when no custom margin is set on the customer.
- Reseller Discount: The default reseller discount to use.
- Billing Output Tags: The BOTs that are used to add to pricing rules that should be shown on the invoice. Usually “Summary” and “cat:Google Cloud Platform”.


