Administration
Table of contents
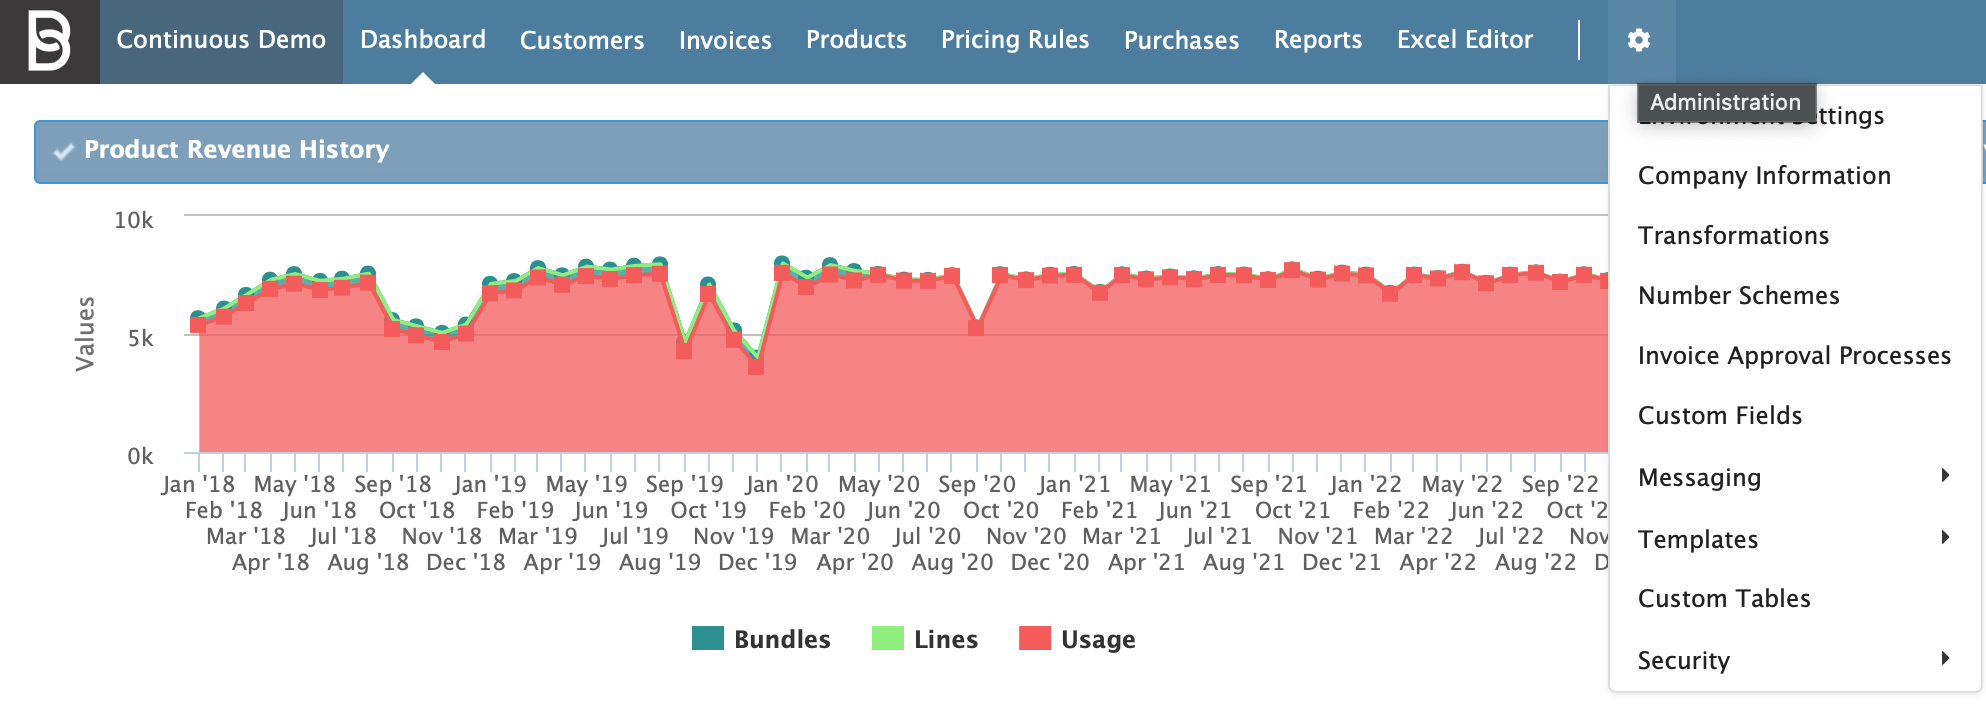
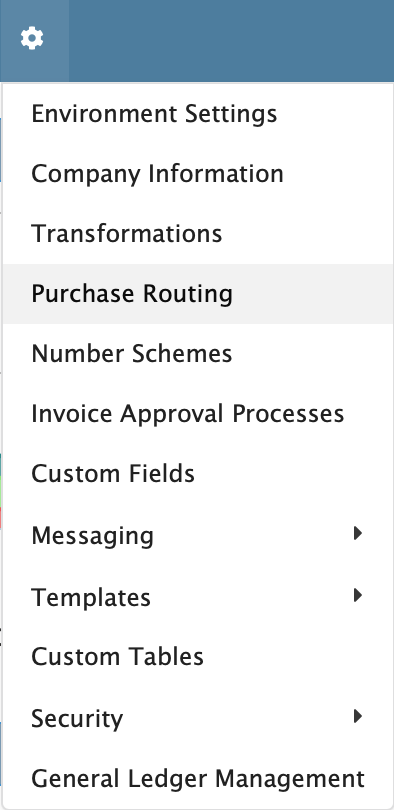
The administration options can be found under the cogwheel icon in the menu banner of the CloudBilling environment, as can be seen in Figure Administration 1. When hovering over the cogwheel, a description will show up with the text “Administration”. Additionally, a drop-down menu will open with several options. The options will all lead to different pages of CloudBilling. When an option has an arrow sign next to it, multiple pages for that option are available. Messaging will be explained in Chapter Performing a message run, as this is a process on its own rather than only the Messaging options.
Figure Administration 1: Administration button with the drop-down menu
Environment Settings
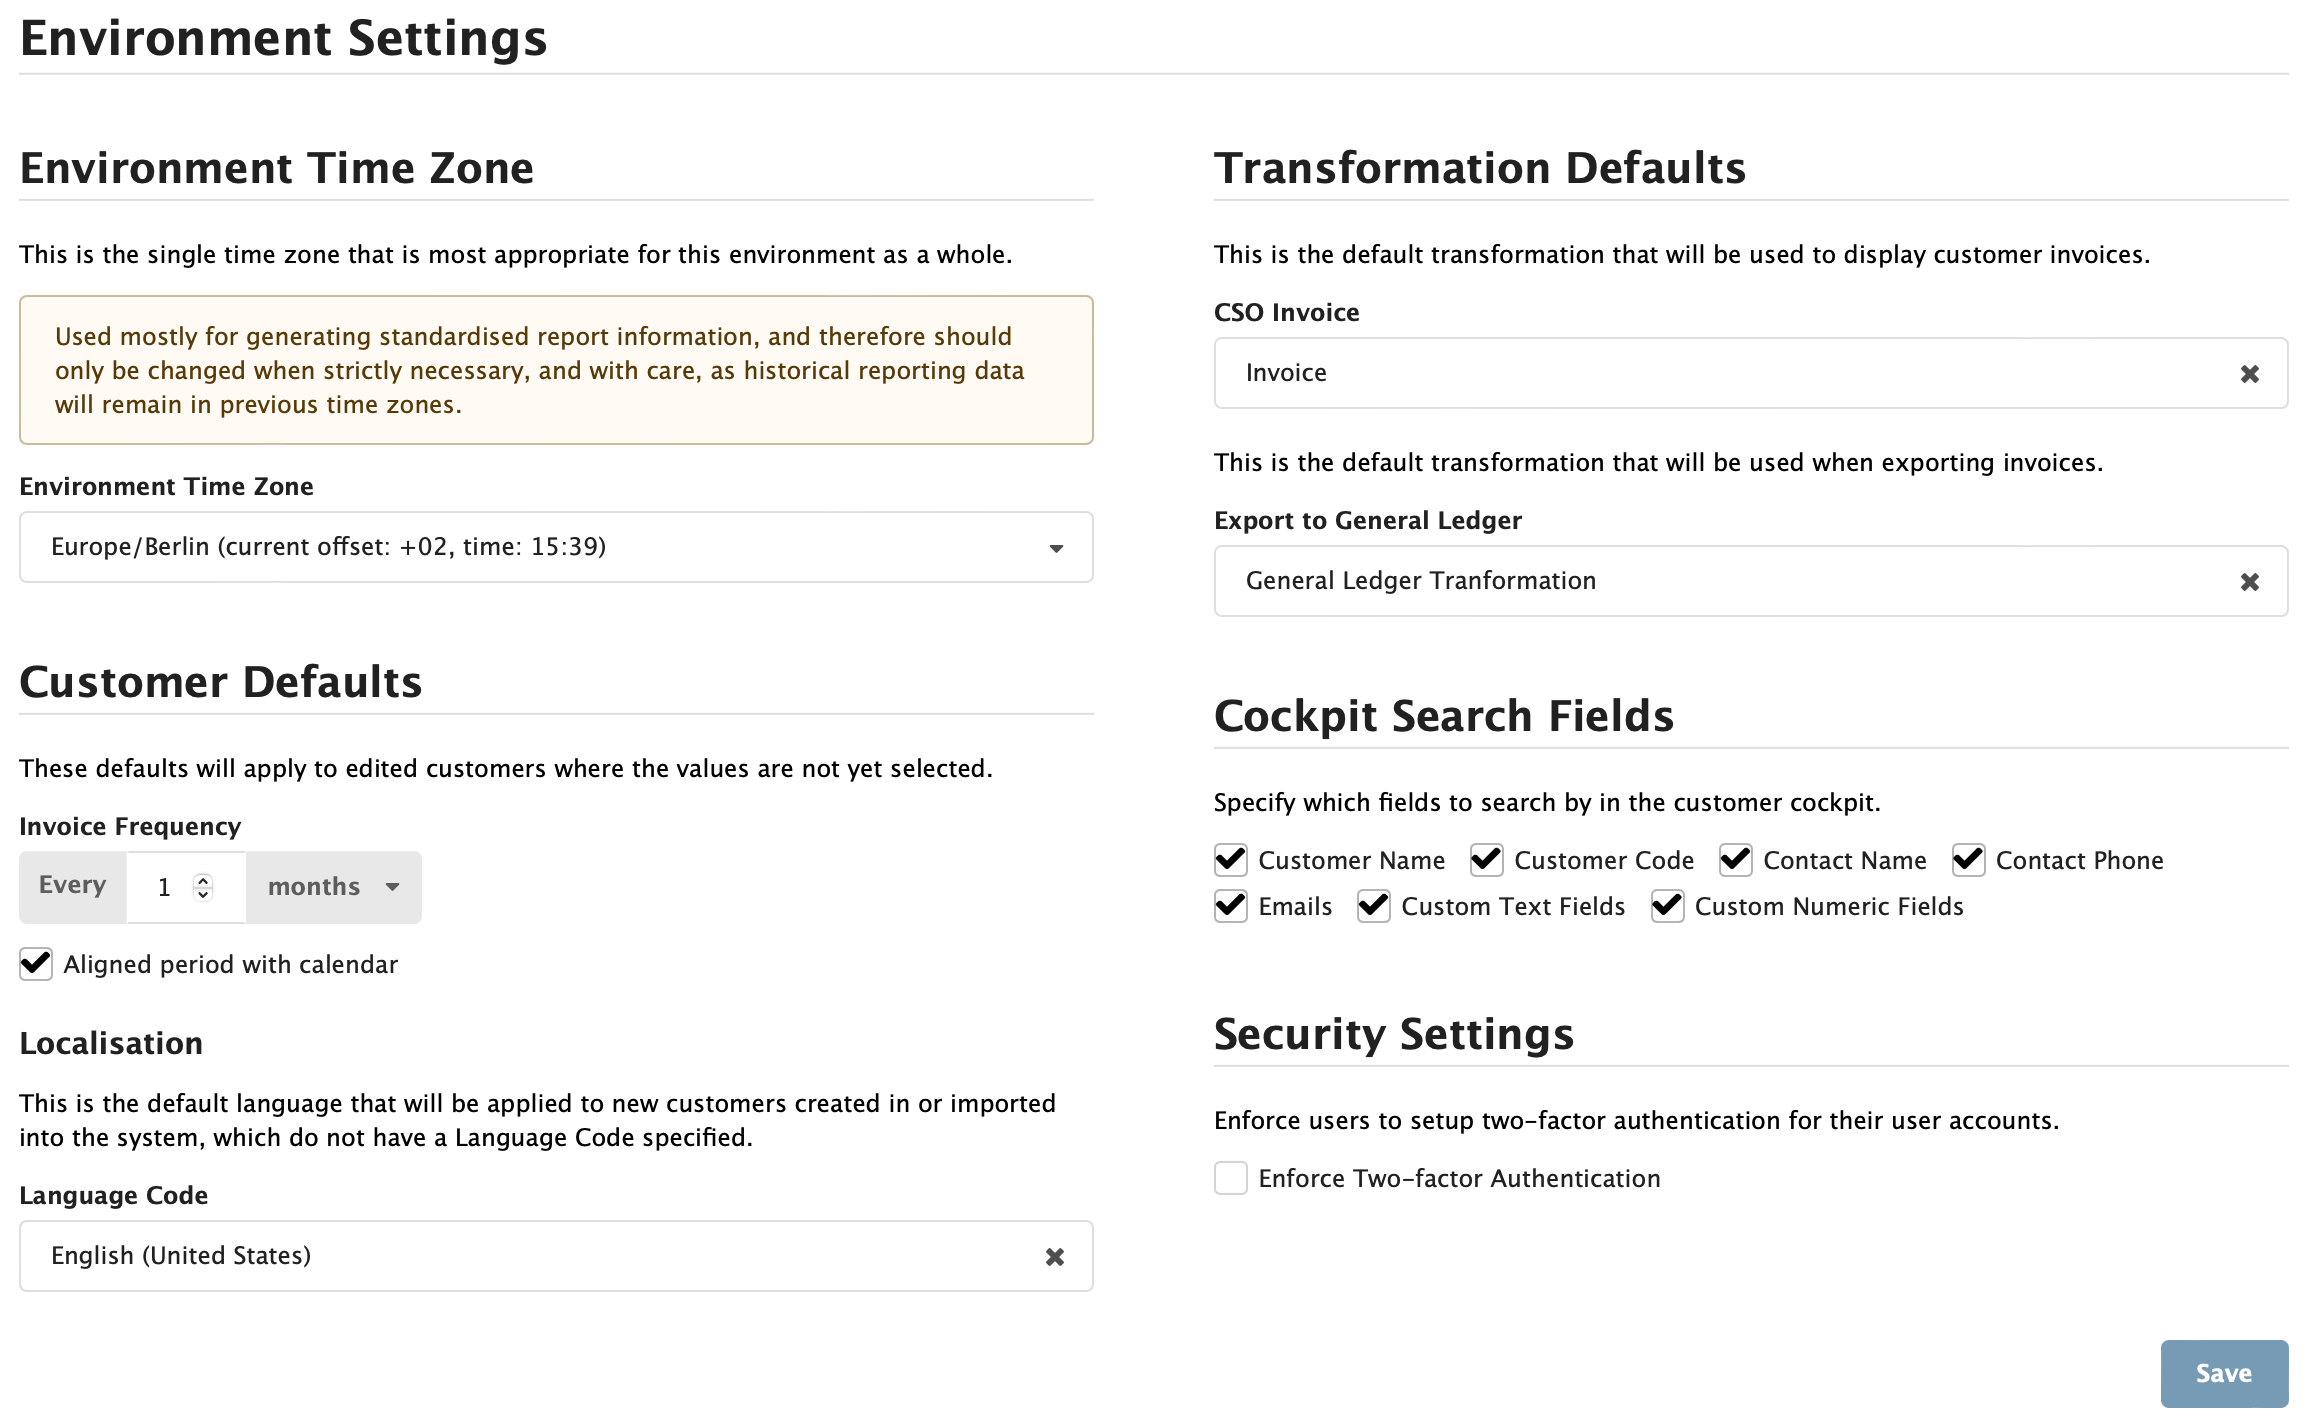
The environment settings can be found under Administrations (Figure Administration 1) as the first option in the drop-down menu. In Figure Administration 2, an overview of the page is shown. Five sections are present on the environment settings page: Environment Time Zone, Customer Defaults, Transformation Defaults, Cockpit Search Fields, and Security Settings. These sections can be used to set up different aspects of the entire CloudBilling environment. The functions of the different sections are explained through a bullet list below:
- Environment Time Zone
- Allows the user to set the time zone of the environment; usually this will be the time zone that the CloudBilling user their company is situated in.
- Customer Defaults
- Allows the user to set the standard invoice frequency for customers.
- Allows the user to set the standard Language Code used for customers.
- Both these settings ensure that a newly made customer uses this standard frequency and language code. They can, of course, be changed on the customer still.
- Transformation Defaults
- Allows the user to set the default transformation for all invoices in CSO Invoice.
- This is the invoice transformation used in the view page to show the invoice.
- Allows the user to set a default Export to General Ledger transformation.
- Allows the user to set the default transformation for all invoices in CSO Invoice.
- Cockpit Search Fields
- Allows toggling which fields can be searched on in the Customer Cockpit.
- If all left unticked, only the name can be searched on.
- Security Settings
- Allows the user to toggle on and off whether two-factor authentication is used for the environment.
Figure Administration 2: Environment Settings screen
Company Information
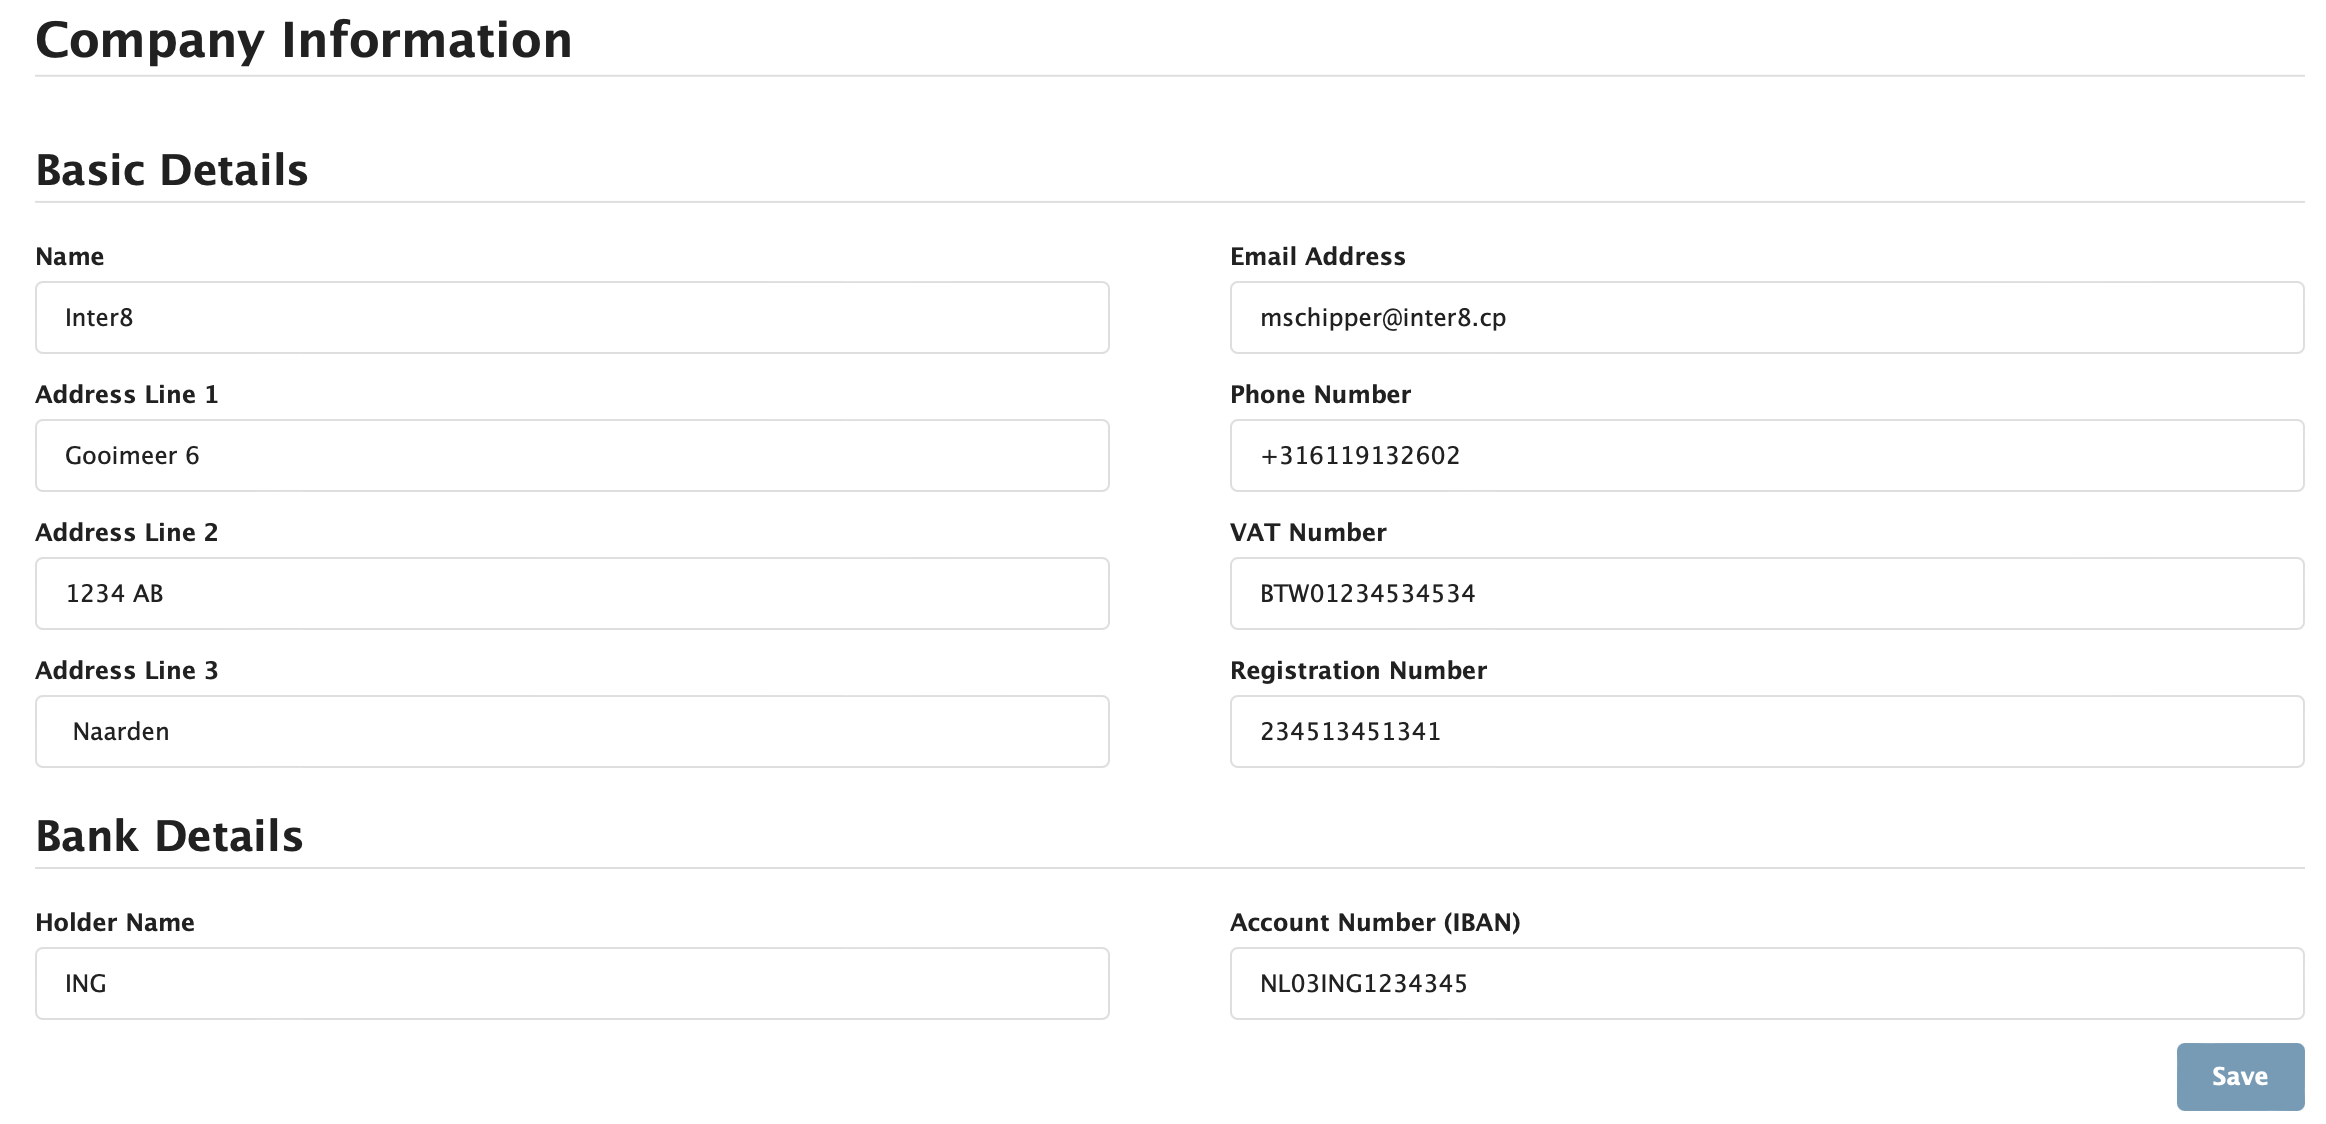
The Company Information page includes the Basic Details and Bank Details of the CloudBilling user their company. Information of the company can be saved on this page; this information can be displayed on the invoices. As can be seen in Figure Administration 3, the Basic Details include the company name, address lines, email address, phone number, VAT number, and registration number. The Bank details include the holder name and the bank account number (IBAN). It is recommended to use this page to save company information as the fields can be retrieved in the template to display the information on the invoice. This allows the user to change their own information dynamically.
Figure Administration 3: Company Information screen
Transformations
On the transformation page, new transformations can be added and existing transformations can be adjusted (Figure Administration 4). A transformation always uses a template, so before a transformation can be made, at least one template should exist in the environment. Transformations are most often made by the CloudBilling consultant. This page can, however, be used to review transformation settings. A transformation indicates how the environment should use a certain template to turn the information from the pricing rules into a result. It transforms raw data into usable and readable information for users.
Figure Administration 4: Transformations screen
Adjusting or making a transformation
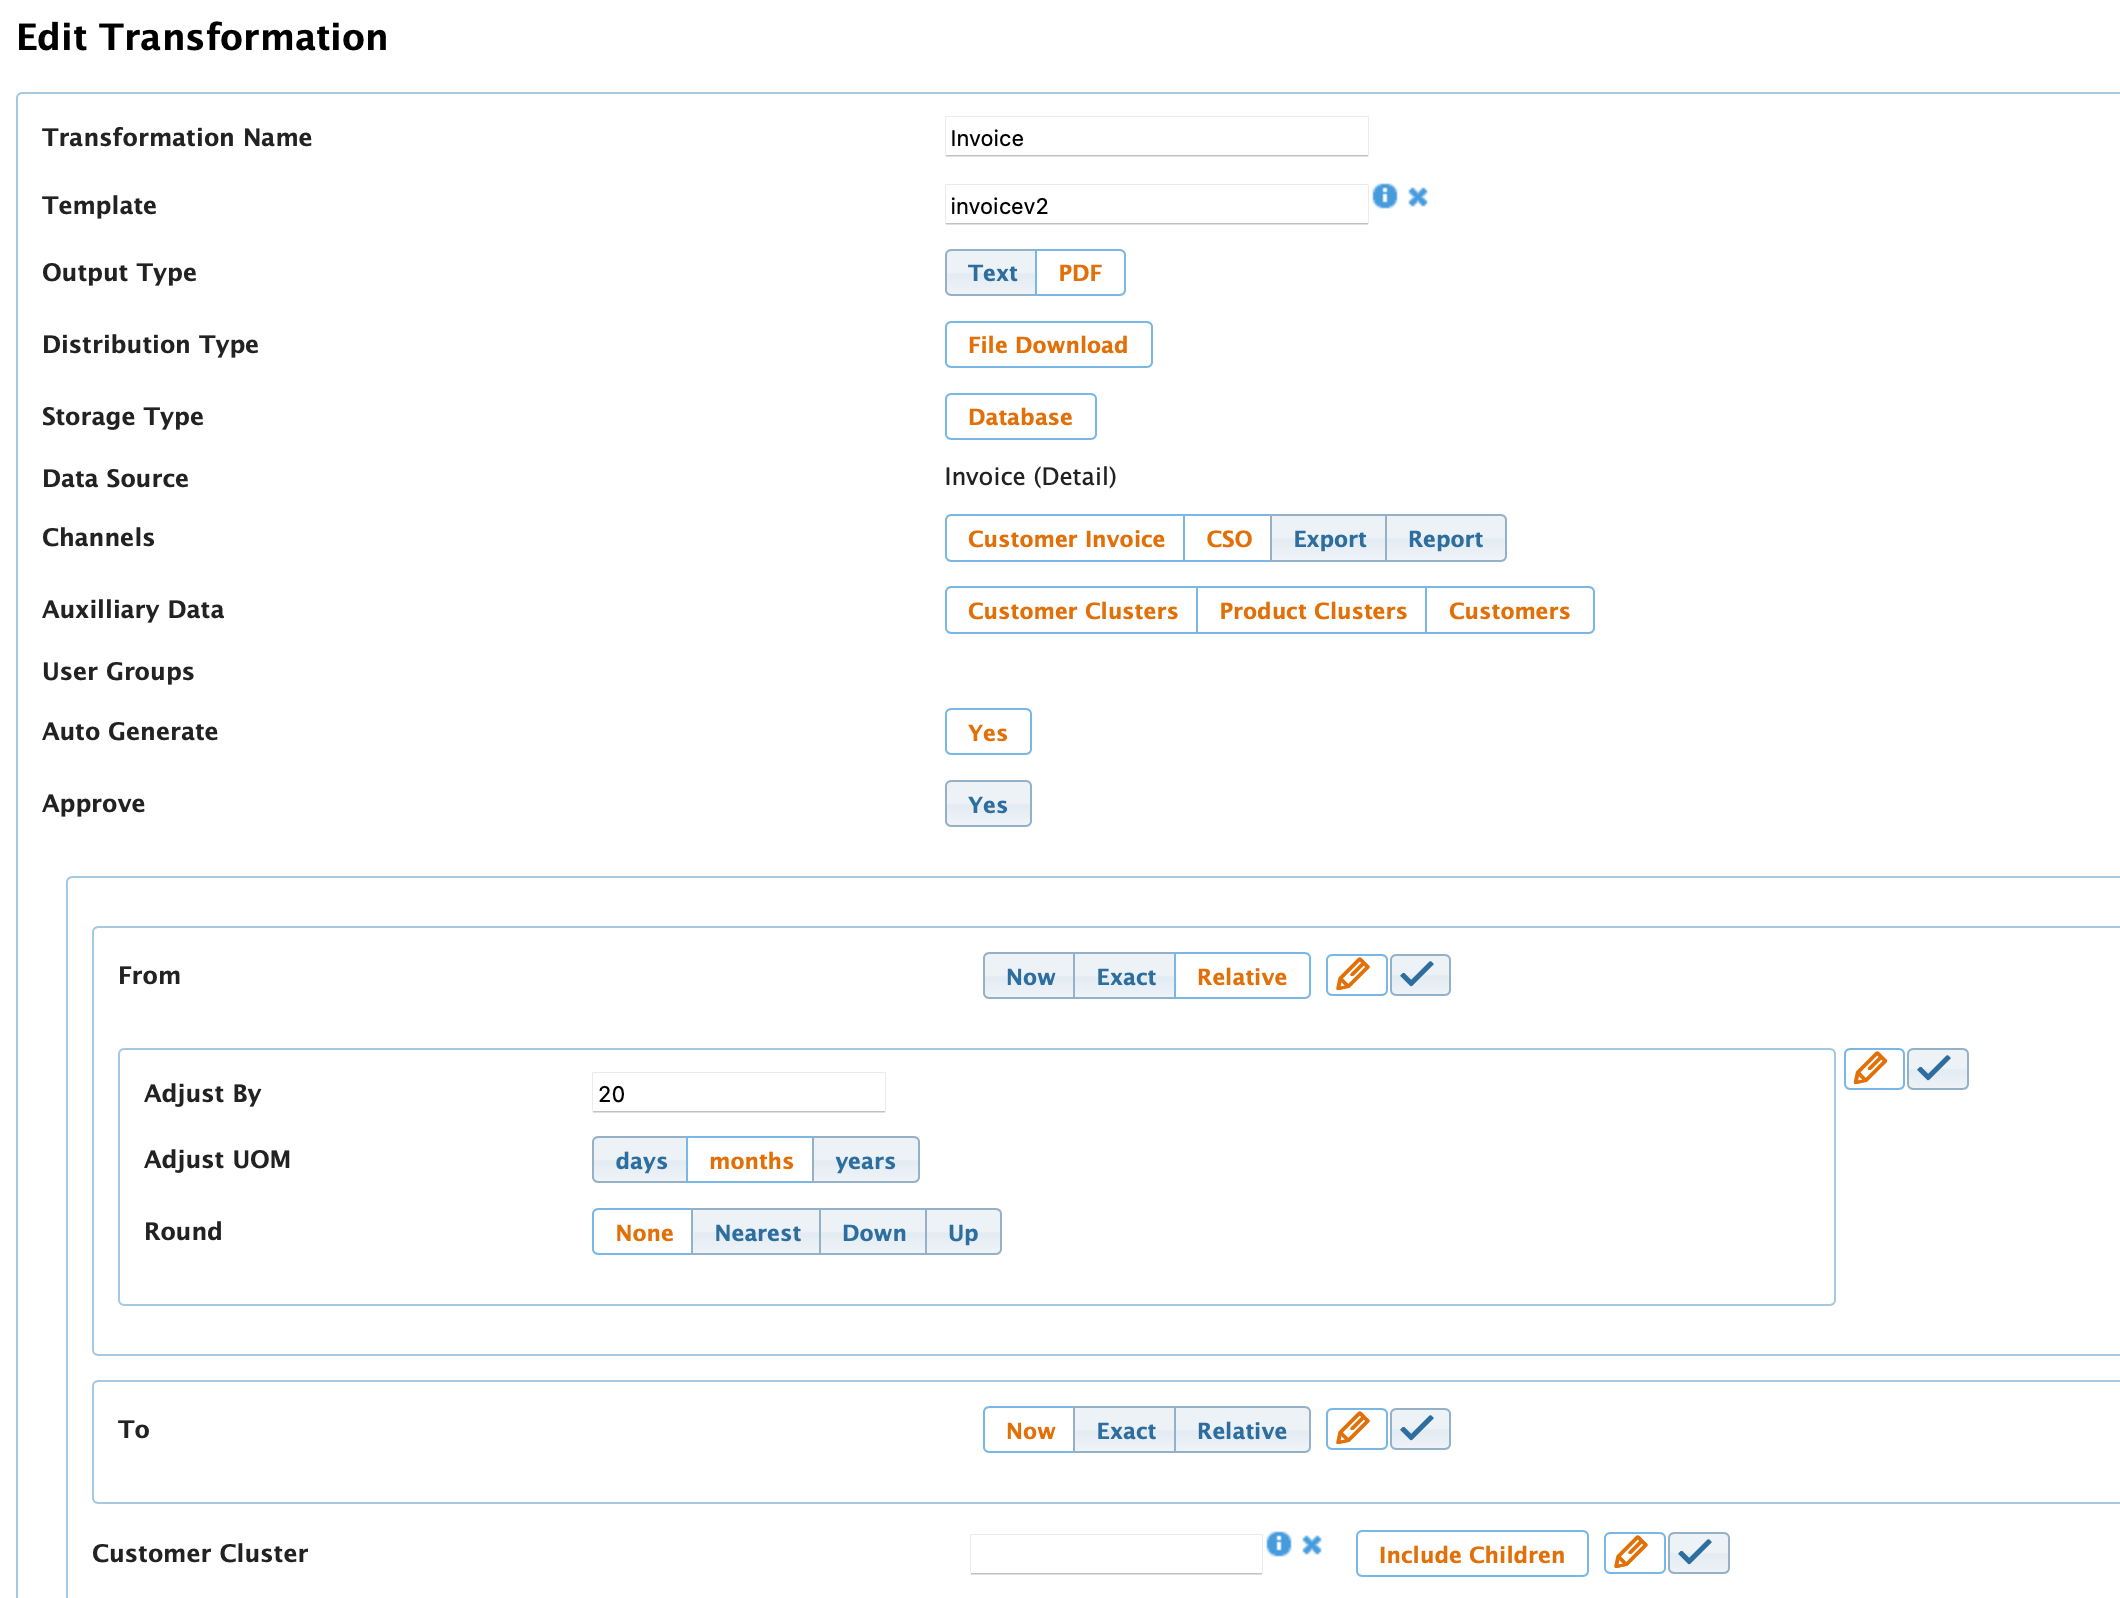
When on the Transformations page, the [Add] button in the left top of the page can be used to make a new transformation. Similarly, the [Edit] button, depicted by a pencil, can be used to adjust an existing transformation. In Figure Administration 5, an example of the transformation settings can be found. This example was accessed by clicking on the [Edit] button. Orange text indicates that the button is ticked. If the button is ticked, the setting is “On”, otherwise the settings is “Off”.
The following settings are present for transformations:
- Transformation Name: Visual Name of the transformation. Shown in the Viewer and on the Transformations page.
- Used Template: The Environment Invoice Template that is used to generate this Transformation.
- Output Type: Whether the Transformation is generated as flat text or a PDF.
- Distribution Type: How the file can be shared, only “File Download” is available now.
- Storage Type: How the file is stored, only “Database” is available now.
- Data Source: What information is used to make the Transformation, this is always “Invoice (Detail)”.
- Channels: Determines where the invoice can be used.
- Customer Invoice allows for the Transformation to be used on singular invoices only, while Export allows for multiple invoices to be processed in one transformation.
- If both are on, the user can make a choice between the options.
- CSO shows the Transformation as an option in the viewer.
- Report allows for the Transformation to be selected on the Reports page.
- Auxiliary data: Indicates what data can be used for the Transformation. Usually all options are on.
- Auto Generate: Ensures the Transformation automatically generates after invoice Approval.
- Approve: Ensures Transformations are automatically set to Approved after successful Transformation.
- Scope Settings: Below the above are all settings that allow for filtering on the Transformation.
- The From and To settings filter on the Invoices the Transformation can apply to. The dates can be set to Now, Exact, or Relative. Additionally, the From date can be adjusted by a period and rounded.
- Customer Cluster and Customer make the Transformation only available to certain Customer Groups or Customers.
- Invoice Statuses and Invoice Types make the Transformation only available for invoices with certain statuses or types.
- Billing Output Tags filter the Pricing Rule Results from the Invoice that are selected by the Transformation.
- Filename Format: Indicates what the name of the file will look like when downloaded from the environment.
- Page Margins: Determine how the PDF is printed on an A4 format. Some defaults can be chosen, for example, A4 or Letter, both with and without a margin. But all margins can be adjusted manually in millimetres. The page fit can also be adjusted with ShrinkToFit or ScaleToFit, where the default is None.
Figure Administration 5: Edit Transformation screen example
The transformation can, when made or adjusted, be saved with the [Save] button at the bottom of the page. When saved, the result can be viewed in the Invoice View when Channel “Customer Invoice” is on, or by using a transformation on an invoice it can be viewed by downloading it from the Transformation Results page. Like this, the transformation can be tested and adjusted to make it look as desired.
Purchase routing
The purchase routing option is only available in the Administration menu when it is turned on for the environment ( Figure Administration 6). Purchase routing can be used to move purchases that come in for a certain customer, to another customer. The purpose of this functionality is to register usage against one customer, while another customer should pay for the usage. This allows the user to track the technical registration (who used the product/service) in your backend, while tracking the commercial registration (who should pay for the product/service) in the billing system. The Purchase Routing page shows a table with all existing purchase routes, containing the settings of the Purchase Route, as described below.
Figure Administration 6: Purchase routing Administrations menu
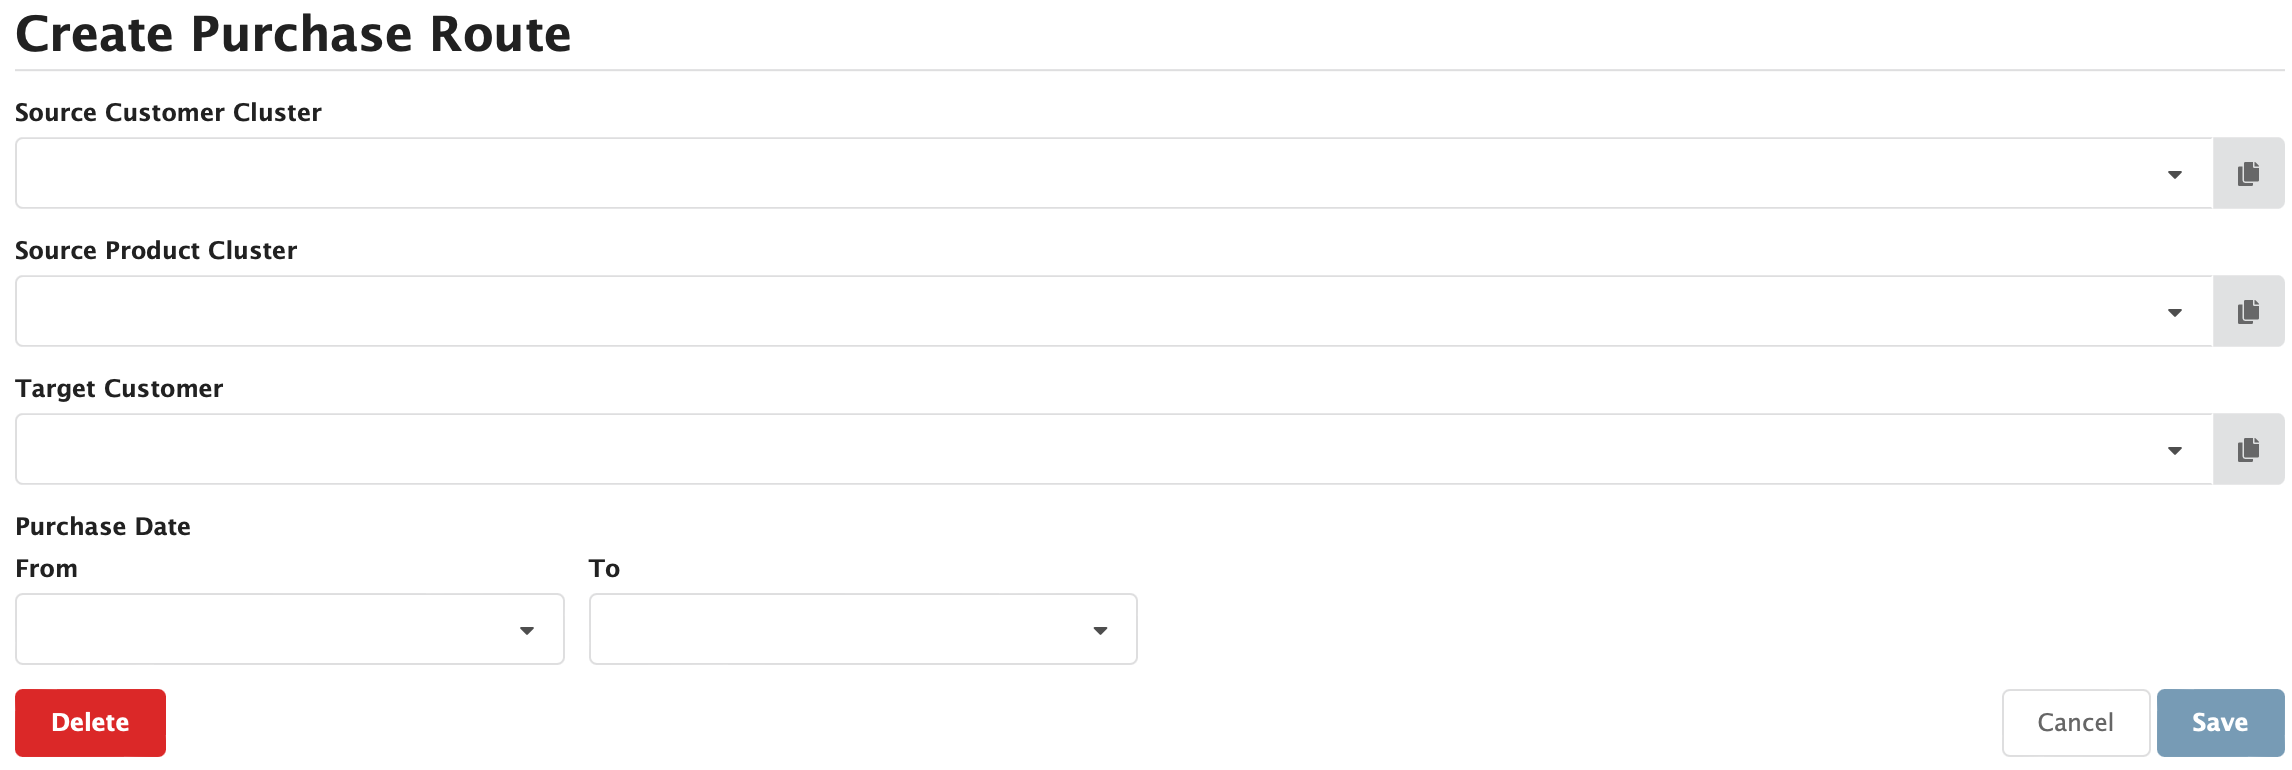
On the purchase routing page, the [Add] button can be used to add a new Purchase Route (Figure Administration 7). Routing works through a set of rules. Each rule consists of three parts:
- Source Customer Cluster: The customer that produces usage.
- Source Product Cluster: The product cluster(s) that usage is produced for.
- Target Customer: The customer that should pay for the usage.
The rule then states that purchases for all customers underneath Source Customer Cluster for products underneath Source Product Cluster are forwarded to Target Customer. Additionally, the purchase From and To dates can be indicated when a period is involved.
Figure Administration 7: Create Purchase Route screen
As an example, consider a customer cluster structure like so:
- All Customers → Netherlands → Reseller → Customer
In this example, customers representing the Reseller and the Customer are present at the relevant levels. The customer is generating usage, which is being sent to CloudBilling. However, the agreement is that the Reseller pays for this usage.
Let’s assume the product cluster structure looks like:
- All Products -> Usage
Now a Purchase Routing rule can be defined for source cluster “Reseller”, product cluster “Usage” and target customer “Reseller”. This would make it so that all customers underneath the reseller will have their Usage purchases routed to the Reseller. In this example, it is only a single customer, but in the future, more could be added.
Routing of purchases is applied continuously to purchases that are not yet completed (a purchase is considered completed when the invoice it is on is approved). If a routing rule is adjusted, the purchases will be re-routed to reflect the new state of the rule. If in the example, the Customer would be moved to a different parent cluster, the rule would no longer apply, and the purchase would move back to the original customer that produced the usage. The rules are automatically re-evaluated whenever a relevant aspect in the system changes. This includes customer clusters, product clusters, the customer itself, or the purchase.
Routing is always based on the original customer of the purchase, not on the outcome of previous routing rules. This makes it so that if a routing rule is adjusted, the new outcome will be according to this rule. This also means that rules cannot be “chained”. Meaning that these rules cannot be applied after each other.
The system enforces that routing rules cannot overlap. That is, there cannot be two or more rules that would cover the same purchase. Since there would be no way to determine which rule should be applied.
Number Scheme
The Number scheme page can be found under Administrations and indicates the format of Invoice Numbers (Figure Administration 8). There should always be at least one Invoice Number Scheme for all customers, so that there will always be an invoice number generated in the correct format and all customers are accounted for.
Figure Administration 8: Number Scheme screen
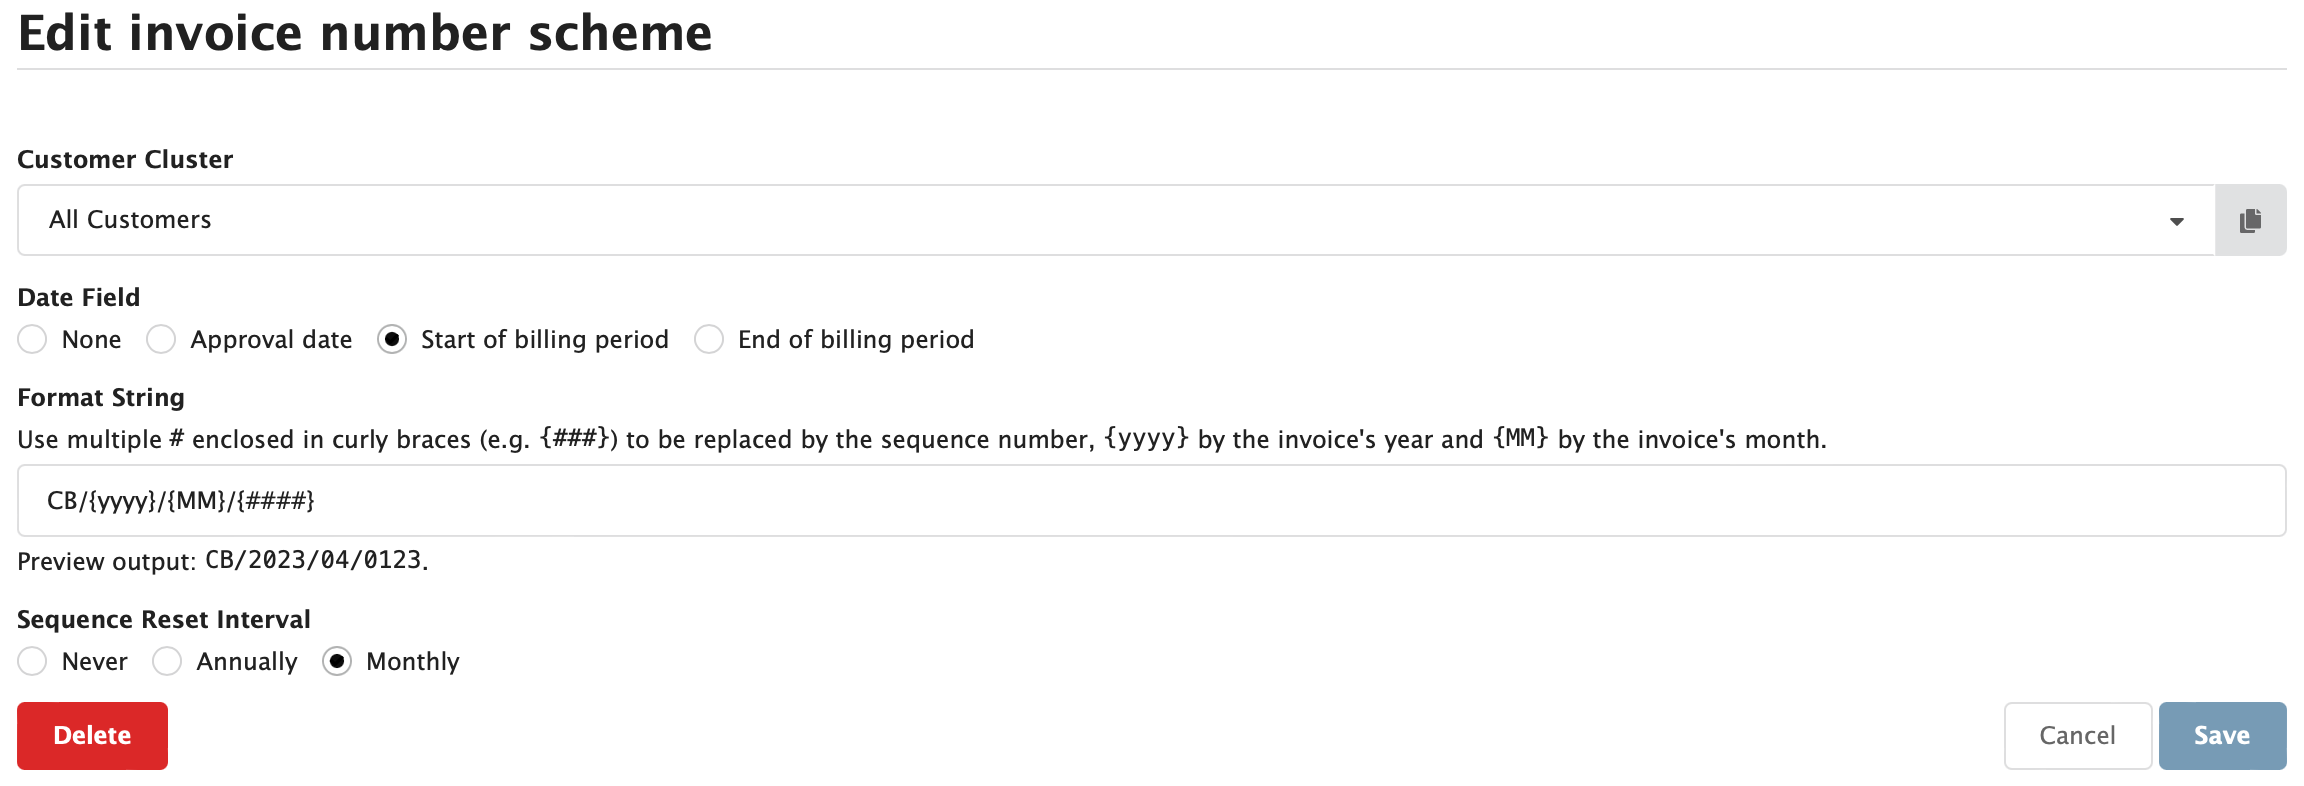
The table shows the customer cluster and the Format String of the Invoice Number that is used. The [Add Scheme] button in the right bottom can be used to make more Number Schemes for different clusters. The standard invoice number will generate invoice numbers that ascend when generated. The Format String shown in the Figure Administration 8 {#######} will generate a ten-digit number that starts as 0000000001 and ascend when more invoices are approved. This assures that every invoice gets a unique number. The invoice numbers could be reset per year if the invoice year is included in the number. In Figure Administration 9, the Edit invoice number screen is shown.
Figure Administration 9: Edit Invoice Number Scheme screen
The Customer Cluster that the invoice number screen should apply to should be chosen. This option is always including the children of that cluster. An invoice number can contain text, dates, and random numbers which are indicated by a hash (#). A date field can be the approval date, the start of the billing period, end of the billing period, or none. The sequence reset interval can be annual, monthly or none. Below the field in which the format is typed, a preview of the invoice number is shown.
Invoice Approval Processes
The standard Invoice Approval Process is valid for All Customers. This invoice approval process consists of three steps.
- The Invoice is Requested for Approval by a User with rights to Request for Approval.
- The Invoice moves to Approving and is locked. It can now be reviewed for correctness.
- If the Invoice is correct, a User with Approval rights can now Approve the invoice. The invoice will become Approved and get an Invoice Number. The process is now finished.
- If the Invoice is incorrect, the user may Reject the invoice and the invoice will move back to Open so adjustments can be made. The process can then be restarted from Step 1.
Multiple Invoice Approval Processes can be set up based on the Customer Clusters. All Customer Clusters must be covered by at least one Invoice Approval Process.
Between step two and three more steps may be added so that more reviewers check the invoice for correctness. CloudBilling will automatically notify the reviewers by email when the invoice moves to the step in the Invoice Approval Process that they should review.
A new Invoice Approval Process may be added by visiting the Invoice Approval Process paged and clicking Add in the top right of the page. A Customer Cluster must be selected and additional steps may be added to ensure additional reviewers are notified during the Invoice Approval Process.
Custom Fields
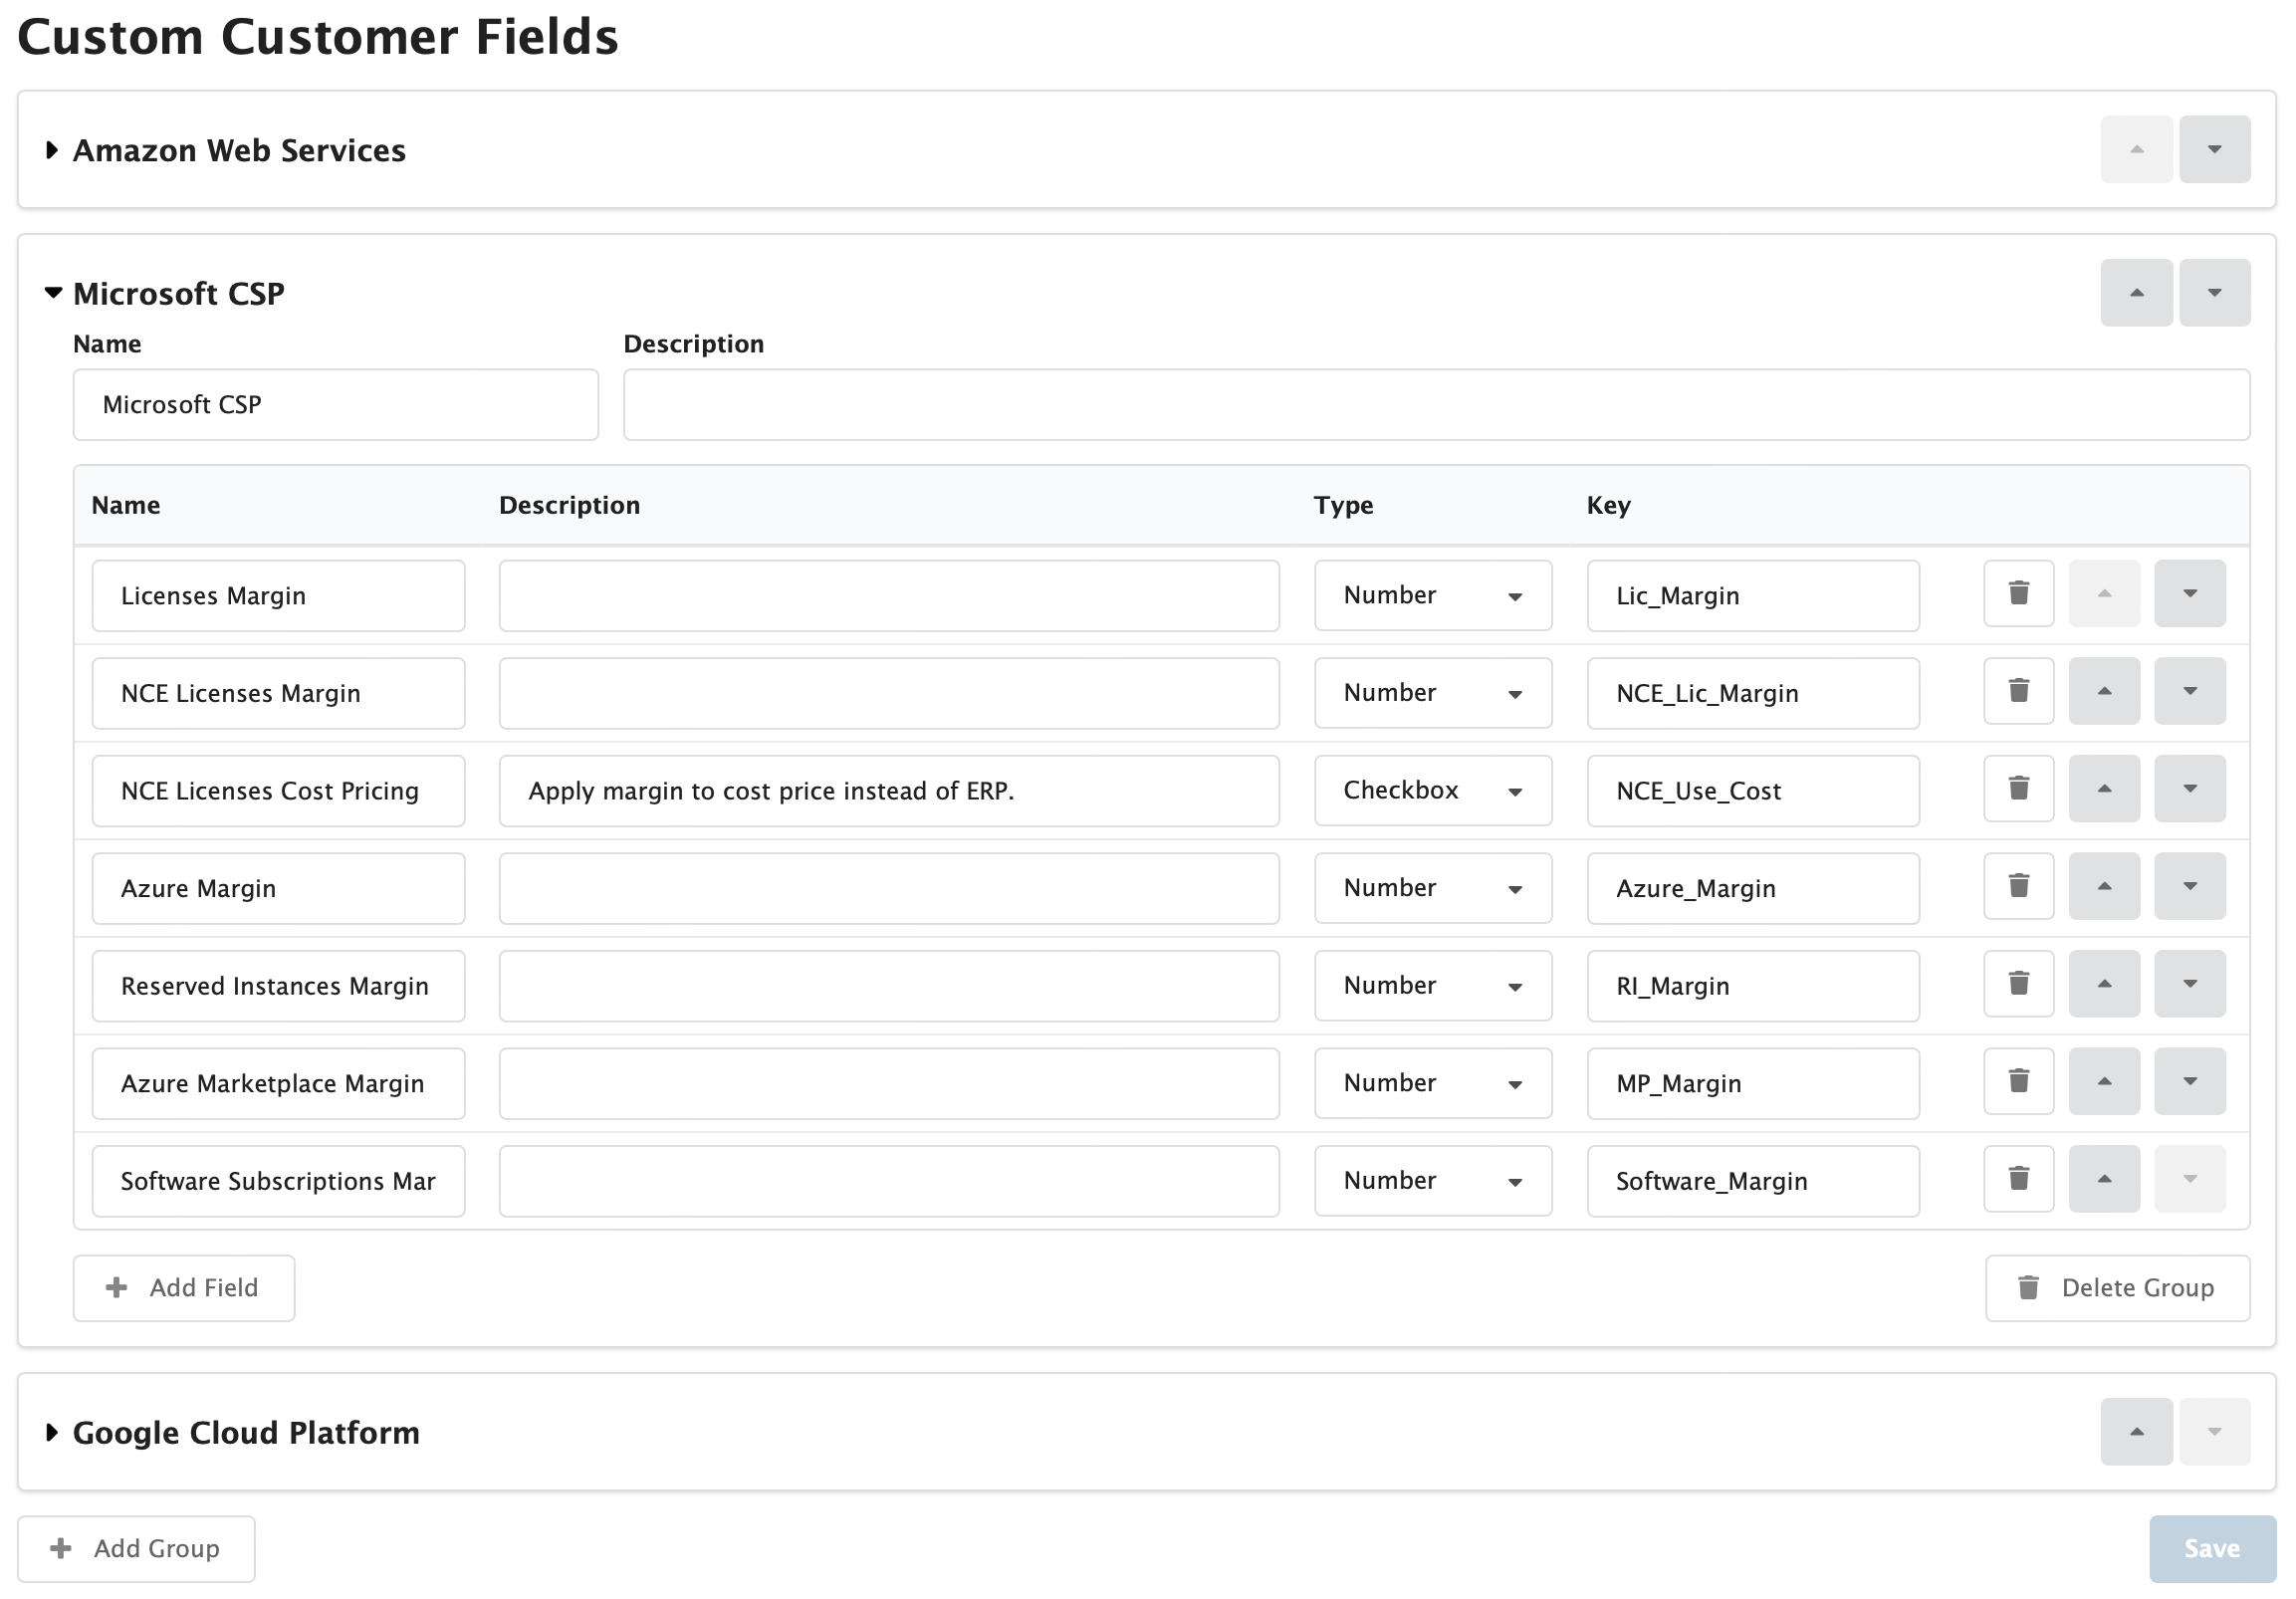
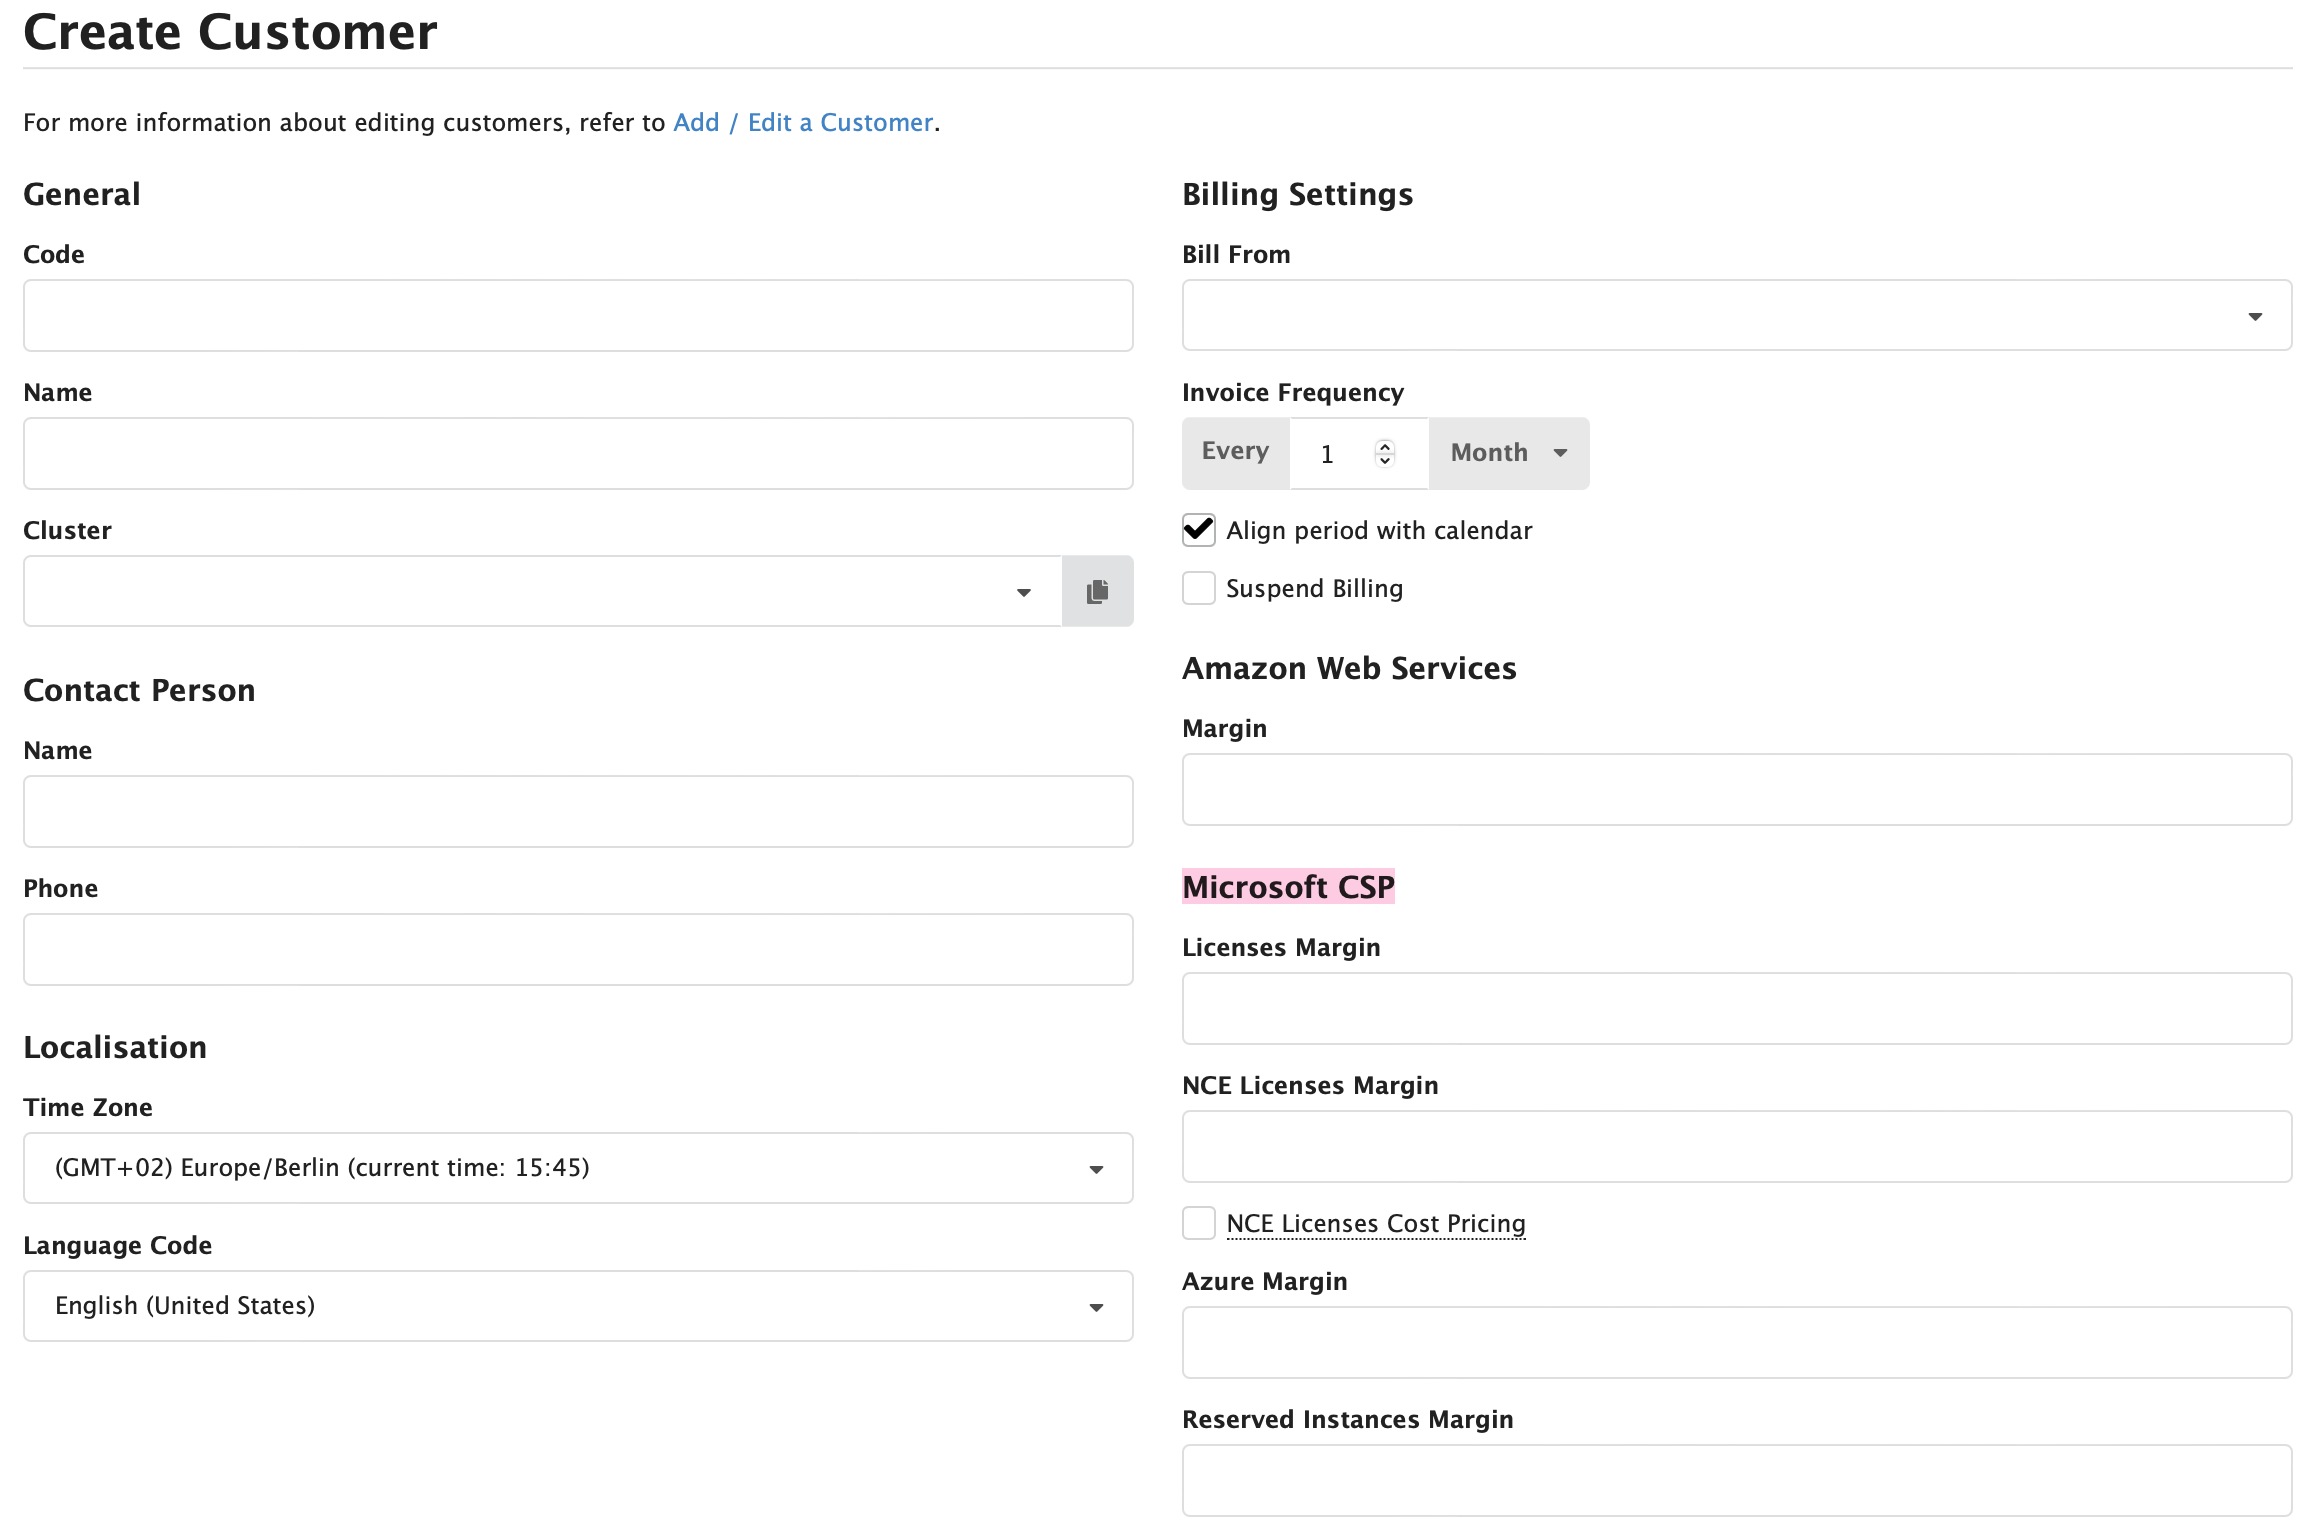
Custom customer fields can be found under the Administration options. These fields can be used to add additional information to all customers in the CloudBilling environment in a structured manner. With this function, you can add information groups and fields (metadata) to all customers. In Figure Administration 10, a group of Margins has been added which consists of the standard Margins for Reserved Instances, NCE, and Azure Plan. These fields are used in the Adjust Percentage rules that are made by the connectors to allow customers to have a different margin than the default margin.
Figure Administration 10: Custom Customer Fields screen
The Group in this example is Margins, and new groups can be added by using the [Add Group] button. The name must be filled in to be able to save the group. A description is optional but can be used to inform the administrator regarding the goal of the group.
A new field can be added to the group by clicking on the [+ Add Field] button within the group. A name, description, type, and a key can be filled in. At least a name and a key must be filled in to be able to save the field. The key of a field is used to recognise this field within the templates and pricing rules. Three different types are available for these fields: Text, Number, and Date. Custom fields will show on both existing and new customers shown in Figure Administration 11.
The name of the group and the description of the group are shown as a title and subtitle above the group of the added fields. The added fields use the Name field as the header of the field and are recognised by the template and pricing rules as the value filled out in the Key field. Because of this, it is recommended to either use a descriptive name or use the same name as the Key, to make it easily recognisable what value the field holds on the customer. The dotted line underneath the name of the field indicates that a tooltip is available. The tooltip will show when hovering over the name as the Description field. The Type indicates what types of values are accepted by the field and thus what the user is allowed to put in the field.
- Strings allow all letters, numbers, and special characters.
- Dates only allow date values and will enforce this by allowing the user to use a calendar tool.
- Numbers only allow numbers and decimals with a dot (.).
Figure Administration 11: Custom Customer Fields on a new customer
Templates
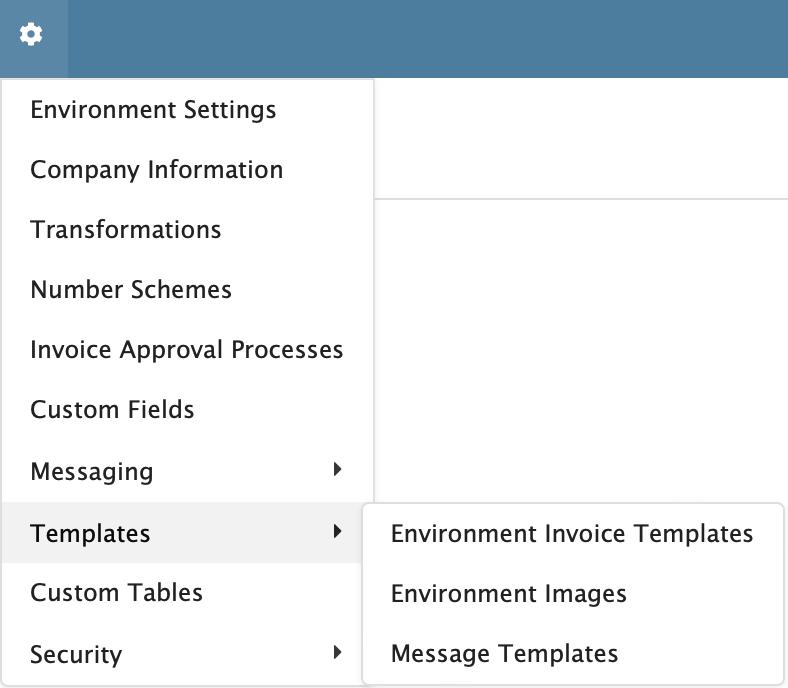
Under Administrations and Templates, the options for Environment Invoice Templates, Environment Images, Message Templates, Customer Images, and Customer Invoice Templates can be found (Figure Administration 12). These settings can be used to upload and manage different templates and different images in the environment.
Figure Administration 12: Templates, different settings
Any templates in the environment are often managed by the CloudBilling consultant, as the templates can call for CloudBilling specific information. The template pages function in the same way, the only difference between the pages is what types of templates can be found on that page, and which templates can, because of their location, be used for what purposes. For completeness, two different templates types exist:
- Environment invoice templates: Used for PDF or Text (often export) transformations of invoices in the environment. The page cannot be searched.
- Message templates: Used for transformations of emails in the messaging run. The page can be searched on template name and template types.
The environment invoice templates are most often used and changed (Figure Administration 13).
Figure Administration 13: Environment Invoice Templates screen
All the screens that contain templates show a table with a list of templates, including their Name and template version. A template can be adjusted by clicking on the line in the table for that template. Similarly, a new template can be added in the right top of the screen with the [Add] button ( Figure Administration 14).
Figure Administration 14: Add Environment Invoice Template screen
An Invoice template needs a name, and a file needs to be uploaded that contains the CSHTML code needed for the transformation. The [Retire] tick box can be used to Retire a template when it should not be used any longer. In the same way, existing templates can be edited. This goes for all different types of templates. Environment Images and Customer Images are pages that can be used to upload image files (e.g. PNG, JPG, JPEG) that should be used in the template transformations. This could, for example, be a company logo, or a footer image. An image needs a name and a file to be uploaded, same as the transformations. For an image to be properly used in the template, the image name should be retrieved in the template code. So when a new image is added, it will not be automatically displayed on the invoice if it was not added under an existing image.
Custom Tables
The Custom Tables screen can be used to store data in CloudBilling in the form of tabular data (Figure Administration 15). This allows user to use important tabular, relational data to be used in conditions and expressions in the pricing rules.
Figure Administration 15: Custom Tables screen
A new table can be added in the right top of the screen by using the [Add] button, or an existing table can be respectively, viewed, edited, copied, rows deleted, or deleted fully with the buttons on the table. The buttons all have a tooltip that shows when hovering over the button. The buttons have the following functions:
- View table rows: View the contents of the table.
- Edit table: Edit the properties of the table. Note that these properties cannot be modified when the table contains rows, so ensure to set these properties right before adding rows.
- Copy table: Copy an entire table. This copies properties and existing rows.
- Delete all rows in table: Empty an entire table. Beware: data in the rows will be deleted as well.
- Delete table: Delete the entire table. All rows in the table must be deleted before the table can be deleted.
When the [Add] button is used, the user will be brought to the Add Custom Table screen shown in Figure Administration 16. This page allows setting a name for the table.
Figure Administration 16: Add Custom Table screen
Once the table properties are set, a new Table Column can be added to the table. A table column needs a long name, a short name, a type, and optionally comma-delimited indexes. All columns that are necessary must be added before rows can be added, as these properties cannot be changed once rows are present in the table. Once a table has been added, it can be filled with data. This is done by adding rows to it, by defining a value for each column. The data in these tables can then be used in pricing rule expressions.
CloudBilling also allows storing multiple “Custom Data Tables” when they conform to the following requirements:
- Each table is uniquely named
- A “schema” exists, in the form of a set of column definitions which each consist of the following fields (Figure Administration 16, Add Table Column screen):
- Long name: the actual name of the column, used to refer to the column and for display purposes.
- Short name: an internal (database) name for the column, of limited length.
- Type: the data type in the column (can be String, Date, or Numeric).
- Index: a list of indexes.
- Indexes are often used for extremely large tables (over 100.000 entries) therefore, it usually does not have to be filled by users.
One of the main examples for which custom tables are used is the storage of conversion rates for currencies. In Figure 81, three conversion rates have been saved in this custom table. These conversion rates will be used in the Price Rules to calculate values that will be shown on invoices in the right currencies.
Figure Administration 17: Custom Table Rows example
Security
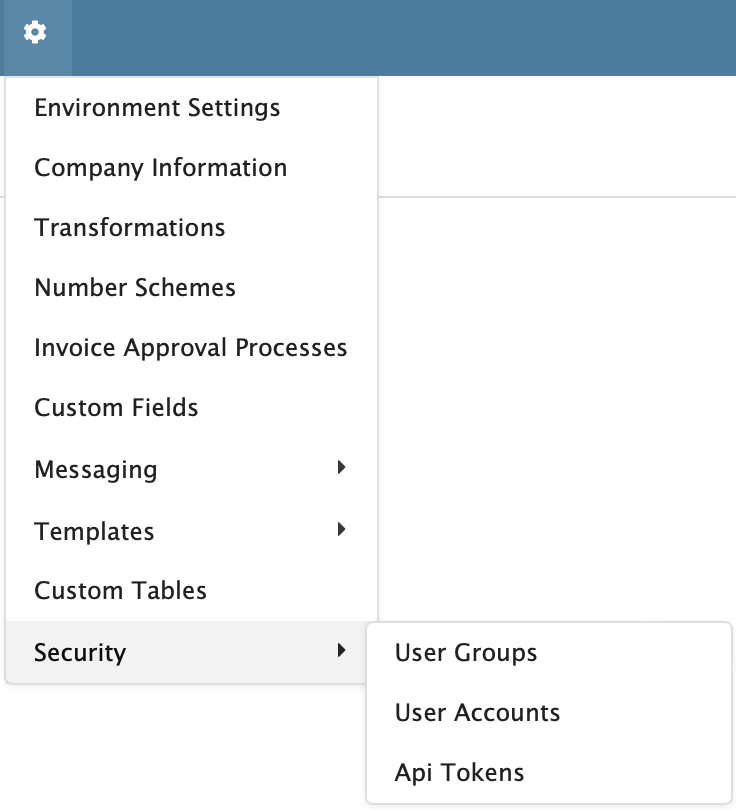
The Security settings consist of three pages; User Groups, User Accounts, and API Tokens (Figure Administration 18). The security settings are used to ensure that the right users have the proper rights to the environment and to give people with Admin rights access to API Tokens when necessary.
Figure Administration 18: Security settings
User Groups
The User Groups page is used to manage the different types of users in the environment (Figure Administration 19). A User Group defines what a user can, and most importantly, cannot do, access, and view in the CloudBilling environment. Each user group gets a specific set of permissions, and each user assigned to this group will have the same access rights as defined for the group. This means that the user can define the scope and rights once per User Group, instead of for each User Account. With the [Add] button a new user group can be added.
Figure Administration 19: User Groups page
A user group needs at least a descriptive name to recognise the group. The admin setting can be ticked to generate an Admin user group. At least one group needs to exist to add new users to the environment. This Admin user group is, therefore, always set up beforehand at the back-end of CloudBilling. Underneath the name, all different CloudBilling modules can be found with the actions listed as buttons. These can determine what the User Group will have access to. When some options are clicked and others are not clicked, the user will only have access to the selected options. This goes for both the actions a user is allowed to perform, and the modules a user can view.
A User Group will only have access to the actions that you have selected, so when nothing is selected for a module, all access to that specific module will be restricted.
Scoping
In an environment Customer Cluster Permission Scoping can be turned on optionally. This allows User Groups to get a Scope for the Customer Clusters that Users in that Group are allowed to view. The Users can then only view the invoices from customers that are in their Scoped Customer Cluster. Invoices from other customers will not be visible to these users.
This might be helpful if you are operating in multiple countries and the Billing Officers from one country should not be able to view the invoices from the customers of the second country.
To enable this feature, contact the CloudBilling team via the support portal or by sending a message to support@cloudbilling.nl.
Best Practices User Groups
To ensure structured billing processes, the following User Groups should be established according to CloudBilling’s best practices:
- CloudBilling Administrator: For CloudBilling Consultants.
- Administrator: For your internal administrator users.
- Billing officer For users responsible for invoice verification. They should have rights to view everything, edit basic objects, and trigger actions like Transformations and Approval of Invoices.
- View Only: For users who need access to the platform without the ability to modify any settings or data.
- Developer/Integration Role: For users that build integrations between the billing system and other systems. They should have rights to access API keys and view certain parts of the platform.
User Accounts
A new User can then be added on the User Accounts page (Figure Administration 18). The * *[Add]** button in the right top can be clicked to add a new user. This will redirect the user to the Add User page shown in Figure Administration 20. A user needs at least an email address, on which they will receive their access link, and a User Group. The first and last names are optional.
When a user is added, please consider the following:
- The account must be activated within 24 hours of receiving the activation email.
- The activation email may end up in the Junk folder.
- If the user has not activated their account within 24 hours, the activation email can only be sent again by a CloudBilling administrator. Please contact Support or your CloudBilling consultant if this happpens.
Figure Administration 20: Add User screen
API Tokens
On the API Tokens page, shown in Figure Administration 21, new API tokens can be generated with the [Generate] button. When the API token is generated, ensure to save it in a secure file (e.g. a .ini file) as the token cannot be retrieved from CloudBilling any more after refreshing the page. Additionally, the search bar can be used to search for existing API tokens. For existing API tokens, a token name, a user that issued the token, the date the token was last used, and the option to revoke the token are present. When the token happens to be revoked, a date will show in the “Revoked On” column. This is all to ensure that the users can keep track of who has API Tokens to their environment. For more information on the API guide, visit this page.
Figure Administration 21: API Tokens screen
API Tokens are only generated once and cannot be retrieved from CloudBilling after a refresh of the page. Ensure that the API Token is saved in a secure place after it is retrieved from CloudBilling and do not share it with anyone.
Single Sign-On
After setting up SSO, you can point your users to the URL specific to your tenant (e.g.
https://app.cloudbilling.nl/AcmeCorp ). If the user is not signed in, we will redirect them to the IdP.
CloudBilling supports Single Sign-On (SSO) and Single Sign-Out through OpenID Connect (OIDC). Contact support to set up SSO for your environment.
Client Application
To set up SSO, we need some information from your identity provider (IdP). This is usually available through the configuration portal of your IdP when you register a new application.
- Client Identifier The authorisation server issues the registered client a client identifier — a unique string representing the registration information provided by the client.
- Issuer Identifier Verifiable Identifier for an Issuer — a case-sensitive URL. Sometimes also called Authority.
When setting up the client application, you configure your IdP with the following parameters (we provide you the value for [ID]):
- Redirect URI:
https://app.cloudbilling.nl/SSO/OIDC/[ID]/Callback - Logout URI:
https://app.cloudbilling.nl/SSO/OIDC/[ID]/SignOut
We use the implicit flow and support either form post or query tokens. We request a scope of openid profile email.
User permissions are defined through application roles. Within CloudBilling you create the User Groups as desired. Then using the roles claim, assign users to one or more user groups by passing the user group’s ID as the role. This allows for fine-grained permission control from within the IdP. These role assignments can be dynamic, as we apply the new roles on each following sign in or token renewal.
Claims
Besides the normal claims as part of the OIDC token, CloudBilling requires the following claims:
| Name | Format | Description |
|---|---|---|
sub | String | The principal about which the token asserts information: the user. |
roles | Array of strings | A set of user groups assigned to the user. These are references to identifiers of user groups within CloudBilling. |
email | String | E-mail address of the user. |
name | String | The name claim provides a human-readable value that identifies the subject of the token. Optional: if not provided, the preferred_username claim is used. |
preferred_username | String | The primary username that represents the user. It could be an email address, phone number, or a generic username without a specified format. Optional: if not provided, the name claim is used. |
given_name | String | The given / first name of the user. Optional: if not provided, the name claim is used. |
family_name | String | The family / surname of the user. Optional: if not provided, the name claim is used. |
locale | String | The user’s locale, e.g. en-GB for British English. |
zoneinfo | String | The user’s time zone, e.g. Europe/Amsterdam. |
Microsoft Entra ID (formerly Azure Active Directory)
A typical integration of CloudBilling Single Sign-on is with Azure Active Directory. By doing so, your users will be able to access the CloudBilling Tenant Portal from their office.com home page.
- Contact us, and we will provide you with the data applicable to your tenant.
- In the Azure Portal, go to Register an application.
- Fill in the form:
Name: ‘CloudBilling’
Supported account types: ‘Accounts in this organisational directory only’ - On the Overview page, copy the ‘Application (client) ID’ and provide that to us. This allows us to configure the integration on our end.
- Go to ‘Branding & Properties’ and enter the following:
Upload new logo: upload this image
Home page URL:https://app.cloudbilling.nl/SSO/OIDC/[ID]/Callback(replace[ID]with the value provided by us) - On the ‘Authentication’ page under ‘Platform configurations’ click ‘Add a platform’, click ‘Web’, enter the following and click ‘Configure’.
Redirect URI:https://app.cloudbilling.nl/SSO/OIDC/[ID]/Callback
Front-channel logout URL:https://app.cloudbilling.nl/SSO/OIDC/[ID]/SignOut
Implicit grant and hybrid flows: select ‘ID tokens’ - On the ‘Token configuration’ page, click ‘Add optional claim’, enter the following and click ‘Add’:
Token type: ‘ID’
Claim: select ‘family_name’ and ‘given_name’ - Choose ‘Turn on the Microsoft Graph profile permission (required for claims to appear in token).’ and click ‘Add’.
- On the ‘API permissions’ page, click ‘Add a permission’, click ‘Microsoft Graph’, click ‘Delegated permissions’, select the following permissions and click ‘Add permissions’:
OpenId permissions: profile - On the ‘App roles’ page you’ll create an app role per User Group in CloudBilling Tenant Portal. We will provide you with a list of ‘Name’ and ‘Id’ per User Groups. For every User Group: click ‘Create app role’, enter the following and click ‘Apply’:
Display name: User Group’s ‘Name’
Allowed member types: ‘Users/Groups’
Value: User Group’s ‘Id’
Description: User Group’s ‘Name’
Do you want to enable this app role: Yes
Now the application registration is complete, and you can grant permissions to your users. To grant permissions to users:
- In the Azure Portal, go to Enterprise applications and click on the application named ‘CloudBilling’.
- On the page ‘Users and groups’ click ‘Add user/group’.
- Select the user(s) you want to grant the permission to.
- Select the role you want to grant them.
- Click ‘Assign’.
The integration is now complete. After confirmation from us, you can test the sign-on by visiting the following url: https://app.cloudbilling.nl/SSO/OIDC/[ID]/Callback.
Final steps
After confirming users can use the application through SSO, you can remove their old user accounts from the environment. This makes sure that users can only access the environment through SSO and no longer through username/password.
