Could not find the answer to your question? You can always contact support via our customer portal or send us an email
Reconciliation
- What is reconciliation?
- How do I reconcile Microsoft CSP usage?
- How do I download my Reconciliation files from Azure?
- How do I perform AWS reconciliation?
- How do I download a Cost and Usage report (CUR) from AWS?
What is reconciliation?
Reconciliation refers to the process of ensuring that two sets of records correspond accurately. In the case of CloudBilling, it means the checks between the information billed to the partner by Public Cloud Vendor and the information on the invoices in CloudBilling
In CloudBilling, CSP (Cloud Service Provider) connectors retrieve consumption data from Public Cloud Providers, including Microsoft Azure or AWS.
The primary goal of the reconciliation process is to compare the costs of Public Cloud services generated in CloudBilling with the costs reported by the Public Cloud Provider itself (such as Microsoft or AWS).
The ultimate goal is to analyze and resolve any discrepancies that may exist between the two sets of records.
How do I reconcile Microsoft CSP usage?
To perform reconciliation for Microsoft CSP, you need to download the right reconciliation files from the Partner Center, depending on the product category that you are reconciling.
The usage and costs in these files can be checked against the usage and costs under the invoice for the customer you have mapped to the specific tenant in CloudBilling. Columns such as billable quantities, unit prices, and subtotals in these files can be compared with the invoice results in CloudBilling.
Keep in mind that for each product or product category, you might need different reconciliation files and may need to account for pro-ration, mutations, cancellations, promos, etc. to properly reconcile the product category.
If you require assistance with Reconciliation, reach us using this link or by emailing us.
How do I download my Reconciliation files from Azure?
Make sure that you know which reconciliation file you need to download and whether it is a billed or unbilled version of it.
You can download the reconciliation file in the Partner Center. On your Partner Center home screen, go to ‘Billing.’
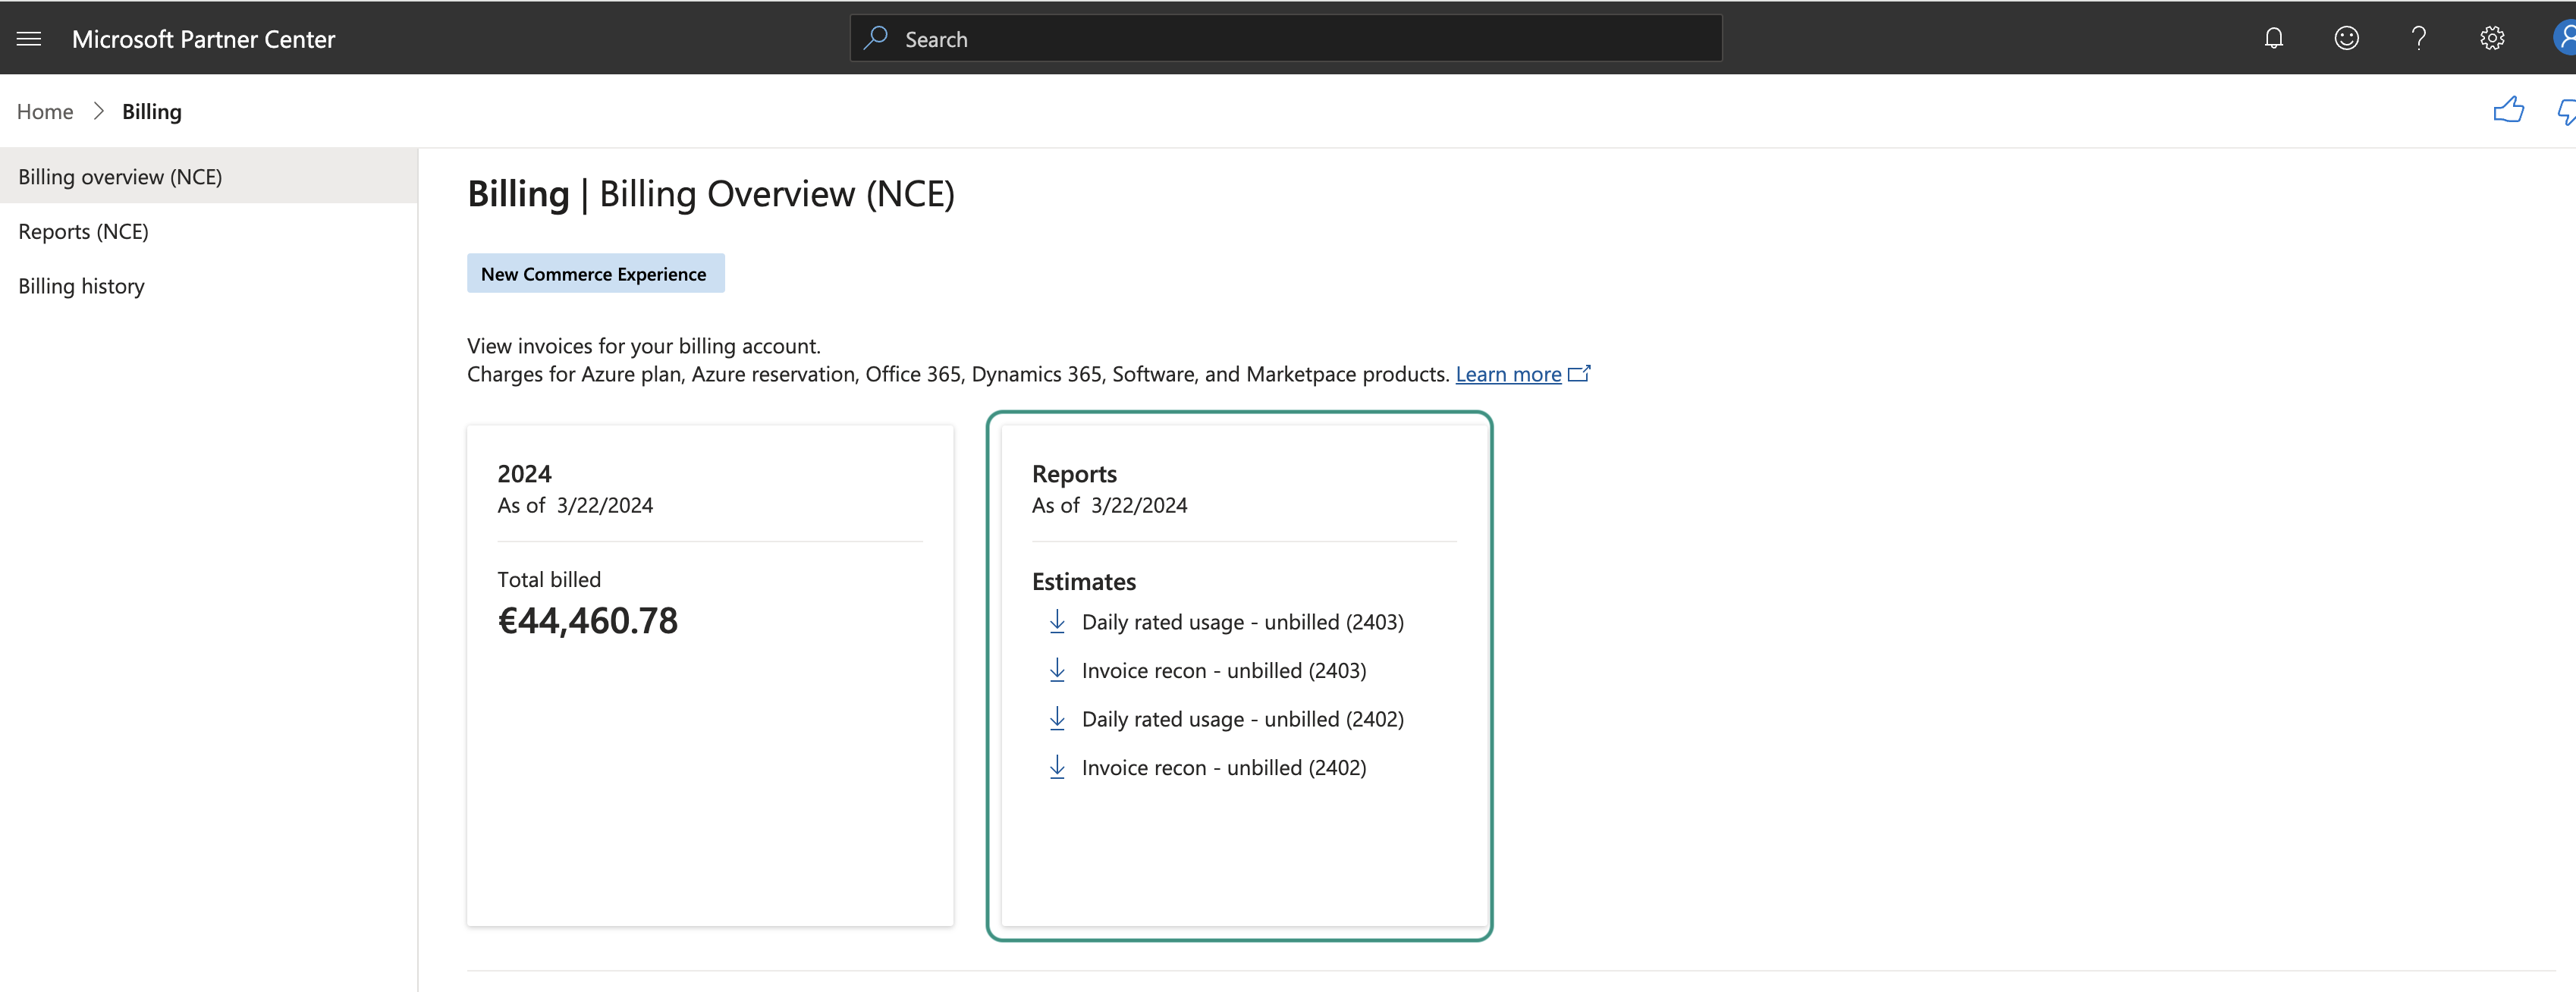
In the billing overview page, you have access to download the unbilled reports for the current and previous month.
Figure FAQ Reconciliation 1: Downloading Azure Reconciliation files for the current and previous months
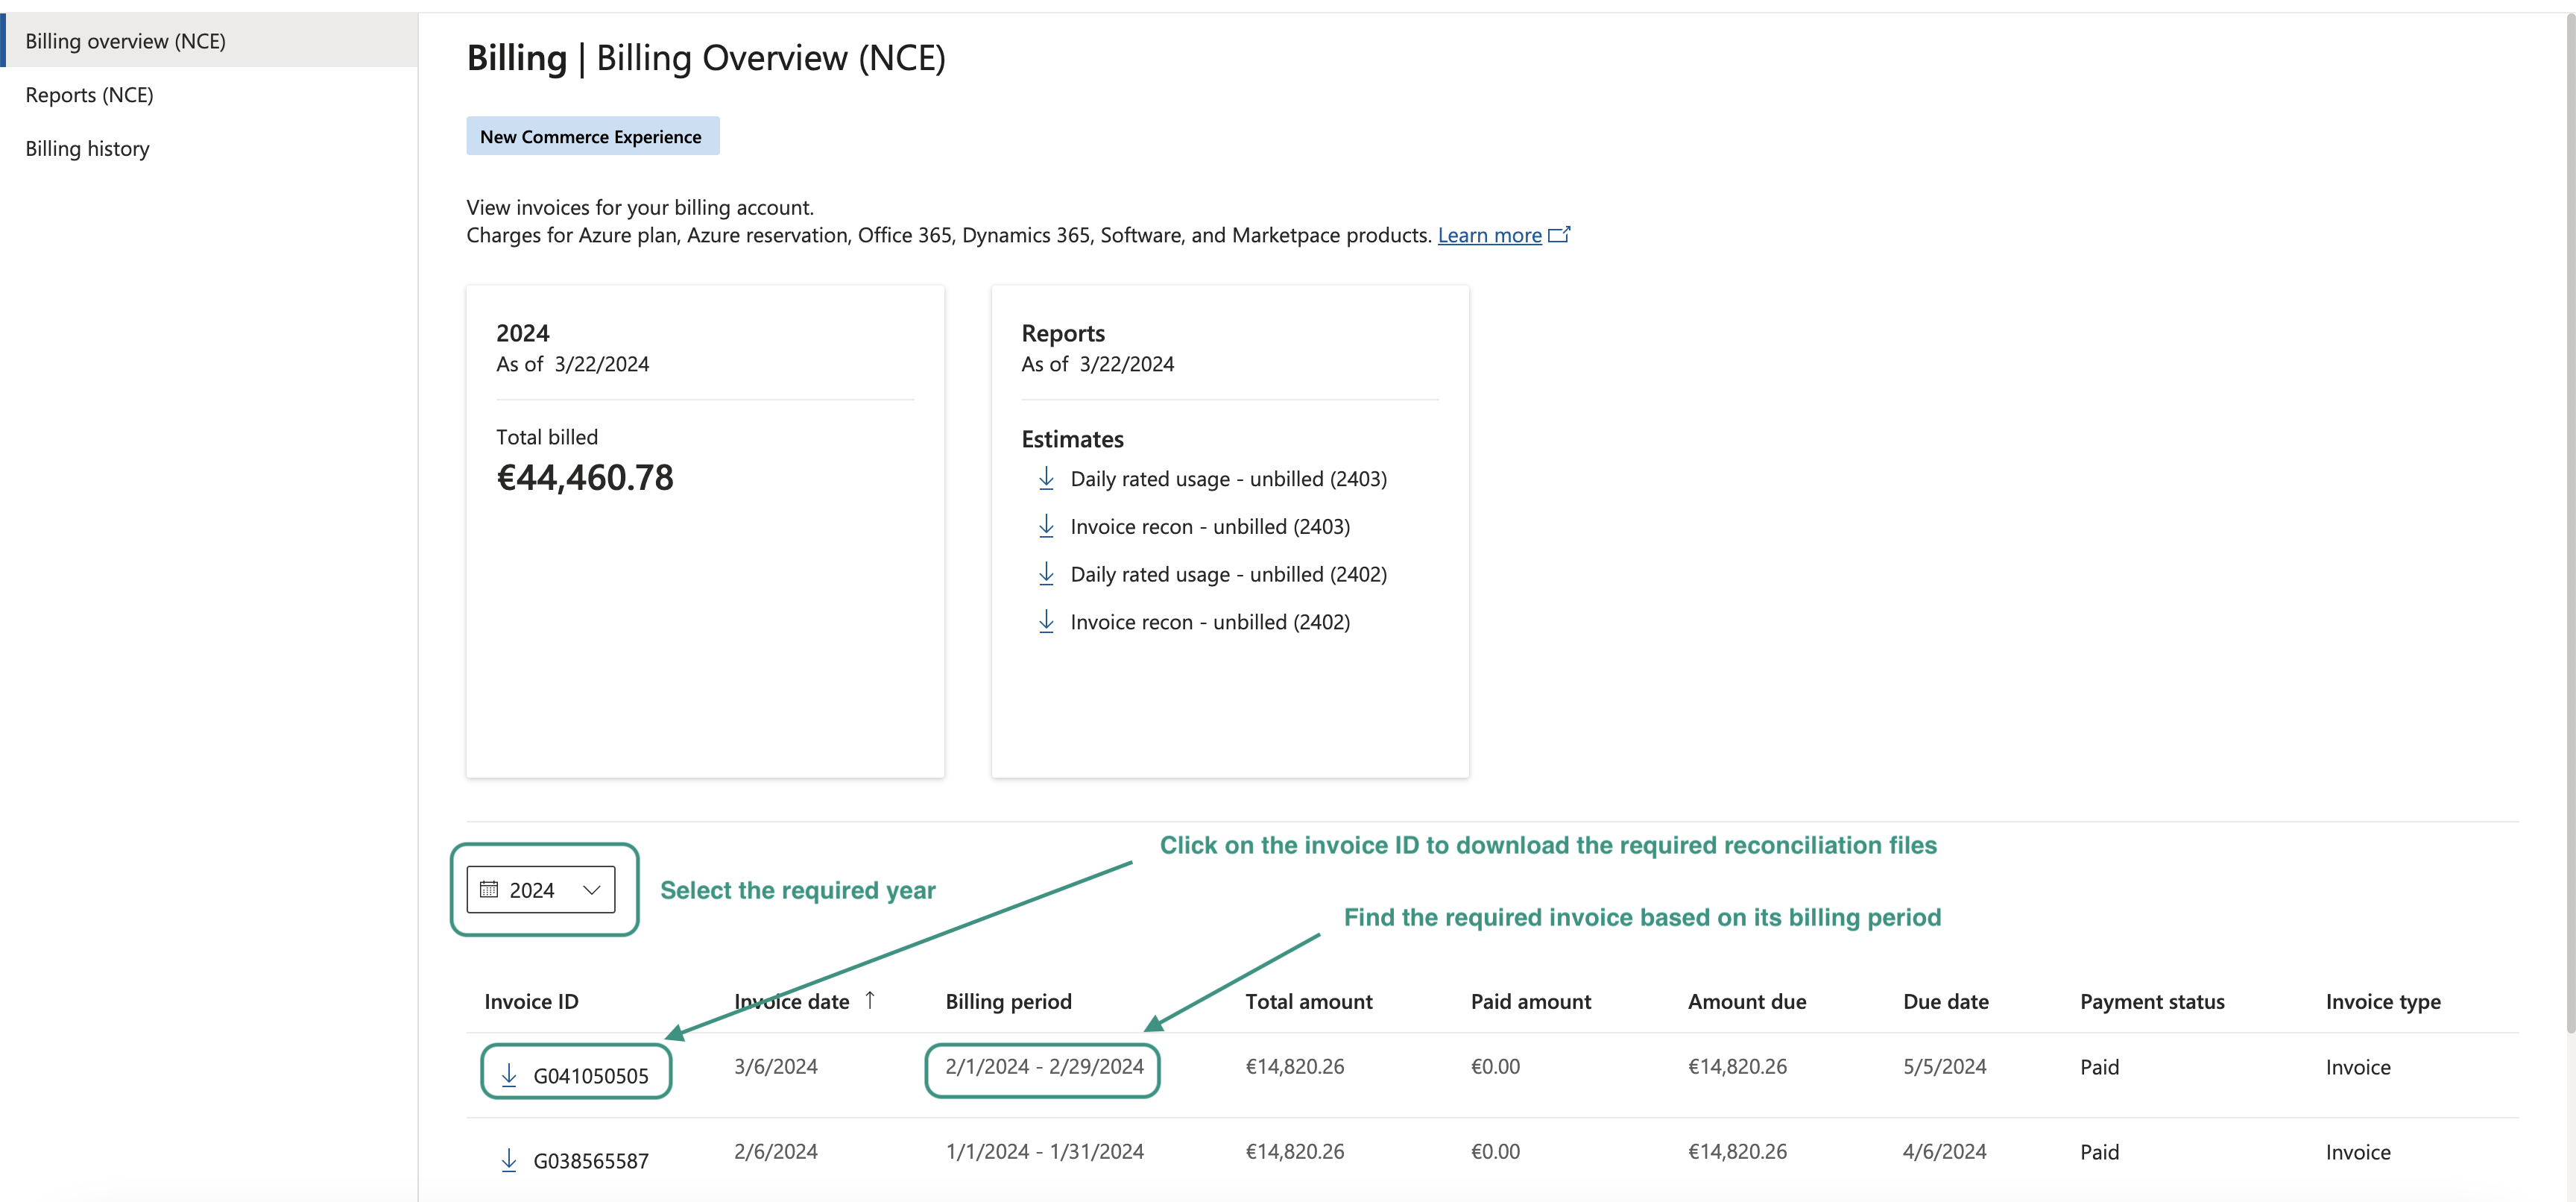
To download the billed version of the files, scroll down to the table and select the desired year. Identify the month you need the reconciliation files for and click on the “invoice ID” field. A pop-up tab on the right will appear where you can select the files you need to download.
Figure FAQ Reconciliation 2: Downloading Reconciliation via Overview
After clicking the download button, the files will become accessible in “Reports (NCE)” tab. Clicking on the report name will start the download.
How do I perform AWS reconciliation?
To successfully reconcile your AWS account, it’s essential to download the Cost and Usage report from the designated bucket in your AWS cloud. Once you have this report, you can compare your usage and costs against those listed on the invoice for your CloudBilling customer.
By comparing multiple columns in these files with the invoice results in CloudBilling, you can ensure that everything aligns properly. However, it’s important to note that different item types may require you to consider various columns in the cost and usage report. This is especially crucial when dealing with credits, discounts, refunds, pro-ration, mutations, cancellations, promos, and other factors that can impact the product category.
Recon files for AWS specifically are extremely large files, so much so that they are split up into multiple files. That means that unlike other cloud providers, it is not always possible to reconcile AWS using Excel. You might need to run a script or a query on the data before you can use it to reconcile your invoice. Please contact support at cb if you require assistance or would like us to do the reconciliation for AWS.
If you require assistance with Reconciliation, reach us via support channel or give us a call
How do I download a Cost and Usage report (CUR) from AWS?
Make sure that the report is being generated in your Amazon S3 bucket. In case you want to create a new report, see our AWS connector guide on how to do that.
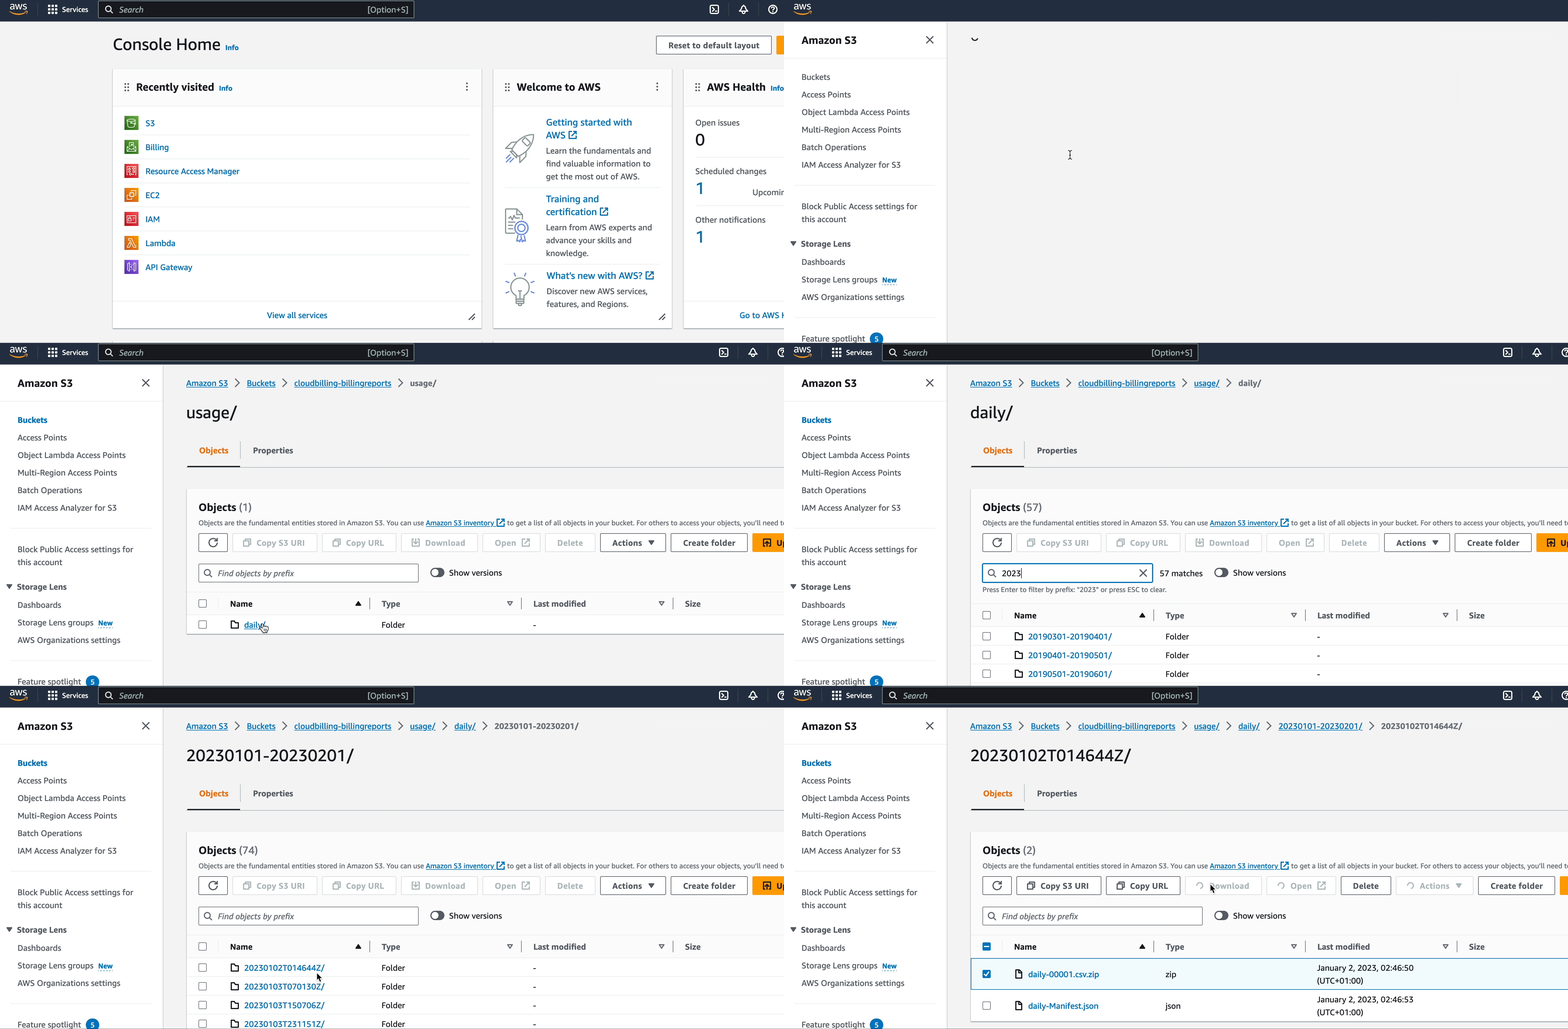
- Go to the “S3” section (e.g., by searching “S3” in the top search bar).
- Select the S3 bucket where the reports are being generated
- Search for folder named ‘usage.’ This folder location is specified in your cost and usage reports. See the images below on how to find your CUR in the bucket.
Figure FAQ Reconciliation 3: Accessing the report description
Figure FAQ Reconciliation 4: Identifying CUR location in the bucket
- Look for the date of the report that you require to download.
- Select the .zip file of a report you require to download by clicking the checkbox.
- Click the ‘Download’ button above.
Figure FAQ Reconciliation 5: Downloading CUR
Below, you can see a step-by-step guide on downloading the report
Figure FAQ Reconciliation 6: Downloading CUR Guide


