Customers
Table of contents
This Chapter will go into more detail regarding Customers in CloudBilling. As can be seen in Figure Customers 1 below, the customers option can be found in the menu bar. When hovering over the text “Customers” the submenu will show. The submenu has four different options, namely Customer Cockpit, Advanced Search, Contract Management and Customer Clusters, which will all be elaborated upon below.
Figure Customers 1: Customers - Menu bar and drop-down menu
Customer Cockpit
In the Customer Cockpit, the customers that already exist in the environment can be searched for (Figure Customers 2). This can be done by typing the name or customer reference in the text box. Additionally, information on the customer is also searchable through the text box. The page contains an informational text balloon which explains what can be entered in the text box to find a customer. The square box with a plus next to the text “Customer Cockpit” will lead to to the “Add a customer” page, while the Advanced search option will lead to the “Advanced Search” screen.
Figure Customers 2: Customers - Customer cockpit screen
Advanced Search
On the Advanced Search screen, a list with existing customers can be found, accompanied by a list with search options reading “All”, “Orphaned”, “Suspended”, “New” and “Advanced”, as can be seen in Figure Customers 3. The first four options respectively show a list of all existing customers, orphaned customers, suspended customers, or new customers. When a customer is orphaned, it means that the customer does not belong to a parent cluster, so this customer is not connected to anything. A suspended customer is usually not in use anymore, while a new customer has just been made.
Figure Customers 3: Customers - Advanced Search screen CloudBilling
The advanced option of the list will open a new part of the page (Figure Customers 4), which will allow for the user to search by customer code, customer name, metadata type, metadata key and metadata value. Clicking a customer (line) on this page shown in Figure Customers 3 will open the Edit Customer page for that customer. The Edit Customer page shows all information currently filled out on the customer and allows for changes to be made.
The Customer Code of a Customer cannot be edited after saving.
Figure Customers 4: Customers – Advanced Search, Advanced option
Add Customer
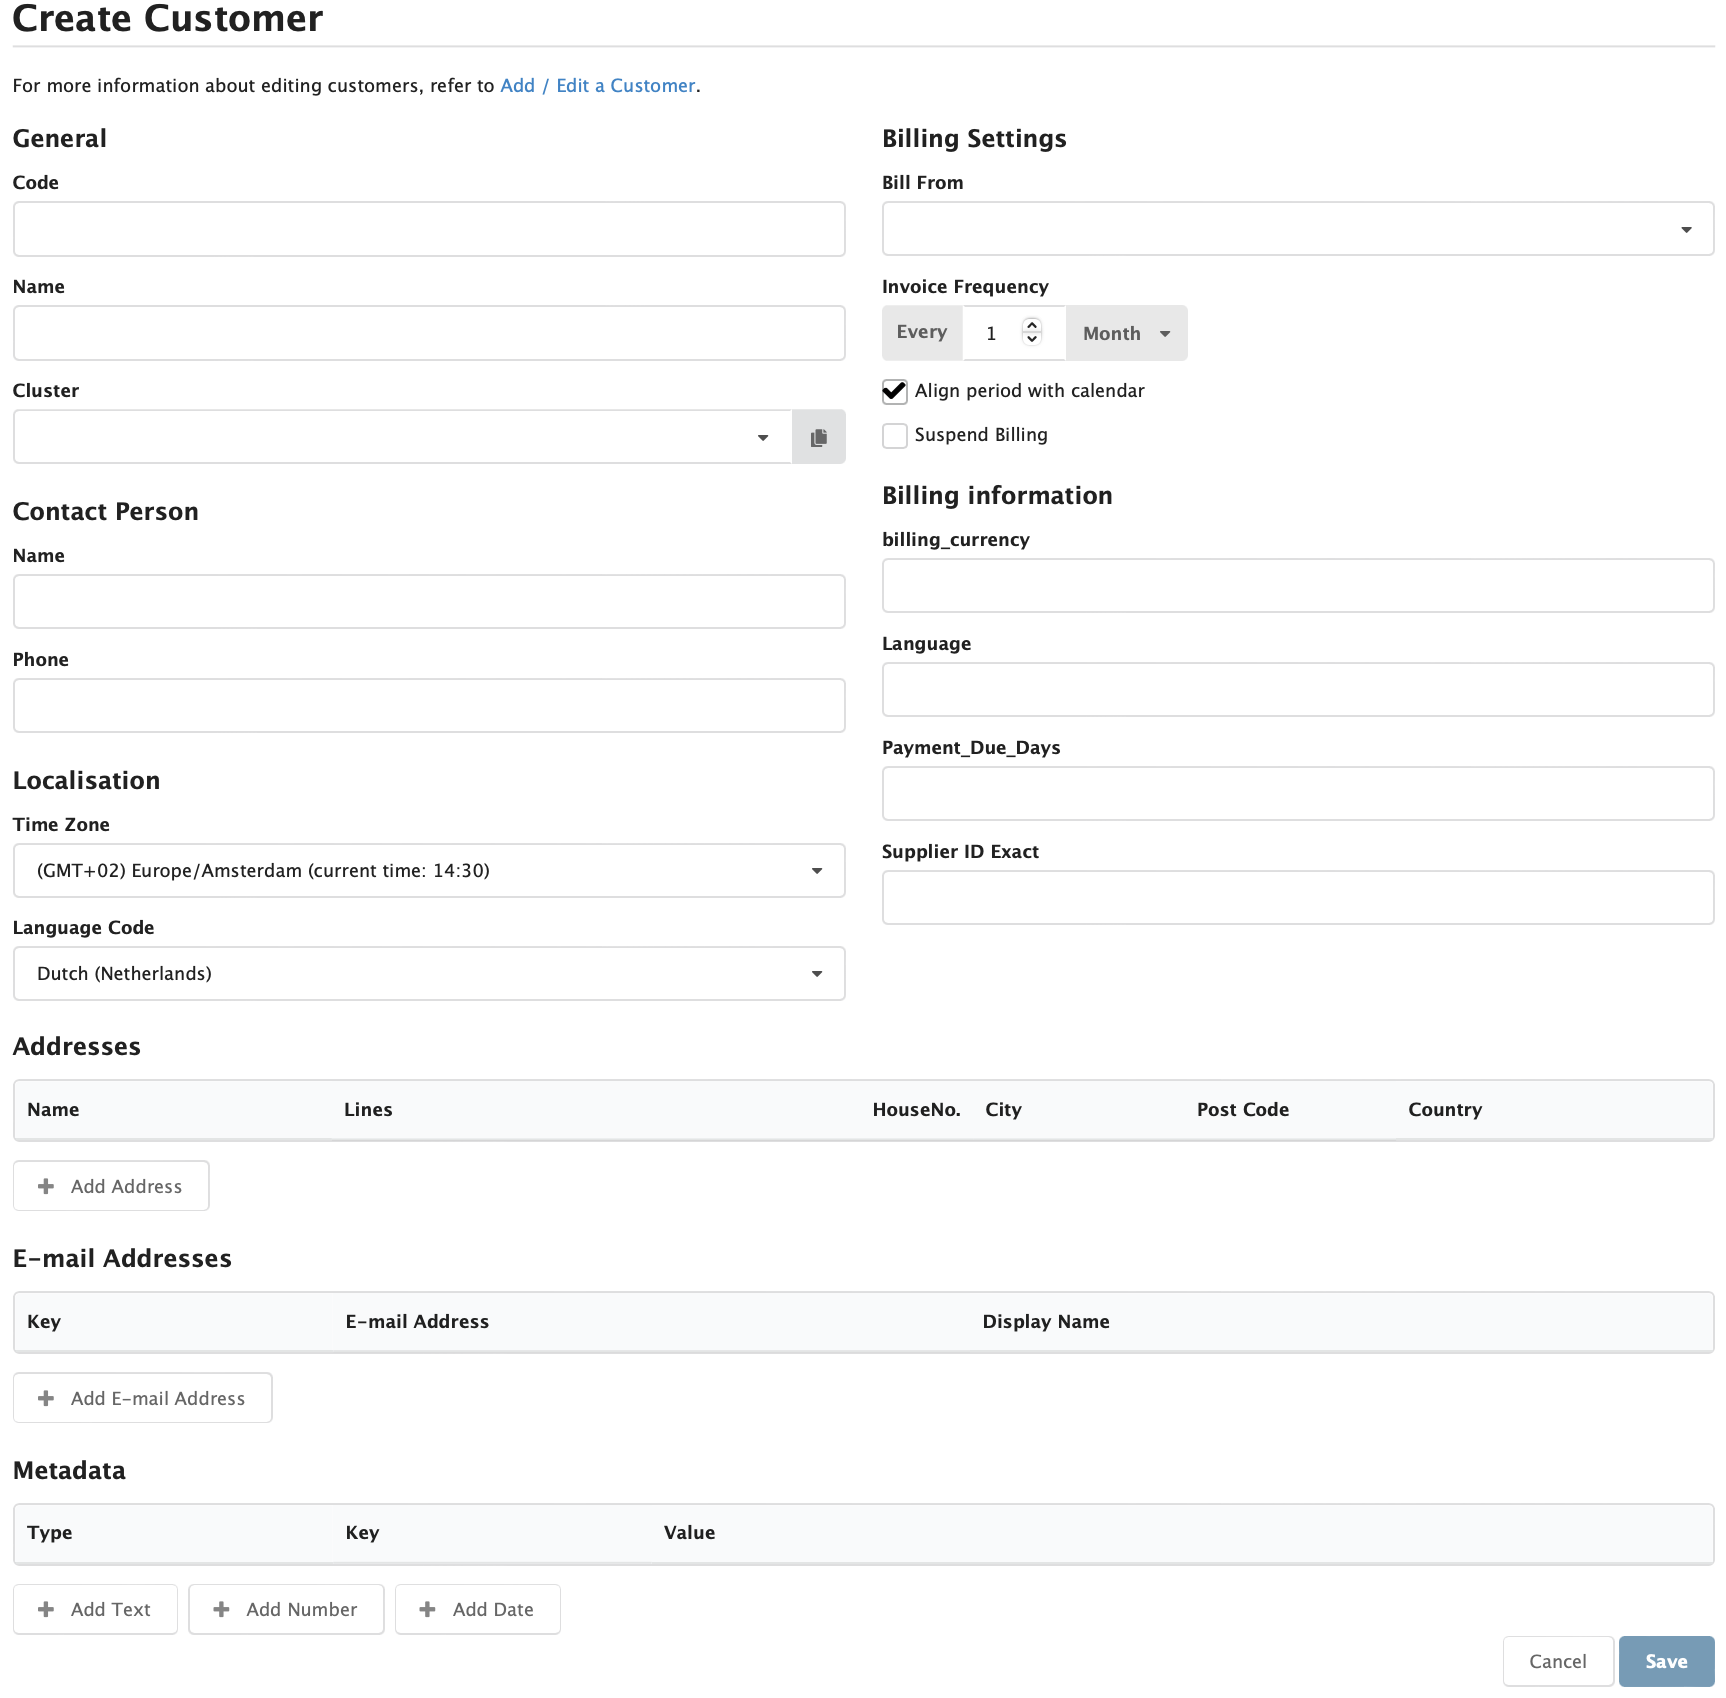
Clicking the [Add] button at the top of the screen will redirect the user to the Add Customer page (Figure Customers 5). This page allows to add an entirely new customer. The information under the header General is mandatory information, thus must be filled out. A customer should at least have:
- A unique Customer Code, as this is used to identify the customer within CloudBilling. This code can consist of any combination of numbers, letters, or special characters.
- A Name, which does not have to be unique.
- A Cluster, which is the Customer Cluster that this specific customer should be linked to. The cluster must already exist in the CloudBilling system.
Figure Customers 5: Customers – Add Customer screen
The Billing Settings, to the right of the General information, determine how a customer is invoiced. Below follows an explanation of all the options:
- Bill From is the start date at which the first invoice for this customer should begin. This setting will not have the same effect when the option Align period is enabled. Once an invoice exists for this customer, this setting no longer has effect. The Bill From date should be set back a few months before the current date.
- Invoice frequency is the period for which a customer should receive an invoice. In Figure Customers 5 it is set to every month. If this setting is changed during one invoicing period, it is only going to be reflected once the current invoicing period finishes. For example, if the current invoicing period is set to monthly (f.e. 1st-Jan-23 to 1st-Feb-23), and during the period is changed to yearly, this change will only take place when the current period is over (1st-Feb-23).
- Align period with calendar is checked when the invoice period should be aligned to a calendar period. When it is enabled, the start of the invoice will align with the start of the calendar period. This means that for a day midnight will be selected, for a month it will be the first of the month and for a year the first of January will be selected. If this setting is changed during one invoicing period, the correct alignment will only be applied two invoicing periods after. For example, consider the following scenario:
- An invoice with a monthly invoicing period that is not aligned has the following invoicing period:
- 5th-Oct-2023 until 4th-Nov-2023
- The user changes the setting to align the monthly invoicing period on 10th-Oct-2023.
- The next invoice will have the following invoicing period to align to the end of the month:
- 5th-Nov-2023 until 30th-Nov-2023
- The invoice after that, for December, will be aligned to the month:
- 1st-Dec-2023 until 31st-Dec-2023
- All following months will have the new alignment from the first until the last of the month.
- Suspend billing can be enabled to ensure no calculation will occur for the customer and no invoices will be generated for the customer anymore.
The Bill From date should be put back a few months before the current month, so that usage from earlier months can still come in and invoices can be generated for earlier months as well. This will ensure that everything can be billed in the correct month. This setting only has effect when there are no generated invoices yet.
The Contact person name and phone number can be used to store contact information for CRM purposes. These settings are optional and can be left empty.
The localisation options can be used to set a time zone and language for the customer. The time zone is not required, the default will be the time zone that is configured in the Environment Settings. The time zone will, however, determine the From and To date of the invoice. Ensure that the time zone is set correctly, as the From and To date of generated invoices cannot be changed. The language code can be used to change the language of the invoice that is sent to the customer. Please note that the different invoice languages that are selected must be supported in the invoice template that is used in the environment.
Multiple addresses can be added to a customer. An address has a name that serves as an identifier (e.g., “Invoice address”). The lines are used to fill out the street name, which usually includes the house number and any additional information. This is dependent on how the invoice template is built. There are separate fields for the city, postal code, and the country.
Similarly, multiple email-addresses can be added to a customer. An email-address has three properties. Firstly, the key, which is also used as an identifier. Secondly, the email-address and lastly the display name which is shown in client emails.
Lastly, metadata can be added at the bottom of the settings. Metadata contains additional information regarding a customer. There are three elements to metadata in CloudBilling, consisting of: a type, a key, and a value. The type can be either Date, Number or Text. The key may be any string and the value is of a format that matches the specified type. Metadata can be used in pricing rules, on the invoice, and in the emails. Additionally, a customer can also be added from the customer clusters screen as can be seen in Figure Customers 6.
Changing a customer might affect the calculation of existing associated invoices. Because of this, CloudBilling will automatically determine which invoices are potentially affected and queue them for recalculation.
Customer Clusters
As mentioned briefly before, a customer will have to be assigned to a customer cluster once they are made. Therefore, a Customer Cluster must exist before a customer can be made. The Customer Clusters screen is shown in Figure Customers 6. It contains a search bar, a list with tag names for all clusters, a graph showing the structure, and an [Add] button.
Figure Customers 6: Customers – Customer Clusters screen
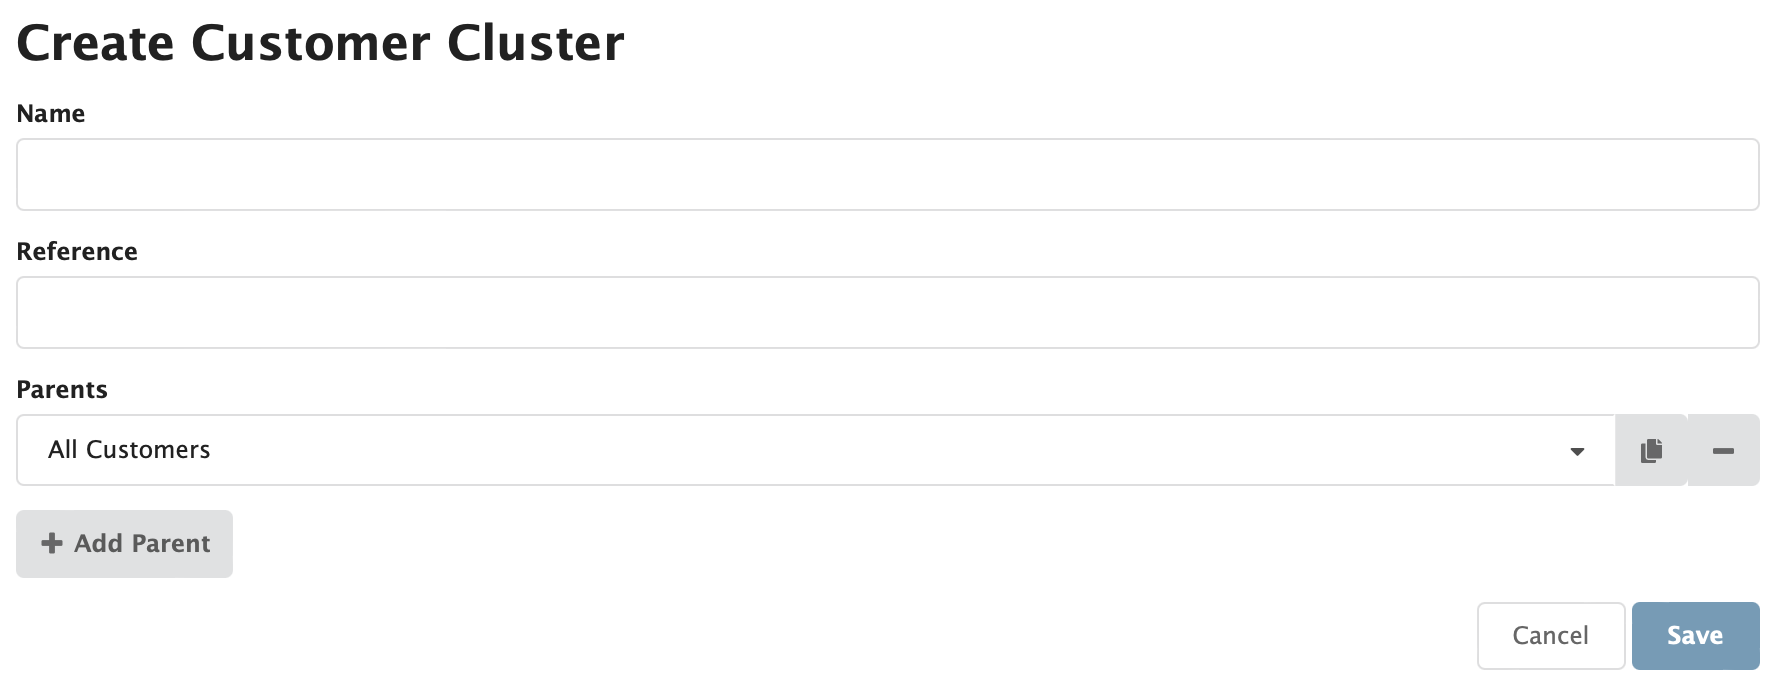
By clicking the button, the pop-up screen as shown in Figure Customers 7 will show. In this screen a Tag name must be added, which will be the name of the Customer Cluster. Additionally, a Parent cluster must be added. Note that both the tag name and parent cluster are mandatory values. For the first clusters this will be the “All Customers” Parent cluster, as can also be seen in Figure Customers 6. Usually, it is good to know beforehand what the structure of the pricing schemes looks like to be able to properly configure the clusters. In this case, country specific tax rules were taken into consideration, which made for customer clusters named after countries. Based on the location of a customer the customer can then be added to the Parent Cluster of, for example, The Netherlands.
Figure Customers 7: Customers – Customer Clusters Add New Child Cluster
Step by step: How to add a ‘customer cluster’
- Hover over the [Customers] option of the menu to open the submenu.
- Click on [Customer Clusters] in the submenu.
- Click on the [Add] button to open the ‘New cluster’ pop-up.
- Write a unique description of the cluster in the field [Tag Name].
- Look up an appropriate parent Cluster in the [Parent Cluster] field. After looking up a cluster, click on [Add] to add the cluster. On the second cluster level, the root cluster “all customers” should be selected.
- Click on [Save] to save the product and close the dialog.
Step by step: How to add a ‘Customer’
- Hover over the [Customers] option of the menu to open the submenu.
- Click on [Advanced search] in the submenu.
- Click on the [Add] button.
- Add a unique [Customer code]. This is usually a unique account number provided by the financial department of an organization, like the debtor ID. Note that this cannot be changed after saving.
- Add the [Name] of the customer.
- Look up and select the appropriate [Customer Cluster]. Most of the time, this will be a customer-specific cluster.
- Add a [Contact Person Name]. This field is not mandatory but required when the name should be printed on the invoice.
- Add a [Contact Person Phone]. This field is not mandatory but required when the name should be printed on the invoice.
- In [Time zone], lookup and select the appropriate time zone. This is usually ‘W. Europe Standard Time’. It is possible that the default filled-in time zone is already appropriate.
- Click on [Addresses] to open the addresses list.
- Within the addresses list, click on [Add].
- Write ‘billing address’ in [Name].
- In [line 1], write the street name and the house number.
- Add the [City], [Post code] and [Country].
- Click on [Email addresses] to open the email fields
- Write ‘billing email’ in [Key].
- Add the email address in [Email].
- Add the [Display Name]. The name will be shown in the email program rather than the full email address.
- Check whether the Localization settings should be changed and do so if necessary. Note that the language chosen should be available in the template and thus discussed beforehand.
- Click on [Save].


